
How to Build a Skateboard From Scratch: Step-by-Step
This post contains affiliate links. As an Amazon Associate, we earn from qualifying purchases.
To build a skateboard from scratch, you need a deck, grip tape, two trucks, four wheels, eight bearings, and eight pieces of hardware. The process involves gripping the deck, mounting the trucks, pressing bearings into the wheels, and assembling everything with a skate tool. Doing it yourself teaches you how your board works and lets you pick every part.
That last point is the whole game. A board you put together feels different because you understand what each nut and bolt does, which is the real value of learning how to build a skateboard from scratch. You stop being a passenger and start being the mechanic.
What follows: a breakdown of every part and tool, a walkthrough of the assembly that clears up the common confusions, and the tweaks you make before your first push.
Key Takeaways
- You need eight bearings total (two per wheel), and the debate over using your truck axle versus a dedicated tool to press them in is real, both work, but the truck method risks damaging the bearing seal if you push unevenly.
- Hardware length matters. The Skate Labs guide specifies 7/8 inch for most setups without riser pads; using shorter bolts, like a 1/4 inch set mentioned in a forum, won’t reach through the deck and truck baseplate.
- Truck tightness is personal, but a safety rule from the Skate Labs PDF overrides preference: never loosen the kingpin nut so far that it’s barely threaded, or it can vibrate off while you ride.
- If not all wheels touch the ground fresh out of the box, don’t panic. The urethane bushings in the trucks need a few sessions to break in and settle, after which all four will sit flat.
- Building a board from raw materials (maple veneers, glue, a mold) is a separate, advanced project documented by places like the NYU MakerSpace, requiring days and specialized tools versus the hour it takes to assemble store-bought components.
The Parts You Need (And Why Each One Matters)
Forget the mystery box. You are buying seven things, and each one changes how the board rides.
A skateboard deck is usually seven layers of maple pressed together. That’s the standard, from the Skate Labs guide. The deck is your platform, and its width, most start around 8.0 to 8.25 inches, decides how much room your feet have. Wider decks are often chosen for stability.
Grip tape is the sandpaper-like sheet glued to the top. It’s not optional. Without it, your shoes slide right off the moment you try to turn or stop. A coarse and durable grip tape is essential.
Trucks are the metal T-shaped assemblies that mount underneath. They hold the wheels and are the pivot point for every turn. Their width should match your deck width; an axle that sticks out too far or sits too short makes balancing awkward. Trucks with consistent geometry and appropriate weight are a good benchmark.
Wheels are urethane rings. Their diameter (size) and hardness (durometer) decide your ride. Smaller, harder wheels (like 52mm, 99a) are faster on smooth concrete and slide easier for tricks. Larger, softer wheels roll over cracks and pebbles but feel sluggish for technical street skating. This is where most beginners overthink. Many skaters start with a middle-ground wheel size and hardness.
Bearings let the wheels spin. You need eight bearings total, two per wheel. They’re graded by an ABEC scale, but for skating, any reputable brand like Bones Reds will roll fine. The expensive ceramic ones are overkill for a first board.
Hardware is the set of eight bolts and eight nuts that clamp the trucks to the deck. The Skate Labs guide says 7/8 inch fits most setups without riser pads. That’s your target. Longer hardware is for when you add riser pads between the deck and truck; shorter hardware won’t grip.
That’s the blank canvas you’re working with before you add your personal setup choices.
The tool question trips people up. The skate tool is less to keep track of on your workbench. It’s the one item I won’t suggest you skip.
The Tool Debate: Skate Tool vs. Separate Wrenches
You have two paths for tools, and forums are full of people insisting one is absolutely wrong. This settles it.
A dedicated skate tool typically combines the sockets you need, such as those listed by SkateWarehouse (3/8″, 1/2″, and 9/16″), with a screwdriver head. It’s compact, hard to lose, and designed for the job. Many brands make reliable skate tools. A skate tool consolidates the necessary tools in one place.
Using separate tools, a screwdriver and individual socket wrenches, works perfectly. It’s often cheaper if you already have a mechanic’s set. The downside is juggling three separate pieces while you’re trying to hold a truck in place. You’ll spend more time looking for the 9/16″ socket than you will tightening the kingpin.
My take? Buy the skate tool. A skate tool saves you from juggling separate tools and is portable for adjustments. It’s the difference between a clean, quick assembly and a frustrating hour of mismatched sockets.
Step-by-Step Assembly: Grip, Mount, and Press
Follow this order. Swapping steps means redoing work.
1. Apply the Grip Tape
Work on a table, in good light. Peel the backing sheet off the grip tape and center it over the deck. Press it down from the middle outward, smoothing out air bubbles. Score the grip tape along the deck’s edge to create a clean cutting line. This scores the tape for a clean cut.
Take a sharp blade, a utility knife, and cut along that scored line. The SkatePro guide suggests making a cut in each corner of the grip tape and scratching the edges to create guidelines for cutting. Go slow. Rushing is how people slice their deck or their thumb. Once the excess is off, use a scrap piece of grip tape to rub along the cut edge. Scratch the sides of the grip tape with the remaining grip tape to get more durable edges.
Common mistake: Cutting the grip tape before scoring the edge. You end up with a ragged, peeling line that catches on your shoes and looks messy within a week.
2. Punch the Mounting Holes
Flip the deck over. You’ll see eight small dimples where the truck bolts will go. Use a narrow punch, awl, or even a large Phillips screwdriver tip. Press firmly through the grip tape at each dimple. You’ll feel a pop as you break through. This gives your hardware bolts a clean path. If you skip this, you may tear the grip tape when inserting the hardware.
3. Mount the Trucks
Place your trucks so the kingpin (the large central bolt) faces inward, toward the center of the deck. The baseplate should sit flush against the deck. Drop a bolt through each of the four holes from the top, add the nut underneath, and finger-tighten them all. Don’t fully tighten one bolt yet.
Grab your skate tool or 3/8″ socket. Tighten the nuts in a criss-cross pattern, like tightening a car tire, go to one, then the one diagonally opposite. This ensures even pressure and prevents the truck baseplate from sitting crooked. Tighten the hardware nuts firmly to secure the trucks.
4. Press the Bearings into the Wheels
This is the step with the most debate. You need to seat two bearings into each wheel, one on each side.
Which is better? The truck method is free and works. The risk is pushing at a slight angle, which can dent the bearing seal and create a gritty spin. The skate tool method is more controlled. Both the truck method and a skate tool with a bearing popper are valid ways to press bearings.
| Bearing Installation Method | Best For | Risk If Done Carelessly |
|---|---|---|
| Using the truck axle | One-off builds, minimal tools | Crooked press can damage bearing seal |
| Skate tool bearing popper | Frequent wheel swaps, precision | None if used correctly |
| Dedicated bearing press | Shop environments, high volume | Over-pressing can crush bearings |
5. Mount the Wheels onto the Trucks
With bearings pressed in, slide a wheel onto the truck axle. Add the axle nut and tighten it by hand. Before fully tightening the axle nut, make sure the wheel can spin freely. A properly seated wheel will have a tiny bit of side-to-side play. If you crank the nut down until the wheel can’t move, you’ve pinched the bearings and they won’t spin fast. Tighten the axle nut so the wheel spins freely with minimal side-to-side play. Repeat for all four wheels.
The Final Adjustments Before You Ride
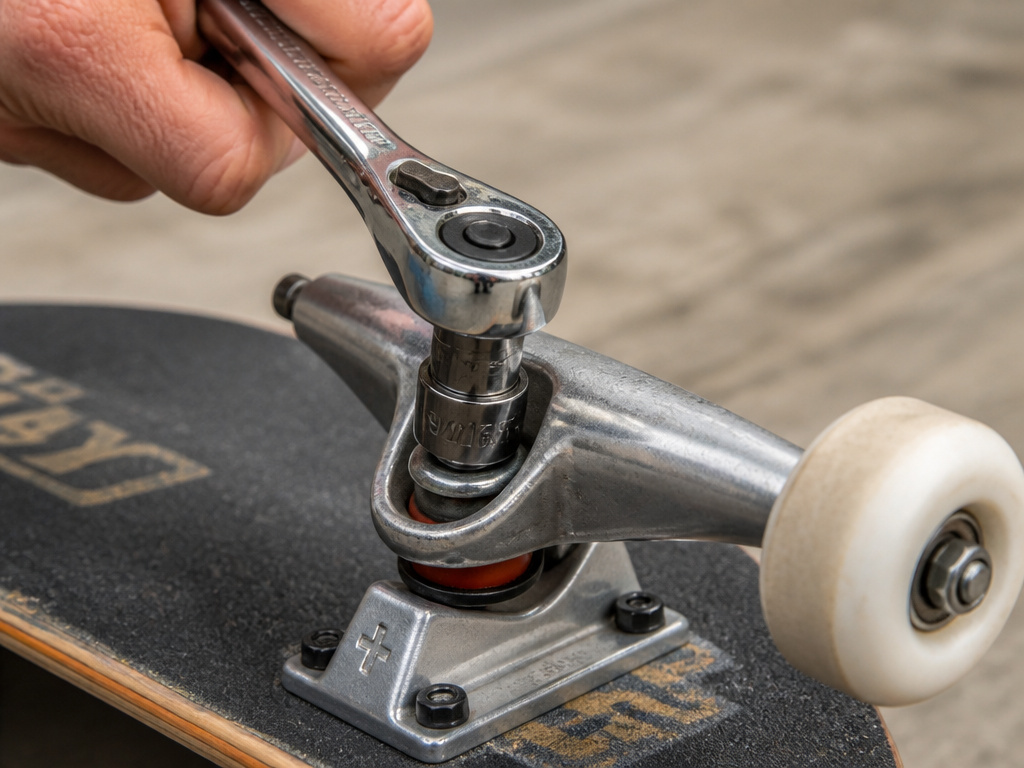
Assembly is done, but the how to build a skateboard from scratch setup is not. Your board needs tuning.
Truck tightness is personal preference. Tighten the kingpin nut (9/16″ socket) and the board turns less, feels more stable at speed. Loosen it and carving becomes easier, but speed wobbles can appear. The Skate Labs guide gives the golden rule: tighten or loosen the kingpin nut a quarter turn at a time and ride between changes. Start with the kingpin nut tightened enough so the truck does not feel loose.
Where this goes sideways: Loosening the kingpin nut until only a few threads are engaged. The Skate Labs PDF warns, “Never loosen the kingpin nut so far that it barely hangs on. Keep the nut fully threaded onto the kingpin, or it can work its way off while you ride.” That’s a guaranteed failure on the first hard carve.
Now, stand the board on a flat surface. Look at all four wheels. It’s common, as SkateWarehouse notes, for one wheel to barely touch the ground. The urethane bushings inside the trucks are new and stiff. This condition usually resolves as the bushings break in. Skate it for a few sessions. The bushings will break in and all wheels will sit flat.
Wheel bite is your next check. Grab the board and tilt it sharply to one side. Does the wheel touch the underside of the deck? If there’s solid contact, your trucks are too loose for the wheel/deck combo. Tighten the kingpin nut a quarter turn at a time and check again. Wheel bite at speed will throw you off.
When Building “From Scratch” Means Making the Deck
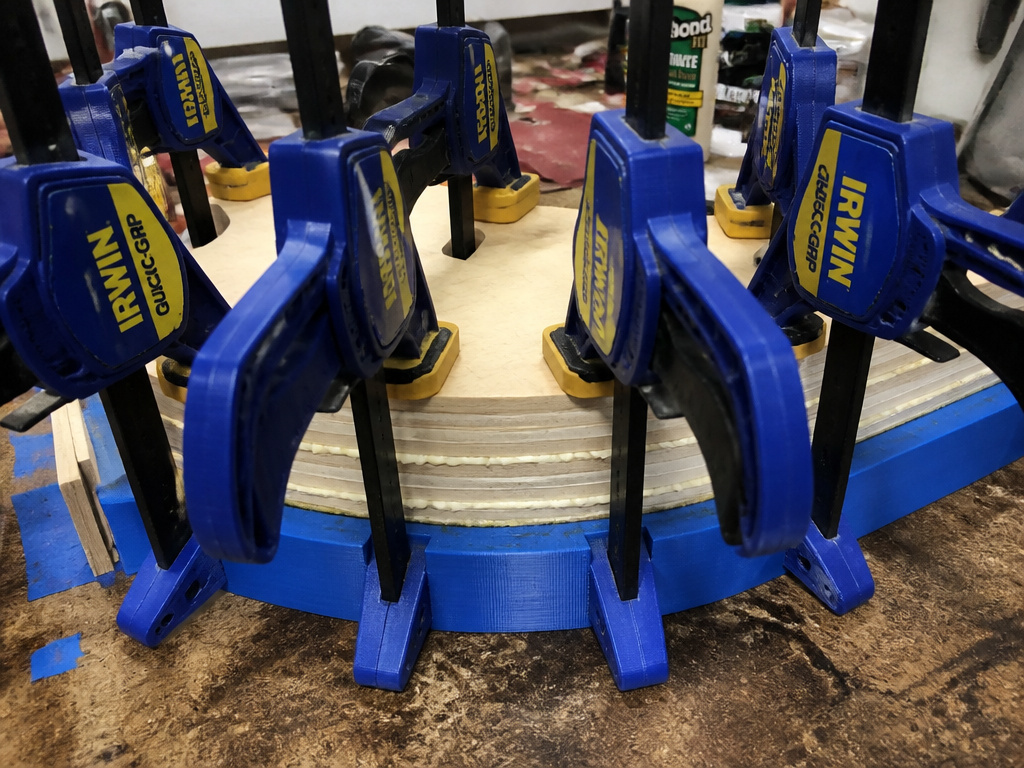
Sometimes “from scratch” means raw materials, not components. The NYU MakerSpace project shows what that actually involves: it’s a different project entirely.
They used seven 32×8 inch Maple Wood Veneers, bonded with Titebond 3 wood glue. The veneers were laser-cut, stacked, and pressed in a custom 3D-printed mold using 12-inch Irwin Quick Grip Trigger Clamps for a little longer than a day. The final pressed deck was 23.8 x 6 inches, a smaller “Penny” shape, because printing a mold for a full-size deck would have taken over a week.
The key insight for a DIY deck is pressure and time. Cold pressing (no steam) with even clamp pressure for at least 24 hours is the method. As one Reddit user clarified, “No steam, only cold press. Steam would affect the integrity of the pop.” This is a multi-day, workshop-intensive process versus the one-hour component assembly. Know which “scratch” you’re aiming for.
Frequently Asked Questions
Is it cheaper to build my own skateboard?
Often, yes. A shop complete can run cheaper than buying premium parts individually, but you get generic, lower-quality wheels and bearings. Building your own lets you pick each part’s quality. The evo guide estimates a cost of $90 – $150 for all-new components. You can spend less by choosing budget-friendly but reputable brands for each category.
What size hardware do I need for my skateboard?
You need eight bolts and eight nuts. The Skate Labs guide specifies 7/8 inch length for setups without riser pads. If you add a riser pad between the deck and truck, you’ll need longer hardware (usually 1″ or 1 1/8″). A Reddit thread showed the confusion: one user recommended a “1/4 inch hardware set,” which another correctly noted is way too short. Stick with 7/8″ as your default.
Can I use any screwdriver to build a skateboard?
You need either a Phillips head or an Allen head (hex) screwdriver, depending on your hardware. Most skateboard hardware uses Phillips heads. A skate tool includes the correct driver. Using the wrong size or type will strip the bolt head, making it impossible to tighten or remove later.
How do I know if my trucks are too loose?
Two signs. First, if you can turn the kingpin nut with your fingers without much resistance, it’s too loose. Second, perform the wheel bite test: tilt the board sharply. If the wheel touches the deck, you risk being thrown off during a turn. Tighten the kingpin nut a quarter turn, test ride, and repeat until the bite disappears but you can still turn comfortably.
Do I need bearing spacers?
The necessity of bearing spacers is a topic of discussion among skaters; some consider them optional for street skating. For street skating on standard wheels, spacers aren’t necessary. They’re more critical for longboarding at high speed or if you consistently land hard on your wheels, as they prevent the bearings from being crushed inward.
The Bottom Line
Building your board is the fastest way to understand how skating actually works. You’ll know why a wheel seizes, how to fix a wobbly truck, and what a loose kingpin feels like before it ejects you.
Start with the component assembly, deck, grip, trucks, wheels, bearings. That’s the one-hour version of “from scratch.” The raw-material deck press is a separate, advanced woodworking project. Both are valid approaches to the how to build a skateboard from scratch question, but only one gets you riding this afternoon.
Your first move after reading this? Check the NYU MakerSpace skateboard guide to see the difference. Then gather your parts, clear a table, and put them together in the order above. The board you build will make sense in a way a pre-built never can, because you touched every piece.
