
How to Fix Razor Tail on a Skateboard: Step-by-Step
This post contains affiliate links. As an Amazon Associate, we earn from qualifying purchases.
To fix razor tail on a skateboard, you can rebuild the worn tail using a 1/8″ bead of Gorilla Wood Glue and an aluminum foil mold, which restores shape and pop. This repair is a temporary solution that extends a deck’s life, but it does not replace the structural integrity of fresh maple plies. For a tail worn past the middle ply or showing deep cracks, replacement is the only permanent fix.
That gap between “can be fixed” and “no feasible fix” is where most skaters get stuck. One source says wood glue works; another says any repair just shortens the board and alters its physics. Both are right, but for different stages of wear. The glue method buys you time on a deck that’s still mostly solid. Once the tail is chipping and the pop is gone, you’re patching a sinking ship. This is the core dilemma of how to fix razor tail on a skateboard.
What follows: the exact glue-and-foil steps from a source that’s done it, the specific performance loss that tells you a repair won’t work, and a straight comparison of when to fix versus when to replace. You’ll also get the prevention tricks that actually slow wear, not just generic advice.
Key Takeaways
- A wood glue and aluminum foil mold can rebuild a worn tail, but the glue itself will wear down and needs reapplication.
- You lose noticeable pop when wear reaches the middle ply at the tip; past that point, repairs are stopgaps, not restorations.
- Brake with your feet, not the tail, it’s the single biggest cause of razor tail and the easiest habit to change.
- Rotate your deck (switch nose to tail) to distribute wear and extend its usable life by weeks.
- A cracked or delaminating deck is a safety risk; no repair fixes structural failure, so replace it immediately.
What Razor Tail Actually Does to Your Pop
You don’t feel razor tail in your shoes first. You feel it in your ollies. The board just doesn’t spring back the same way. That’s because pop depends on the tail’s flex and rebound. A full, rounded tail acts like a diving board; you load it with your foot, and it snaps back. A thin, sharp tail has less material to flex, so the rebound is weaker and slower.
You start noticing your board losing pop when you wear to about the middle ply at the tip of your tail. At this point, your tail is also much thinner and very likely to start to chip, which will only make your board’s pop worse.
That’s the performance threshold. Once the wear passes that middle layer, the deck’s ability to store and release energy drops fast. Tricks like tre flips, pop shuv-its, and impossibles, anything that needs a solid scoop, become harder. The timing feels off because the tail is literally shorter, changing the geometry of your kick.
A deck can lose its pop due to wear, long before it visibly breaks. Razor tail, where the tail layers peel and fray, is my cue to start thinking about a replacement. I’ve ridden boards past that point, and the effort to get the same height isn’t worth the saved cash.
Can You Fix It or Just Slow It Down?
The community is split on the how to fix razor tail on a skateboard question. One detailed tutorial advocates for a wood glue and foil mold repair. Another argues there’s no feasible fix, as sanding or cutting further damages the board. Both views are valid, but for different goals. The glue method from boardoftheworld.com is a patch for a deck with life left in it, while ultimategearlists.com argues there is no feasible fix. It adds material where wood was lost, temporarily restoring the shape. It won’t make a dead board new, but it can give a fading deck another few weeks of decent sessions. Think of it like retreading a tire, it works until it doesn’t.
The Step-by-Step Guide to Fixing Razor Tail with Wood Glue
This method comes straight from a source that’s documented it. You’ll need Gorilla Wood Glue (or another rigid wood glue), aluminum foil, a razor blade or scraper, and sandpaper (around 80-grit works).
> Common mistake: Applying too much glue in the first layer. You will wind up with a glue bubble that doesn’t dry properly inside.
| Step | Action | Why It Matters |
|---|---|---|
| 1. Create the Mold | Lay the deck graphic-side up on folded foil. Pull the foil edges up to curl tightly around the tail, making a tight seal against the grip tape. | A loose mold lets glue leak onto your grip tape, creating a mess and a slick spot. |
| 2. Apply First Glue Layer | Squeeze out about a 1/8″ bead of glue along the worn area. Spread it thinly to coat the damaged wood, avoiding thick globs. | This thin layer acts as a base. A thick bubble won’t dry through, remaining soft and failing quickly. |
| 3. Level and Add More | Prop the tail so the worn section is as flat as possible (use books or a small table). Let the first layer set slightly, then add more glue to fill low spots and rebuild the tail’s curve. | A flat work surface ensures the glue builds evenly, restoring the tail’s original angle for proper pop. |
| 4. Remove the Mold | After 1-2 hours, check if the glue is gelatinous. If so, carefully peel the foil off. If it sticks, leave it; you’ll scrape it off later. | Removing the foil at the right time prevents it from bonding. If it bonds, you’ll scrape it off after full drying. |
| 5. Final Shaping | Let the glue cure fully (overnight is safe). Then, sand down any excess hardened glue and reshape the tail’s perimeter with sandpaper. | Sanding smooths the repair, blends it into the deck, and removes any foil residue. |
The repaired tail will add a layer of hardened glue to the worn area. It will also wear down again, because wood glue can razor tail, too. You can repeat these steps as the glue layer wears. It is a temporary repair.
Where This Goes Sideways
If you leave the aluminum foil on too long and it sticks to the dried glue, you’ll have a gritty, foil-covered patch. The fix is simple: after everything is dry, scrape it off with a razor blade. It’s an annoying extra step, but it doesn’t ruin the repair. The bigger risk is applying glue over a tail that’s already splintering or delaminating. The glue needs solid wood to bond to; if the layers are separating, the patch will fail fast.
When Repair Isn’t Enough: Signs You Need a New Deck
Fixing razor tail makes sense when the deck is otherwise healthy. But some damage can’t be glued over. Knowing the difference saves you time and prevents a dangerous break.
| Problem | Can You Fix It? | What to Do |
|---|---|---|
| Severe Razor Tail (wear past middle ply) | Temporary patch only | The wood glue repair can restore shape, but pop will remain diminished. Start saving for a new deck. |
| Chipping & Splintering | No | Splinters mean the wood layers are failing. Sanding them smooth removes vital material, shortening the tail further. |
| Cracks, especially around tail/nose | No | Cracks compromise structural integrity. No glue repair can restore the deck’s strength or safety. |
| Delamination (layers separating) | No | Moisture or impact has broken the epoxy bond between plies. The deck is structurally unsound. |
| Lost Pop (deck feels dead) | No | This indicates overall fatigue in the maple. A glue repair adds surface material but cannot restore the spring of fresh wood. |
According to skateboards.com, a cheap stock deck costs between $20-$25 (as of 2023) and lasts 1-4 months depending on the rider. For many, that’s a better investment than hours of repair work on a board that’s already tired. A repair is worth it if you love the deck, need to stretch its life a few more weeks, or are on a very tight budget. Otherwise, a fresh deck always performs better; learn the proper steps for a deck replacement.
I learned this the hard way trying to revive a deck with a hairline crack near the rear truck. I glued it, rode it, and it snapped clean through on a routine ollie a week later. The repair held the crack together visually, but the wood around it had already given up. Now, I retire decks at the first sign of a crack or deep delamination.
How to Prevent Razor Tail Before It Starts
Prevention is cheaper and easier than any repair. The best methods are simply habits.
1. Stop Using Your Tail as a Brake
This is the single biggest cause. Dragging the tail to slow down grinds the edge against pavement like sandpaper. Instead, drag the sole of your shoe against the ground. Your shoes will wear faster, but shoes are cheaper than decks.
2. Master Your Manuals
Failed manuals scrape the tail. Practice them daily to build board control. The goal is to balance, not drag. As you improve, you’ll scrape less and balance more.
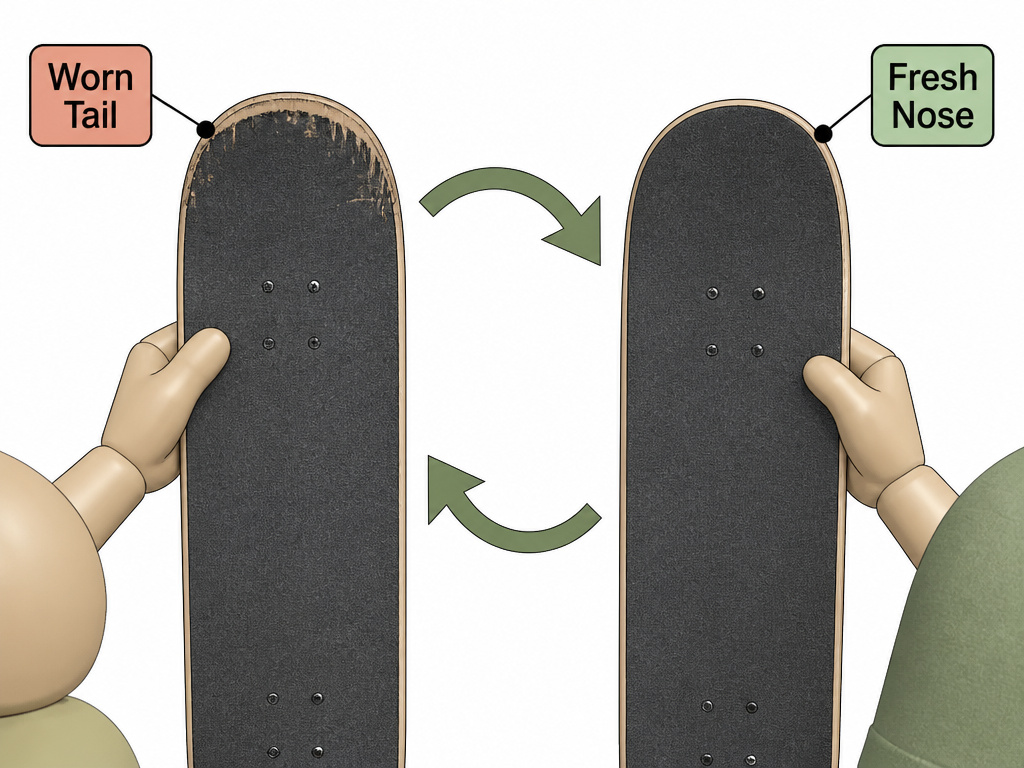
3. Rotate Your Deck
Switch the deck’s orientation so the nose becomes the tail. This distributes wear evenly across both ends, extending the deck’s life. It feels weird for a session or two, but your brain adjusts quickly.
4. Add a Tail Guard
Plastic or rubber tail guards screw onto the tail, taking the abrasion instead of the wood. They affect the feel of certain scoop tricks, but for cruising and basic ollies, they’re excellent protection. They were common in the 1980s and are still available.
5. Choose Your Surface
Rough, broken asphalt chews through tails. Smooth concrete or skatepark surfaces are gentler. This isn’t always possible, but when you have a choice, pick the smoother ground.
6. Preemptive Glue Layer
On a new deck, you can add a thin layer of wood glue along the tail’s outline as soon as you see the first signs of wear. Let it cure for 24 hours. This hardened glue layer sacrifices itself, slowing down the wear on the actual wood. You’ll have to reapply it as the glue wears down.
How to rebuild a skateboard tail with wood glue
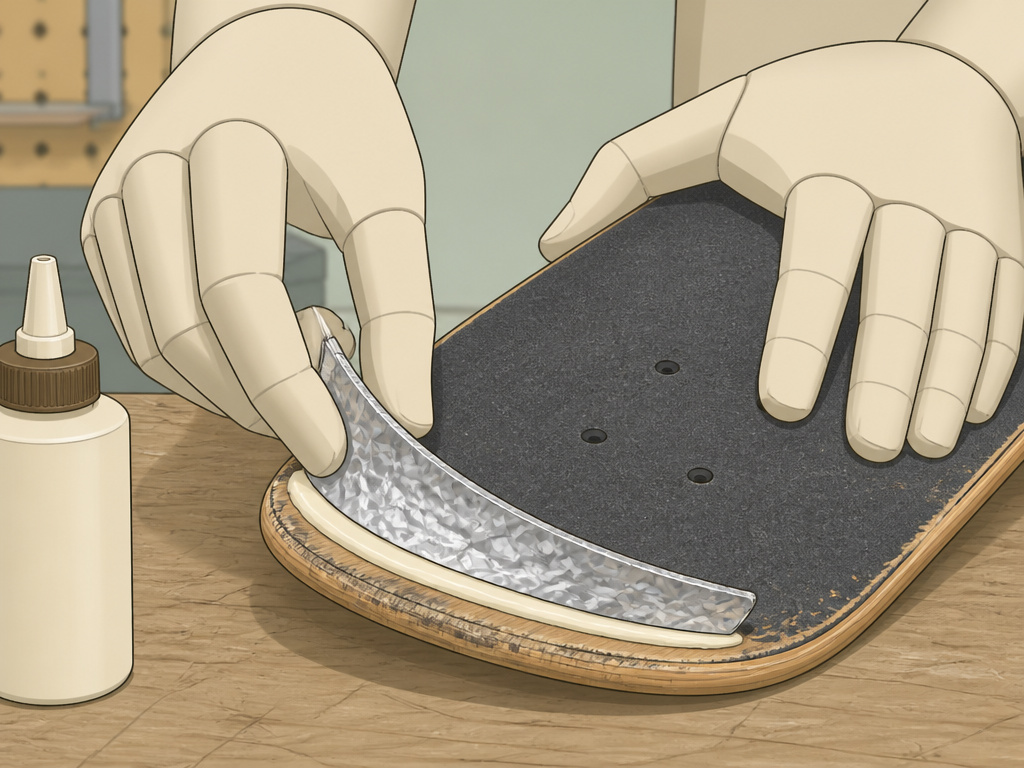
According to boardoftheworld.com, you can rebuild a worn tail using wood glue and a simple mold, while ultimategearlists.com states there is no feasible way to fix razor tail, which highlights the debate on how to fix razor tail on a skateboard. First, create a curved mold from aluminum foil to match the tail’s shape. Apply a thin bead of wood glue along the worn edge. Don’t add too much glue, as a large bubble won’t dry properly. Press the foil mold onto the glue to form it. After a couple of hours, when the glue is gelatinous, remove the foil. If it sticks, let the glue dry completely and then scrape it off carefully. Once hardened, you can sand the new glue layer smooth. This adds material back to the tail to restore its shape and function.
Frequently Asked Questions
Can you really fix razor tail, or is it just a temporary patch?
You can rebuild the tail’s shape with wood glue, which restores some pop and makes the edge blunt again. However, it is a temporary patch. The glue itself will wear down with use, and the underlying wood is still fatigued. It extends a deck’s life but does not restore it to like-new performance.
Does razor tail affect pop?
Yes, significantly. Pop relies on the tail’s ability to flex and snap back. As the tail wears thin and short, it loses flex and spring. You’ll notice you have to pop harder for less height, and scoop tricks become much harder.
How can I stop razor tail on my skateboard?
The most effective method is to stop using the tail as a brake. Drag your foot instead. Other strong preventative measures include rotating your deck (switching nose to tail), practicing manuals to reduce accidental dragging, and adding a plastic tail guard for physical protection.
When should I replace my skateboard deck?
Replace it when you see deep cracks, delamination (layers separating), or when the pop is gone and the tail is chipping apart. A deck that feels “dead” and unresponsive, even after a repair attempt, is telling you it’s done. Riding a compromised deck is a safety risk.
Is sanding down a razor tail a good fix?
According to skateboards.com, sanding down rough edges is a useful maintenance step, while ultimategearlists.com warns that sanding removes material, shortens the board, and can damage the epoxy. However, it does not restore pop or length, it removes material, making the tail even shorter. It’s a last-resort way to make a worn deck slightly safer to ride while you save for a new one.
The Bottom Line
Here is what actually worked for me. The wood glue fix works well when your deck still has some life left, when the wear is shallow and the pop is only slightly diminished. It’s a low-cost solution that can extend a deck’s life. But once you’re chipping wood and the board feels dead, no amount of glue will bring it back. At that point, the only fix is a new deck.
Be honest with yourself about the deck’s condition. If you’re spending more time fixing it than skating it, it’s time to let it go. Check your local shop for a cheap shop deck or a blank, they perform just fine and cost half of a pro model. Then, start fresh and brake with your feet this time. Your next deck will thank you.
