
How to Ollie Higher on a Skateboard: Step-by-Step
This post contains affiliate links. As an Amazon Associate, we earn from qualifying purchases.
To ollie higher on a skateboard, research indicates the importance of a strong rear-foot impulse and rapid upward foot movement, along with effective use of friction between your foot and the deck. The board’s geometry, like reducing wheelbase from 0.44 m to 0.35 m, can add a 3% height gain, but the modern popsicle shape is already close to optimal. The real gains come from maximizing friction with your shoe and the deck, and committing to a full-body jump that pulls your knees to your chest.
Your back foot has to deliver that shove in a fraction of a second, and then get out of the way fast enough, over 2.22 m/s upward, to not steal the board’s upward momentum. Most tutorials just say “pop harder,” but the real question is how to ollie higher on a skateboard. The research gives you a finish line.
What follows is the breakdown of those numbers, the ongoing academic argument about when your front foot should leave the deck, and the practice drills that bridge the gap between knowing the physics of how to ollie higher on a skateboard and feeling the pop. We’ll also look at why your setup matters less than you think, and where to spend your energy instead.
Key Takeaways
- Your back foot needs explosive speed. A 2021 simulation study set the bar: an 18.7 Ns impulse from the rear foot is the minimum to achieve a 0.30 m jump, and that foot must then move upward faster than 2.22 m/s.
- Friction is your friend, not a side effect. Higher friction between your shoe and the griptape creates a more vertically upward force, directly lifting the board higher. This is why rubber-soled shoes and fresh griptape are essential for max height.
- Geometry tweaks offer diminishing returns. While optimizing multiple board parameters can theoretically increase ollie height by 12%, the standard popsicle deck is already near-optimal; a wheelbase change from 0.44 m to 0.35 m only nets a 3% improvement.
- Jump with your whole body, not just your legs. Your head needs to rise. If your torso stays level, you’re just lifting your legs, which caps your potential air. Aim to pull your knees to your chest.
- Practice height before landing. Isolate the upward motion by practicing ollies without worrying about the landing, or even by doing “one-footed” drag drills to feel the front foot’s role.
The Physics of the Ollie: What the Studies Say
You can find a hundred videos saying “pop, slide, and jump.” The research on how to ollie higher on a skateboard asks how hard, how fast, and why. A 2021 simulation study published in the Mechanical Engineering Journal pinned down two specific thresholds. To get the skateboard’s center of mass 0.30 meters off the ground, your rear foot must deliver an impulse of 18.7 Newton-seconds. Think of that as the total “oomph” of your pop, the force multiplied by the time you apply it.
The 2021 simulation study established that an impulse of 18.7 Ns from the rear foot is necessary to achieve a 0.30 m jump height for the skateboard’s center of mass. The same study concluded the rear foot must also move upward at a velocity greater than 2.22 m/s after separating from the deck to avoid robbing the board of its upward momentum.
But it’s not just about the push. The study also found that after you deliver that impulse, your back foot must separate from the deck moving upward faster than 2.22 meters per second. If your foot lingers or moves slower, it acts like an anchor, stealing precious upward energy from the board. This is the “suck up your back foot” advice, quantified.
The 2006 biomechanics study adds another layer, measuring the forces involved. During the ollie’s propulsive phase, skaters generate a vertical ground reaction force peak of 2.22 times their body weight (with a variation of ± 0.22). That’s you pushing down against the earth to launch up. The landing is even more intense, with an impact peak reaching 4.74 times body weight within the first 30 to 80 milliseconds of touch-down.
Where this goes sideways: Focusing only on the “pop” and ignoring the “jump.” Your back foot can hit the tail with all the force in the world, but if your body’s center of mass isn’t also accelerating upward, you’re just slapping the ground. The board might rise, but you won’t be going with it. The height of your ollie is ultimately limited by how high you can jump.
The Footwork Debate: To Drag or to Separate?
Here’s where the sources don’t agree, and it’s a crucial mechanical fork in the road. The 2024 optimal control study from Sports Engineering champions the classic front-foot drag. It states that sliding the front foot up the deck creates a friction force that points more vertically upward, helping to lift the board higher. However, the 2021 simulation study argues for early separation of both feet from the deck to avoid disturbing the board’s rotation.
However, the 2021 simulation study argues for early foot separation. It claims that to avoid disturbing the board’s natural rotational movement after the tail hits the ground, “both feet should separate from the deck before the tail of the deck hits the ground.” In this model, the front foot’s job is to guide and then get out of the way, not to provide sustained upward pull.
| Study (Year) | Recommended Action | Proposed Mechanism |
|---|---|---|
| Heinen et al. (2024) | Slide front foot over deck during jump. | Friction between foot and griptape creates additional upward resultant force, lifting board higher. |
| Mechanical Engineering Journal (2021) | Separate both feet from deck before tail hits ground. | Prevents the foot from disturbing the board’s post-impact rotation, allowing cleaner, higher flight. |
So which is right? For most skaters, especially those not yet hitting their max height, the drag technique is the practical path. It provides control and a tangible feeling of “pulling” the board up. The separation theory might describe the ultra-refined technique of a skater who has already maximized their pop and is fine-tuning board flight. Start with the drag. Master it. Then see if early separation feels like it adds another inch.
Technique Breakdown: From Theory to Concrete Moves
Knowing you need an 18.7 Ns impulse is one thing. Feeling what that translates to in your ankles and knees is another. We can map the physics onto your posture and timing.
Start with your stance centered. Your shoulders should be over the board, your weight balanced. If you’re leaning back, your pop will drive the board forward, not up. If you’re leaning forward, you’ll kill the tail’s snap. Pro Dominick Walker’s tip is gold: place your front foot just below the front bolts and your back foot on the tail pocket. This gives you room to slide and a solid platform to pop from.
The sequence isn’t “crouch, pop, then jump.” It’s a single, explosive uncoiling. As you slam your back foot down, you are already initiating the jump from your legs. The “pop” is the very first part of your upward leap. The PBS Design Squad video nails it: “The downward force of your foot on the back of the board makes the nose flip upwards. If the force is big enough, the upward motion of the board can actually overcome gravity and send the board into the air as you jump.”
Common mistake: Sequencing the pop and the jump as two separate actions. This creates a delay where the tail hits, the board starts to rise, and then you jump, missing the coupling that throws you and the board upward together. They must be one motion.
Now, the front foot. As the board nose rises from the pop, drag the side of your front foot up the griptape. This isn’t a gentle brush. You’re using the friction to literally pull the board upward while your own body continues its jump. This is where the griptape and your shoe’s rubber outsole become critical equipment. Worn-out soles or slick griptape fail at this job.
Finally, the “suck up.” This is the visual of pros getting their knees to their chest. It’s not for show. It’s the physical manifestation of maximizing your jump height and getting your feet out of the board’s way so it can rise unimpeded. Your back foot, having popped, must rocket upward to follow your knee.
Your Setup: How Much Does Your Gear Actually Matter?
It’s tempting to think a different board will solve your height problems. The science is pretty clear: not really. The 2024 study concluded that the modern popsicle stick skateboard shape is already close to optimum for aerial maneuvers like the ollie. Slight geometry changes have a minimal effect.
For example, the study’s model showed that reducing the wheelbase from 0.44 meters to 0.35 meters increased the peak ollie height from 0.876 meters to 0.899 meters. You would need calipers and a very specific deck to even notice that difference mid-air.
| Parameter Change | Effect on Ollie Height | Practical Takeaway |
|---|---|---|
| Wheelbase (0.44m → 0.35m) | +0.023 m (~3%) | Negligible for practice. Don’t buy a new deck for this. |
| Multiple Geometry Optimizations | Up to +12% | Theoretical maximum, but results in a non-standard, likely unskateable board shape. |
| Higher Friction (Shoe/Griptape) | Directly increases upward force | Major, immediate gain. Replace worn griptape and shoes. |
| Deck Weight/Inertia | Heavier board requires more impulse | Lighter decks can feel poppier, but technique dominates. |
The real equipment levers are about friction and feel. Griptape and rubber-soled shoes are highlighted in the research because a higher coefficient of friction directly creates a more vertically upward force when you drag your foot. If your tape is slick or your shoe’s ollie patch is worn through, you’re leaving height on the table. A deck with fresh Mob Grip and shoes with intact rubber will do more for your ollie than hunting for a perfect wheelbase.
Trucks and wheels matter for stability and confidence, which indirectly affects commitment. A stable setup from quality trucks and wheels allows you to focus on the trick, not on fighting wobbles. But they won’t add inches to your pop by themselves.
Practice Drills to Break Plateaus
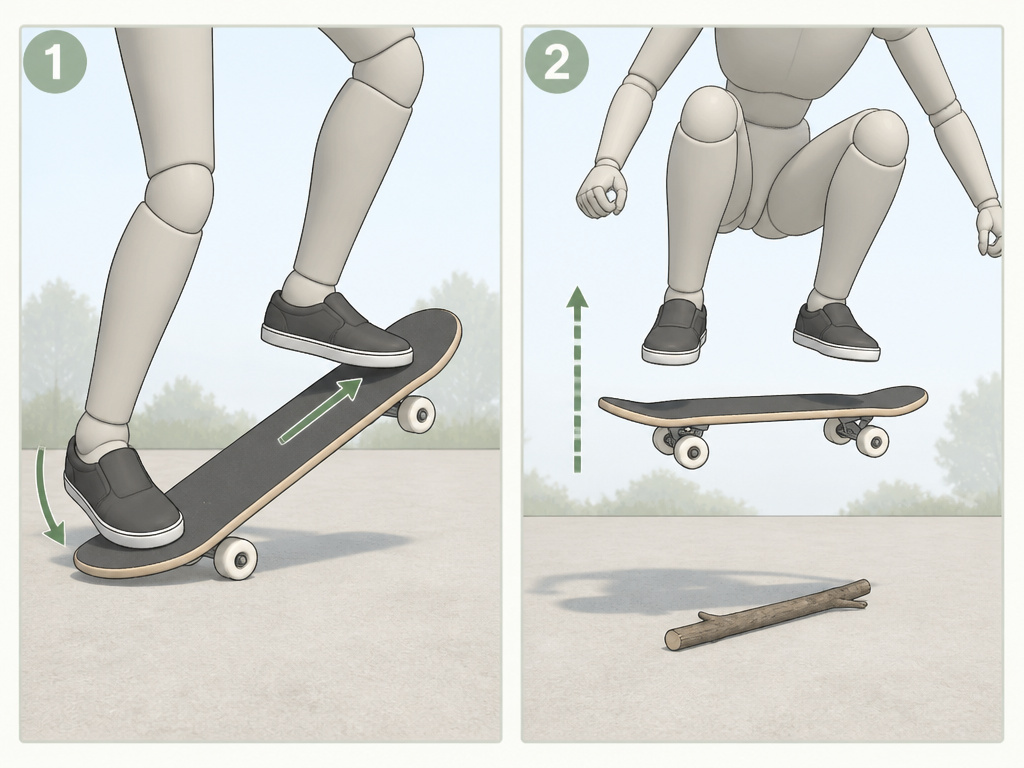
You understand the forces. You’ve checked your gear. Now you need to wire it into muscle memory. Here are drills that target specific failure points.
- The One-Foot Drag Drill. This comes straight from the Secrets of Skateboarding website. Pop the tail and immediately plant your back foot on the ground, but continue dragging your front foot up and slamming it down on the board. You’re doing an ollie with only your front foot. It feels awkward, but it isolates the dragging motion and proves you can get the board airborne with just that action.
- Height-Over-Landing Drill. Commit a session to not caring if you land. Crouch, explode, and focus solely on pulling your knees as high as your chest. Let the board flip out. This breaks the mental barrier of “I need to land this” which often causes you to cut your jump short. As the source says, “When practicing getting your Ollies higher, it is not important that you land your Ollies.”
- The Obstacle Mandate. Place a small object on the ground, a stick, a rolled-up jacket. The visual target forces your brain to commit to a specific height. Using obstacles definitely helps you force your body to jump. Start low and gradually increase the height. The consequence of clipping the obstacle provides instant, unambiguous feedback.
- Stationary to Slow Roll. Start on grass or carpet as Dominick Walker suggests, where the board won’t roll out. Get the full motion down stationary. Then move to very slow rolling. The forward momentum changes the mechanics slightly and is how you’ll actually use ollies, but mastering the components stationary removes balance from the equation initially.
I spent weeks frustrated that my ollies weren’t getting higher. I was popping, I was sliding my foot. Then I watched a clip of myself and saw my head never moved, my torso stayed level. I was just lifting my legs. The day I focused on actually jumping, on sending my whole body upward, I cleared a curb for the first time. The board followed because I finally led.
Frequently Asked Questions
How high can a human actually ollie?
The verified world record is contested but sits around 44.5 to 45 inches (about 1.13 to 1.14 meters), set by skaters like Danny Wainwright. For many skaters, clearing increasingly higher obstacles is a significant milestone.
Why does my board rocket away from me when I ollie?
This usually means you are popping the tail but not jumping upward with your body. Your foot imparts force to the board, sending it up and forward, but your body stays behind. Remember, the ollie is a jump with the board. Your center of mass must rise simultaneously.
Should I bend at the knees or the waist for more height?
Bend at the knees. Bending at the waist (hunching over) shifts your weight forward and makes it mechanically harder to generate upward force. A deep knee bend stores elastic energy in your legs, like a spring, for a more powerful explosion upward. Keep your back relatively straight and your head up.
How long does it take to ollie higher?
It depends entirely on consistent practice. You can feel a difference from focused drills in a single session. But to add several inches consistently, especially while rolling, expect a few weeks of dedicated practice. Plateaus are normal; breaking them often requires a change in focus, like the drills above.
Do stronger legs mean higher ollies?
Yes, but with a caveat. Strength helps you generate the necessary impulse faster. However, technique is the primary driver. A perfectly executed ollie from a lighter skater will beat a muscled, poorly-timed jump every time. Strength can help you generate impulse faster, but the sport-specific skill of timing the pop, drag, and jump is irreplaceable.
Before You Go
The chase for height is a thorough exploration of your own coordination. The research gives us a map: hit that impulse threshold, maximize friction, and jump with your whole body. Your board setup is fine. The world record proves the popsicle deck can fly over a mailbox.
Your next session, try just one thing: film yourself. Watch your head. If it doesn’t go up, you’re not jumping. All the pop in the world won’t compensate for that. Once your body leads, the board will follow. Then work on that front-foot drag until you hear the griptape rip. That sound is the friction doing its job, pulling you and your board a little higher into the air.
