Razor tail and skateboarding comes hand to hand, and you can’t debate on it with me. So, whether you are a trainee or an expert, you get to face the razor tail. It isn’t something you can save your board even after great care.
Everything ages with its time and use, but of course if you have placed your skateboard in room, it will not get razor tail!
Nevertheless, who’s going to spend money and then place it in the room. Also, knowing at the same time you can fix it and can save it too from further damage. I was so bad at keeping my skateboard from damage and had to face the razor tail over and over almost on my first 2 boards.

No need to stress over mate! I am here to talk about, what is razor tail skateboard and how to fix it? I will take you over a comprehensive guide and then a step-by-step detail guide to help you fix your best friend. So, let’s start with it:
What Is Razor Tail Skateboard?
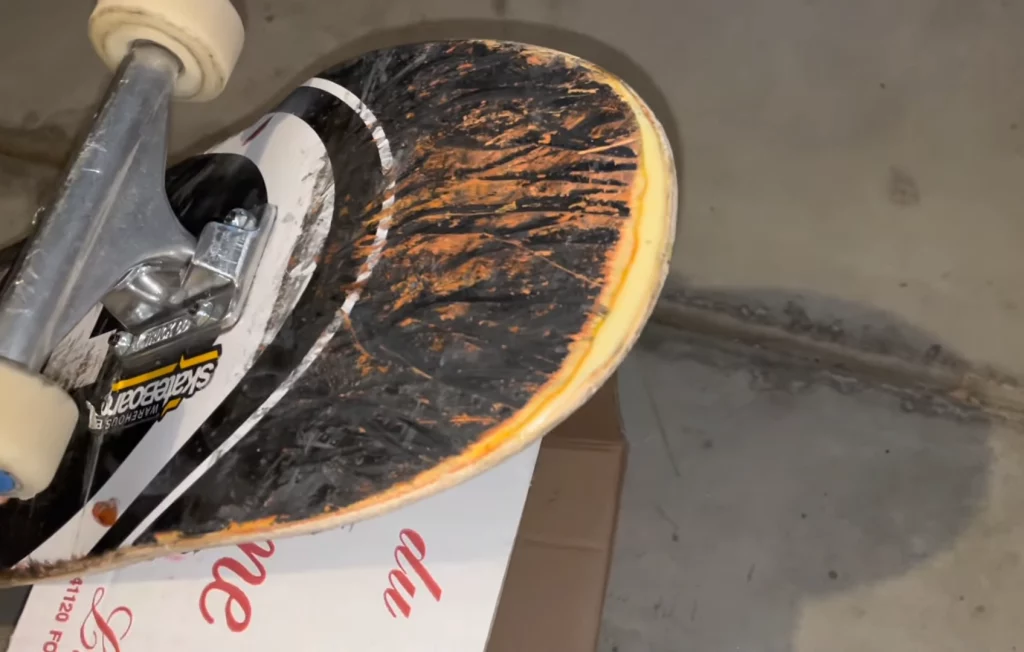
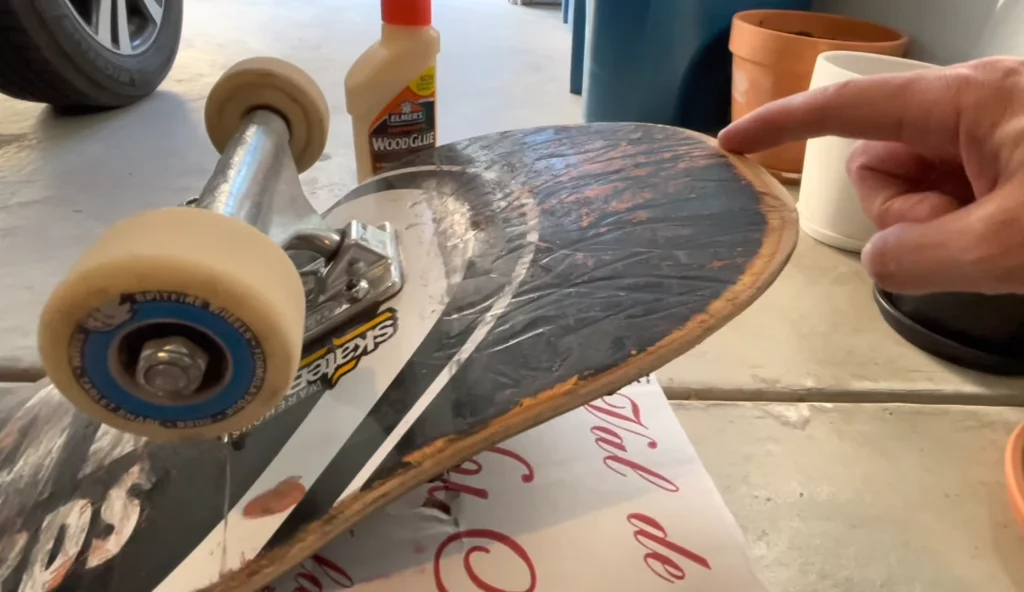
Razor tail isn’t something strange, if I explain it to you in simpler words, when a skateboard tail gets chipped off it’s called razor tail. People also think that when their skateboard razor tail get chipped off you can’t use it as it will hinders your game.
Meanwhile, by taking great care you can easily avoid getting your skate razor tail chipped off. These include; knowing skating in a right manner, knowing how to skate and prevent your board from damage, prevent it from hitting into stairs, roads etc.
In addition, if your skateboard tail is chipped off to a level that it hinders your skating for real, that’s when you can’t do anything about it. But if it’s a slight chipping, then there is a simple way to fix it all. That being said, I have a step-by-step guide for you in the next section to help you fix your razor tail.
How To Fix The Razor Tail Skateboard?
I believe that every skateboarder experience razor tail once with their skateboard, and if it is to a boundless range, it can crack anytime, maybe in the middle of skating when you are on high speed. You don’t need to wait for such time, better take care before it happens.
Considering that, here is a step-by-step guide to fix your skate razor tail within the comfort of your place and being in your budget. But you will need few items to deal with it.
Things you will need to fix razor tail
- To create a mold of your tail, use aluminum foil.
- To repair the wood’s deteriorated layers, use wood glue.
Step-by-step Guide To Fix Razor Tail Skateboard
Starting with it, there are two methods in fixing the skateboard tailbone and I will talk about both ways separately. So, let’s dig into these methods.
Method 01: Sand & cut the tail off
Step 01:
This is the simplest method but people usually don’t use this, but faster than the second one. For sanding the razor tail, your razor tail can be quickly and simply removed with a belt sander. As I mentioned the simplest, so if you don’t have the tools for it, you can still do it.
Use a sandpaper or a sand block, as these are the easiest things you can even find at your place. Now, after grabbing the block sand it up and around and forth until the razor tail is gone.
Step 02:
In this step, you will need a sawtooth or tool equivalent to it. With the tool you need to focus on too for giving a steep structure to the skateboard. Cut the tail and give it a shape as it was earlier and you are done. But you must consider that, this will shorten the length of the board.
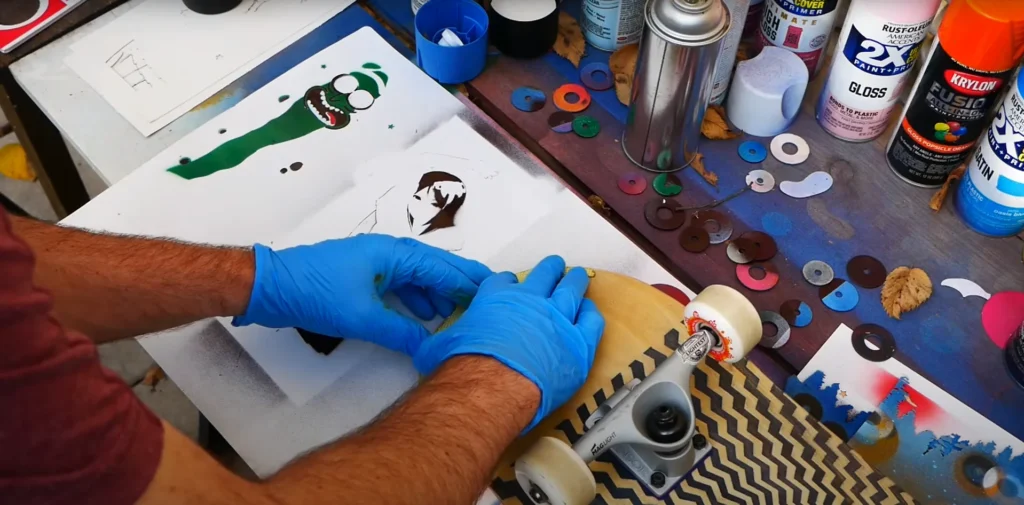
Method 02: Molding & Taping The Razor Tail
Step 01:
Grab an aluminium foil and cover the razor tail with it completely starting from one side to the other. Primarily a 12 feet aluminium foil would be enough for it. Making a wall that functions as a barrier to hold the extra glue is the aim of this step.
Make sure the foil is firmly attached to your tail, with all the surface part and firmly attached to your grip tape. Now, if it isn’t tightly sealed, adhesive/glue you put will leak and go on the grip tape and we don’t want that.
Step 02:
In the second, we will put of our first coating. Apply a glue thin layer measuring about 1/8′′ thick to the razor tail. But make sure don’t get excited with it and add a lot of glue, stay patient and just create a thick layer so that it can stick together.
Step 03:
Now, you are seeing that the first layer has started to dry off you need another on top off it for better durability and protection. Basically, this step involves adding a bit extra glue to gradually balance out the missing wood on your tail.
Step 04:
As we talked about creating a shape in the first method, that’s what we are going to do here too. But this time we need to add wood where you think it need to give the tail shape. Make sure the tail is as flat as it can be so that you can easily attach the extra wood and give it a finish.
On the other hand, when you put some height to the skateboard you can easily see the sides and can work on it with right technique and vision.
Step 05:
Step 5 calls for the wait and you are required to wait for 1-2 hours. Take a seat back and relax or just read a book and come back to it. Now, the glue will get hardened and it call for you to remove the aluminium foil.
After that, make sure the wood is also dry because it will wear if it isn’t as wood takes time. If you want to ensure more protection, you can sand it too and you are done!
Conclusion:
Razor tail skateboard is a common thing but people usually confuse it because of the its name. Otherwise, it’s just your chipped tail. Now, to fix it is also a painless task as you will not need any expensive gadgets and machines etc.
Above, in this article, I have talked about what is razor tail skateboard and how to fix it? I have shared everything from my experience and I hope that you get to fix your skate with this guide!
Hi, I am Mian. I am the Owner and Founder Of Skateboard First. I am such a huge fan of skateboarding, and I am here to enhance your experience in skateboarding.