
How to Cut Grip Tape on a Skateboard: Step-by-Step Guide
This post contains affiliate links. As an Amazon Associate, we earn from qualifying purchases.
To cut grip tape on a skateboard, you need a sharp blade, a hard object to score a cut line, and a controlled 45-degree angle cut from the underside of the tape.
Get one wrong and the grip bunches, tears, or leaves a white, frayed edge that catches on shoes. This guide walks through the exact steps from four manufacturer sources, points out where their advice differs, and shows you how to avoid the mistakes most beginners make on their first try. It will also explain how to cut grip tape on a skateboard.
What follows: the four essential tools, the debate over marking methods, the one cutting angle that prevents snags, how to handle the tricky nose and tail bends, and the finishing rub that bonds the edge for good.
Key Takeaways
- Use a razor-sharp blade in a box cutter or utility knife; a dull blade tears the grip and is more likely to slip and cut you.
- Always score the perimeter first with a hard object like a screwdriver or file to create a visible white cut line on the grit.
- Cut from the underside of the tape at a 45-degree angle toward the board’s center to prevent the excess from folding over and creating a ragged edge.
- Make small pre-cuts at the nose and tail curves before scoring the main line; this keeps the grip from buckling when you cut the sharp bends.
- Finish by sanding the edge with the excess grip tape offcut; this bonds the adhesive and seals the edge against peeling.
Gather Your Tools (You Need Four Things)
You don’t need a workshop. The job requires one cutting tool, one marking tool, one item for finishing, and the grip tape itself. Brand specifics come from the sources: Yocaher grip tape comes in precut 9-inch by 33-inch sheets, a size SkatePro notes is standard for most decks. That sheet should overhang the board’s edges by 1-2 centimeters, as Element specifies, giving you material to work with.
The cutting tool is essential: a sharp blade. Yocaher recommends a box cutter for the safe handle, noting a single-edged razor blade works nearly as well. SkateHut and Element simply say a sharp utility knife, razor blade, or knife. The critical point every source agrees on is sharpness. A dull blade doesn’t cut cleanly; it drags and tears the abrasive material, requiring more force and increasing the chance of a slip. As Yocaher puts it bluntly: dull blades cause more injuries than sharp ones do.
For marking, sources disagree on the ideal tool but converge on the principle. You need a hard, narrow object to compress the grit along the deck’s edge, leaving a visible white line as a cutting guide. Yocaher suggests an old truck hanger or the edge of a screwdriver. Element says a screwdriver or skate tool. SkateHut lists an old screwdriver, Allen key, file, or the back of a skate tool. Cloud9 Griptape and the Howcast transcript advocate for a flat file, with Howcast calling it the best for the job but admitting the edge of a truck’s hangar works in a pinch. Sources disagree on the best tool for learning how to cut grip tape on a skateboard: Yocaher suggests a truck hanger or screwdriver, SkateHut lists several metal objects, while Cloud9 Griptape and Howcast advocate for a flat file.
The last item is for finishing: you’ll use the offcut of grip tape itself to sand the fresh edge. Some also use a screwdriver to press the edge down a second time. Having a pointed tool like a screwdriver to poke holes for your truck bolts later is also wise, as Cloud9 Griptape recommends going from the top down.
Score the Perimeter to Create a Cut Line
With the grip tape applied smoothly and bubbles pressed out, don’t reach for the blade yet. First, you need a guide. Run your chosen marking tool—screwdriver shaft, file, truck hanger—around the entire edge of the deck, pressing firmly so the grit grinds away against the board’s lip.
Technical Snippet: Creating a cut line involves abrading the grip tape’s surface along the deck’s edge with a hard, narrow object. This compression removes the grit’s dark coating, revealing a white guideline that shows exactly where the board ends underneath the tape. The line must be continuous and visible from above before cutting commences.
You’ll see a white line appear. This isn’t a scratch on your deck; it’s the colored top layer of the grip being worn off, exposing the lighter abrasive material beneath. The line should be clear and unbroken. Cloud9 Griptape adds a warning: you can file through the grip if you get carried away, so use caution and don’t overdo it. The goal is a visible track, not a trench.
This step does two crucial things. It gives your blade a path to follow, and it pre-compresses the adhesive right at the edge, making a cleaner cut possible. Skipping it means cutting blind, which almost guarantees uneven edges and flaps of tape that refuse to lie flat. A Reddit user in r/NewSkaters learned this the hard way, posting a photo of a mangled nose and tail with the community immediately responding: “You need to rub it with something hard like a screwdriver shaft to score it.”
The 45-Degree Angle That Stops Jagged Edges
Here is where most first-timers go wrong. They see the white line, put the blade straight down on it, and push. The grip tape crumples, tears, or leaves a frayed edge. The correct method has three parts: cut from underneath, angle the blade, and pull with control.
First, insert the blade from the underside of the tape. Yocaher, Cloud9 Griptape, and SkateHut all specify this. You press the blade up through the sticky side so it touches the edge of the deck. This uses the deck’s edge as a cutting board and stops the top grit layer from splintering.
Second, angle the blade. But what angle? Sources differ slightly but agree an angle is essential.
- Yocaher: “Angle the blade TOWARD the center of the board to prevent any excess griptape from folding over.”
- SkateHut: “Cut from underneath and maintain the blade at a slight angle.”
- Element: “Hold the knife at a slight angle for a clean edge.”
- Howcast: “Put the blade in on a 45 degree angle.”
The consensus is a slight angle directed inward. Sources offer different advice on the blade angle for how to cut grip tape on a skateboard: Yocaher says angle toward the center, SkateHut and Element recommend a slight angle, and Howcast specifies 45 degrees. Angling the blade inward, toward the board’s center, slices through the tape cleanly and prevents the outer flap from catching and folding under your cut.
| Blade Angle | Recommended By | Why It Works |
|---|---|---|
| Toward board center | Yocaher | Prevents excess tape from folding over the edge |
| Slight angle | SkateHut, Element | Produces a clean cut without tearing |
| 45 degrees | Howcast | Provides a specific, repeatable angle for a smooth slice |
Third, control the pull. Howcast instructs to “cut towards ourselves; we’re just going to pull towards ourselves.” Yocaher simply says “slice along the line,” which implies a push. Pulling towards yourself offers more control over the blade’s path, especially if you brace the board with your other arm. SkateHut warns to take it slow and keep fingers away from the blade.
Common mistake: Cutting with the blade straight up and down. This pinches the grip tape between the blade and the deck, causing it to bunch and tear instead of slice. You’ll get a jagged, white edge that feels rough and starts peeling within a week.
Handle the Nose and Tail With Pre-Cuts
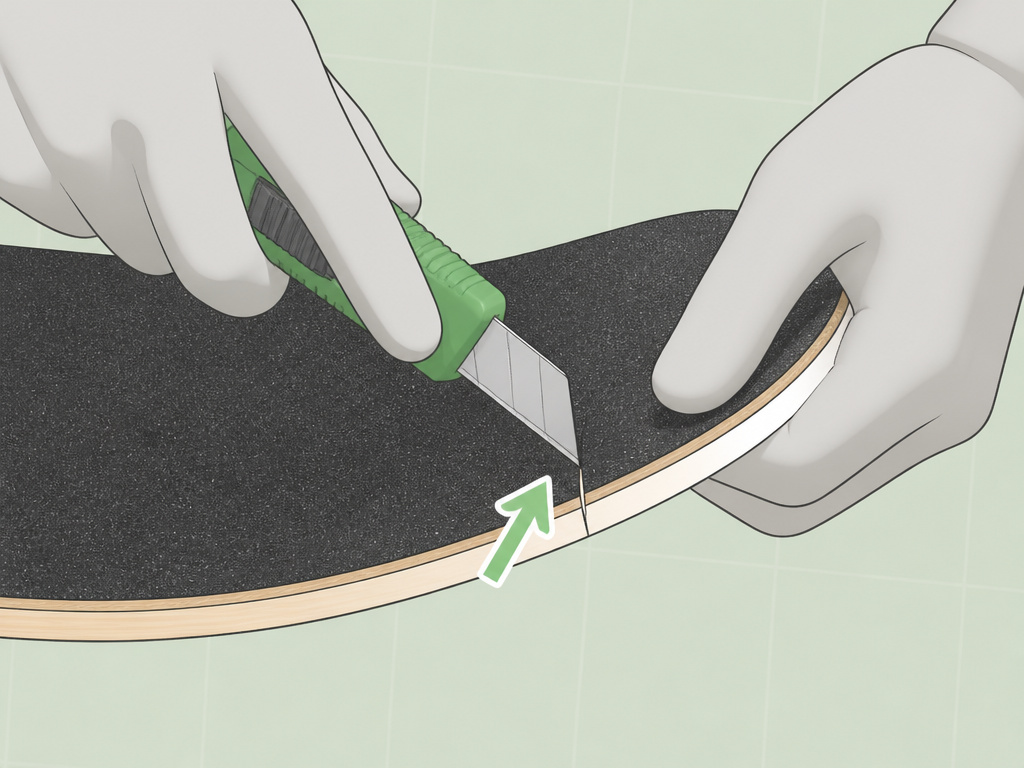
The straight sides of a deck are easy. The sharp upward bends at the nose and tail are where grips jobs get ugly. The concave curve creates tension in the tape. If you try to cut the continuous perimeter line through these bends in one go, the grip can buckle, leading to a jagged cut or even a tear.
The solution is a pre-cut. Before you even score your main perimeter line, make a small incision. Howcast is explicit: “give a little cut right at the breaks, where the board tips up, right up to the edge of the board… This is going to help when we’re cutting around.” SkatePro’s guide also advises making cuts in each corner of the griptape before creating guidelines.
- Identify where the flat deck starts to curve up at the nose and tail.
- Use your blade to make a short, vertical cut from the overhanging edge right down to the board’s surface at the start of the curve. Do this at all four “corners” (two at the nose, two at the tail).
- Then proceed to score your continuous white line around the entire board.
These relief cuts release the tension. When you later cut the main line, the grip at the curves has room to lay flat, and your blade can navigate the bend without the material fighting back. Reddit advice echoes this: “make a few incisions at the curves (at the nose and tail), and the less cuts the better.”
Finish the Edge to Prevent Peeling
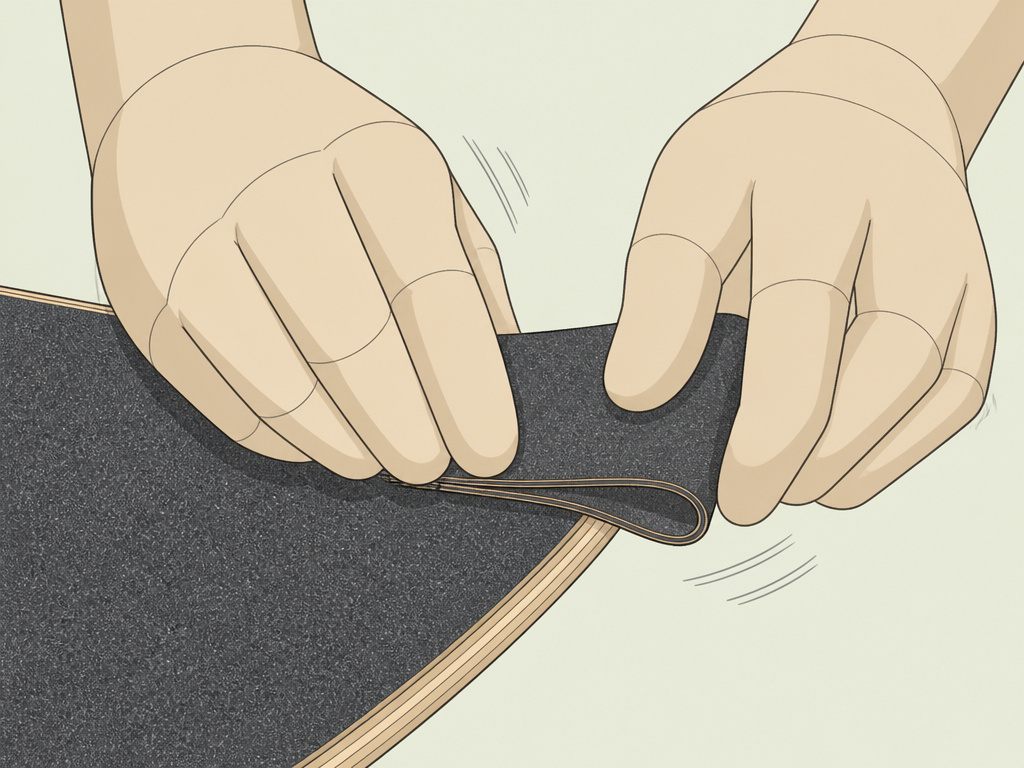
You’ve trimmed the excess. The edge looks clean. You’re not done. A raw cut edge is prone to lifting, especially as your shoes scrape against it. The final step bonds that edge to the deck.
Take the large piece of grip tape you just cut off and fold it in half, grit sides together. Now use this as a sanding block. Rub it vigorously back and forth along the freshly cut edge of the grip tape still on your deck. Howcast, Cloud9 Griptape, and SkateHut all describe this step.
Element suggests an alternative or additional step: sand the edges or round them a second time with a screwdriver. The goal is the same—ensure the grip is flush and fully adhered. Finally, use a pointed screwdriver to poke holes from the top down for your truck bolts, as Cloud9 Griptape advises. Pushing from the top prevents you from lifting the freshly adhered grip tape from the deck.
How to create a cut line on grip tape
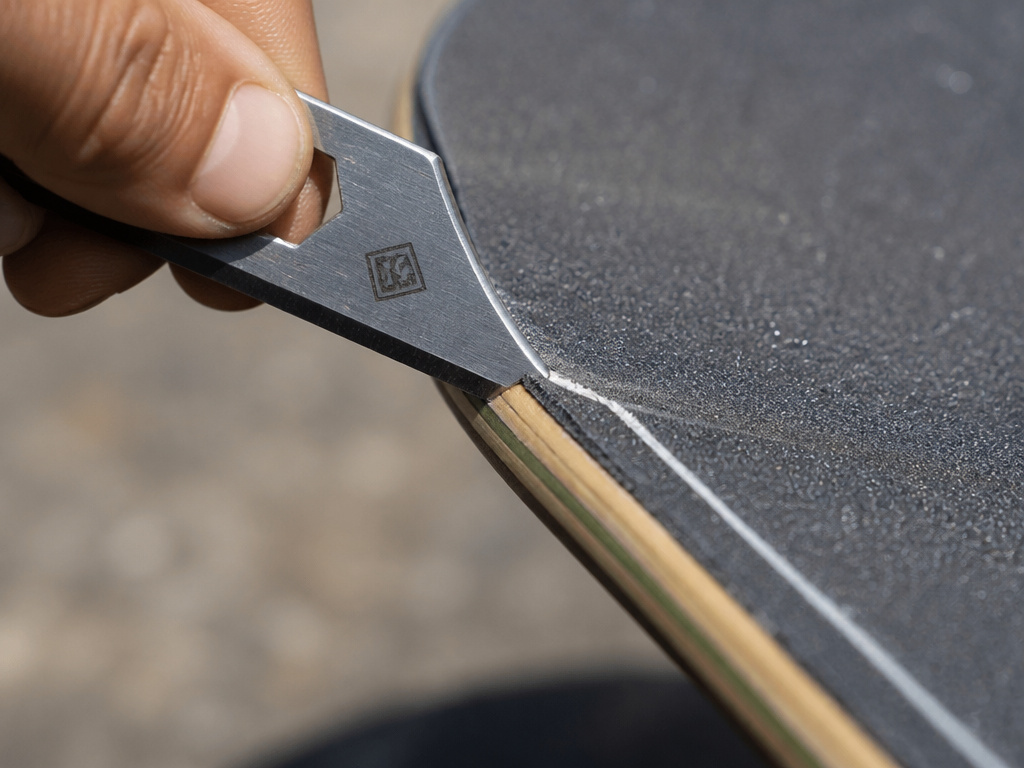
Before you make a single cut, you need a clear guideline. Use a hard metal object to rub firmly around the edge of the deck. A screwdriver, the edge of a skate tool, an Allen key, or a flat file all work for this. Pressing this tool against the board’s edge creates a visible white line in the overhanging grip tape, which becomes your cutting guide. Be cautious not to apply too much pressure, as you can file through the grip itself.
How to remove old grip tape from a skateboard
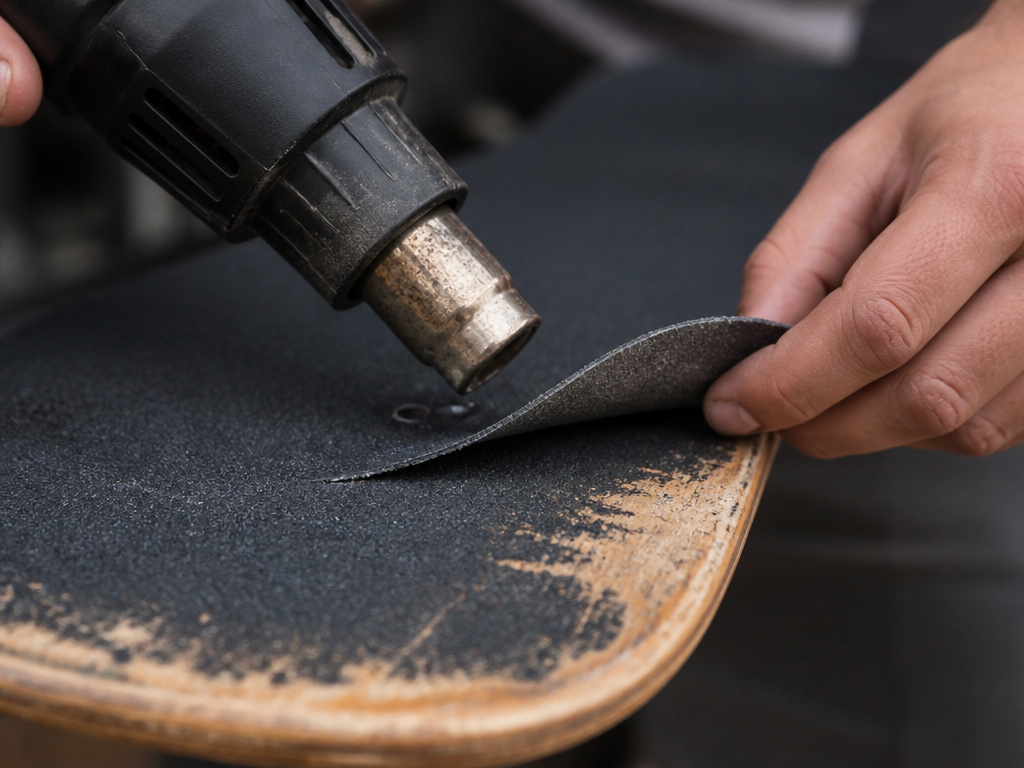
Taking off old grip tape starts with softening the adhesive. Use a hairdryer to blow hot air along the edges of the tape, heating it to make it easier to detach from the deck. Once the adhesive is warm and more pliable, you can start peeling the grip tape off. After removal, some sticky residue will likely remain on the board’s surface. You can remove this by gently scraping it away. Rubbing the area with an alcohol-based cleaner or nail polish remover can help dissolve the leftover adhesive, leaving the deck clean and ready for a fresh sheet.
Frequently Asked Questions
What can I use to cut griptape if I don’t have a blade?
In a true pinch, the Howcast transcript shows a last-resort method: use the edge of a truck’s hangar, baseplate, or axle to scrape and peel the excess grip. It’s described as a “quick fix” that “won’t come out as smooth.” A sharp blade is always the right tool for a clean job.
How do you cut grip tape on a skateboard without tearing it?
Pre-cutting the nose and tail curves also prevents tearing.
Is grip tape just sandpaper?
Technically, no. It’s also backed with a pressure-sensitive adhesive, as Cloud9 Griptape states, which sandpaper lacks.
Can you cut grip tape with scissors?
You can, but you shouldn’t. Cloud9 Griptape advises against it: “You won’t get the precise cut you would with a retractable blade knife or a razor blade. Also, you’ll run the risk of the grip peeling up.” Scissors crush and fray the abrasive material, leading to a weak, uneven edge that lifts quickly.
How do I fix a ragged grip tape edge after cutting?
If the edge is just rough, use the sanding method with the offcut described above. If there are actual flaps or overhanging pieces, carefully lift the affected section, re-trim it with a very sharp blade following the correct angle, and then sand the edge thoroughly to re-bond it.
The Bottom Line
A clean grip tape cut isn’t about artistic talent; it’s about matching three mechanical steps: scoring a guide, angling the blade inward, and sealing the edge with friction. The one thing you must not skip is the final rub-down with the offcut—that’s what turns a cut edge into a bonded one that lasts. If your first attempt has a few rough spots, don’t stress. Then go skate. The grip will wear in, and any minor imperfections will vanish under your feet. Your next grip job will be perfect.
