
How to Change Skateboard Bushings for Your Weight
This post contains affiliate links. As an Amazon Associate, we earn from qualifying purchases.
To change skateboard bushings for your weight, you need a skate tool and new bushings matched to your weight. Match the bushing durometer (hardness rating) to your body weight: sources offer different recommendations. For riders under 65kg (143 lbs), SkatePro suggests 81A-85A or 86A-90A, while Freedom Skateshop recommends 78A-88A for up to 40kg and 90A-92A for 40-80kg. For riders 65-80kg (143-176 lbs), Freedom Skateshop recommends 90A-92A. For riders over 80kg (176 lbs), Freedom Skateshop recommends 94A-100A. The swap involves removing the truck, replacing the old urethane cushions, and reassembling with the correct tightness.
That weight-to-durometer match is the whole game. A heavier rider on soft bushings will bottom out the truck and feel unstable; a lighter rider on hard bushings will fight the board to turn. The numbers aren’t arbitrary, they’re about how much force your weight applies to compress the urethane, which is the core of how to change skateboard bushings for your weight.
What follows: a straightforward weight chart drawn from manufacturer data, the exact tools you need, a seven-step replacement guide that avoids common mistakes, and what to do if the new setup still doesn’t feel right.
Key Takeaways
- Match bushing hardness to your exact weight using a manufacturer chart, guessing usually ends in a board that feels unstable or unresponsive.
- You only need a skate tool to change bushings; replacing them takes about 15 minutes once you know the order of parts.
- Replace cracked or deformed bushings instead of cranking the kingpin nut tighter, overtightening damages the bushing and the truck.
- New bushings need a short break-in period; they may squeak or feel sticky for the first few sessions but will smooth out.
- Use your current bushings as a reference point, if you know their durometer, move up or down the scale incrementally to dial in the feel.
Why Your Weight Dictates Bushing Hardness
Your body weight determines how much force deforms the urethane bushing when you lean into a turn. A 200-pound rider compresses a soft bushing almost completely, which can make the truck feel mushy and unstable. A 120-pound rider on that same soft bushing gets a smooth, responsive carve. The durometer number, the A-scale rating printed on the bushing, tells you how much resistance the urethane provides.
Manufacturers publish weight charts because the physics is consistent, which is the core of how to change skateboard bushings for your weight. Heavier riders need a higher durometer (harder bushing) to achieve the same amount of turn under the same lean angle as a lighter rider on a softer bushing. Ignoring this turns your board into a fight.
The part nobody mentions: Cranking down a soft bushing with the kingpin nut to stabilize a heavy rider doesn’t work. It pinches the urethane, creates a dead spot in the turn, and the bushing cracks within weeks. You need the correct hardness, not more torque.
The sources disagree on exact numbers, which tells you this isn’t a perfect science. It’s a starting point.
| Your Weight | Recommended Durometer Range | Feeling & Best For |
|---|---|---|
| Under 40kg (88 lbs) | 78A – 88A | Very easy turning, ideal for young children or very light beginners. |
| 65kg – 80kg (143 – 176 lbs) | 90A – 92A | Balanced stability and turn. The sweet spot for many adult street skaters. |
| Over 80kg (176 lbs) | 94A – 100A | High stability, resistant to leaning. Prevents bottoming out for heavier riders. |
Freedom Skateshop recommends 90A-92A for riders 40-80kg, while SkatePro suggests a softer 81A-85A and a stiffer 86A-90A for riders under 65kg. The table above presents a combined range for guidance. If you’re between ranges, start with the softer option, you can always tighten the kingpin nut a quarter-turn for more stability.
Tools You Actually Need (It’s Just One)
You need a skate tool. That’s it. A basic T-tool with a 3/8″ socket for the kingpin nut is the only specialized item. A wrench can work in a pinch, but the skate tool’s compact size allows you to work on the board without fully removing the truck, saving time.
Have your new bushings ready. If you don’t know the durometer of your current set, look for a number stamped on the side, it might be faint. If there’s nothing, note that brands like Independent, Thunder, or Venture often ship their trucks with 90A bushings. That’s your baseline.
A clean rag is helpful. Old bushing dust is gritty, and you don’t want that in the pivot cup. You don’t need lubricant, you don’t need a vice, and you definitely don’t need power tools. This is a five-minute mechanical job.
The Step-by-Step Bushing Swap
This works for any standard street skateboard truck. The process is the same whether you have Independent, Thunder, Venture, or most other brands. Reverse kingpin longboard trucks follow the same principle but often have different bushing heights.
Step 1: Note Your Current Tightness
Before you touch the kingpin nut, feel how loose or tight your trucks are. Spin the nut with your fingers to gauge resistance. This is your reference point for reassembly. Overtightening during reassembly is the most common mistake.
Step 2: Loosen the Kingpin Nut
Use the 3/8″ socket on your skate tool. Turn the nut counter-clockwise until it’s off. Keep the nut, the top washer, and the top bushing together in order as you remove them. The hanger (the part that holds the axle) will now be loose.
Step 3: Remove the Hanger and Bottom Bushing
Pull the hanger away from the baseplate. The bottom bushing and washer will stay on the kingpin or fall out. Retrieve them. Now you have all parts: kingpin nut, top washer, top bushing, hanger, bottom bushing, bottom washer.
Common mistake: Forcing the hanger off if it’s stuck. If it won’t pull free, the pivot cup (the plastic insert in the baseplate) might be gripping it. Wiggle it gently; don’t pry and risk cracking the cup.
Step 4: Clean and Inspect
Wipe the kingpin and the inside of the hanger with your rag. Check the pivot cup for cracks or excessive wear. A worn pivot cup adds slop, not tightness. If it’s shredded, replace it, it’s a cheap part. This is also when you inspect your old bushings. Are they cracked? Split? Flattened on one side? A deformed bushing looks asymmetrical, like a pancake with a lean. If you see threads on the kingpin sticking out past the nut, your bushings are too soft or worn for your weight.
Step 5: Install New Bushings
Slide the bottom washer onto the kingpin. Follow it with the new bottom bushing. The standard lower bushing height is usually 14mm. Press the hanger back onto the kingpin, aligning the pivot in the cup. Slide the new top bushing onto the kingpin (standard upper height is 12mm), then the top washer. The cupped side of the washer should face the bushing.
Step 6: Re-tighten the Kingpin Nut
Thread the nut back on by hand first. Then, using your tool, tighten it until you feel the first sign of resistance on the bushing. This is the “snug” point. From here, make small adjustments to fine-tune the feel. The iFixit guide emphasizes matching your original tension. If you liked how it felt, replicate it. If you’re changing durometer, start snug and test.
Step 7: Test and Adjust
Put the board down and lean on it with your hands. Does it turn smoothly? Stand on it and do a slow carve. The new bushings will feel stiffer initially. Ride them for a session before deciding to loosen or tighten further.
What If the New Bushings Still Feel Wrong?
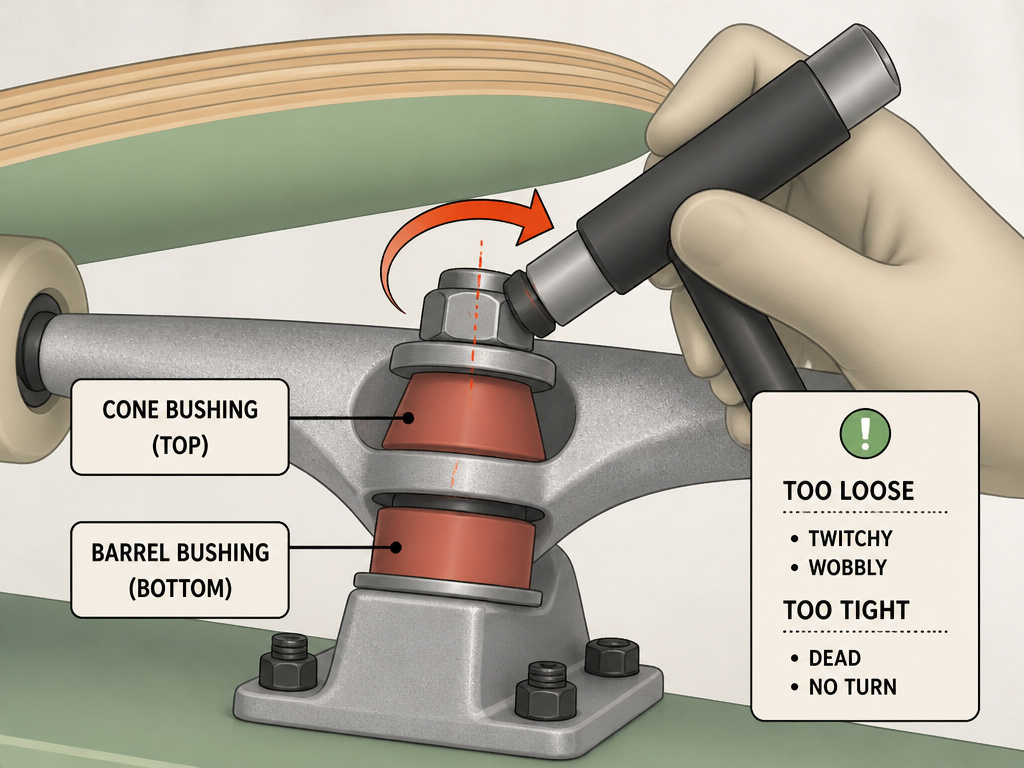
You followed the weight chart, but the board is twitchy or still unresponsive. Don’t go back to the old ones yet. First, check the kingpin nut tension. A quarter-turn can change everything. If the nut is already perfect, the issue might be bushing shape or formula, not just durometer.
| Symptom | Likely Cause | Fix |
|---|---|---|
| Board turns too easily, feels unstable. | Bushings too soft, or kingpin nut too loose. | Tighten the nut slightly. If still unstable, try a harder durometer (e.g., move from 90A to 92A). |
| Board resists turning, feels “dead.” | Bushings too hard, or kingpin nut too tight. | Loosen the nut slightly. If still dead, try a softer durometer. |
| Truck feels sticky, not smooth. | New bushing break-in period, or pivot cup friction. | Ride it for a few sessions. Add a drop of bearing oil between washer and bushing if squeaking persists. |
| One side turns more than the other. | Uneven kingpin nut tension, or a deformed bushing. | Loosen nut completely and re-tighten evenly on both trucks. Inspect bushings for asymmetry. |
Another lever is bushing shape. Street setups typically use a cone bushing roadside (top) for turn initiation and a barrel bushing boardside (bottom) for stability. Switching to double barrels adds maximum stability for heavy riders or downhill. Mixing shapes is an advanced tuning step, but it’s useful if you’re between weight ranges.
For specialized performance, the urethane formula matters too. RipTide APS offers high rebound for a lively feel. RipTide WFB is lubricated for super-fast carves. RipTide KranK hardness changes directly with kingpin tightness. A guide to skateboard bushing hardness dives deeper into these material differences.
Front vs. Back Truck: Should They Be Different?
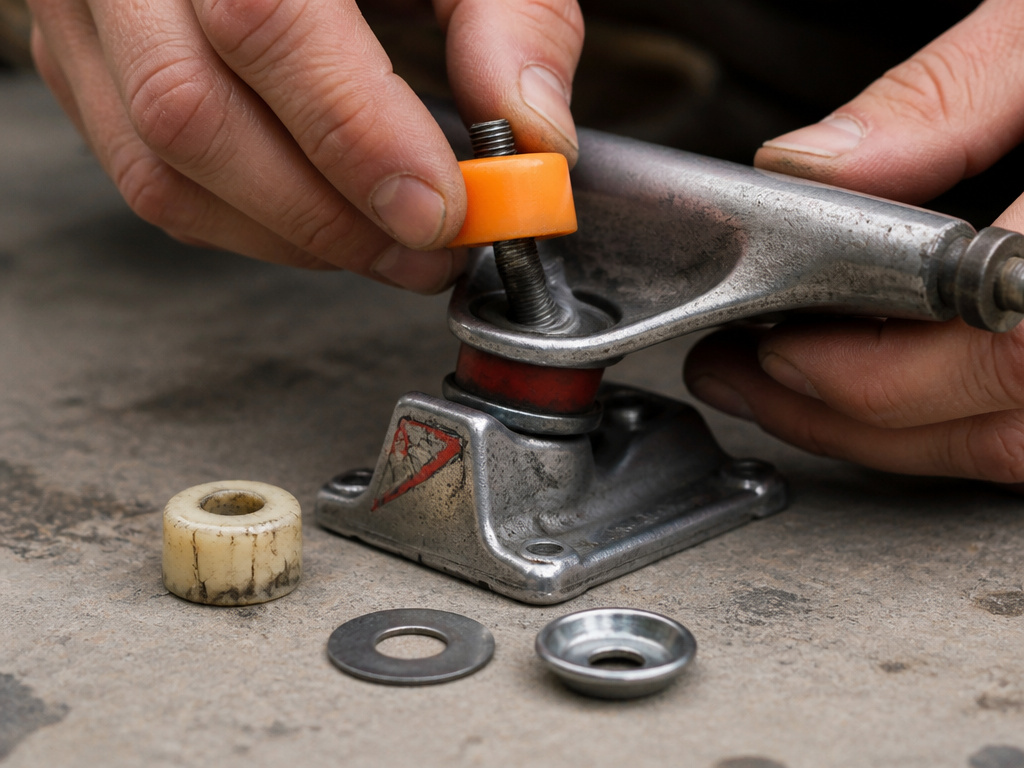
For street skating, keep both trucks the same. Symmetry matters for flip tricks and consistent board feel. Some longboarders or cruisers run slightly softer bushings in the front for more responsive steering, but that’s a specialized technique. If you’re changing bushings, change all four (two per truck). Don’t mix old and new on the same kingpin, the worn one will compress differently and create a lopsided turn.
Check your washers. Stock washers are usually “cup” washers that cradle the bushing. Flat washers allow more bushing deformation, resulting in a looser feel. If you’ve maxed out tightening and still see kingpin thread, adding a flat washer under the cup washer can take up space. This is a band-aid; the real fix is harder bushings.
How to Know When Bushings Are Worn Out
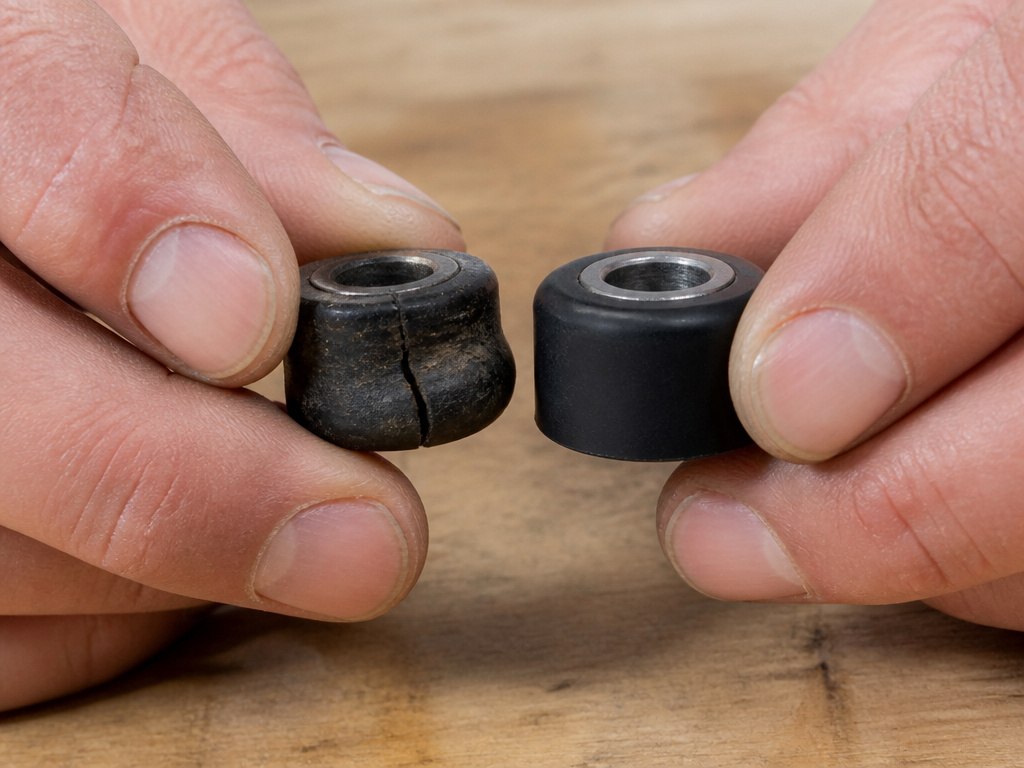
Don’t wait for a complete failure. Inspect them every few months or if the board starts feeling vague.
- Visual Cracks: Any split in the urethane, even a hairline, means replacement. Cracked bushings lose rebound.
- Deformation: A bushing that bulges on one side or has a permanent flat spot is done. It won’t rebound evenly.
- Stickiness: If the bushing surface feels gummy or tacky, it’s oxidizing. Performance is already degrading.
- Timeline: According to iFixit, bushings need replacement every couple of years at most with regular use. A daily skater might need to replace them more frequently.
A worn bushing doesn’t just feel bad, it makes your trucks inconsistent. One turn feels different from the next. That unpredictability kills progress. Replacing them is cheaper than a hospital visit from a sketchy landing.
Where this goes sideways: Tightening the kingpin nut to compensate for worn, soft bushings. By the time the threads are visible, the bushing is so compressed it’s creating a hard stop, not a smooth turn. The truck can seize or the bushing can split under pressure.
If you’re a heavier rider and this keeps happening, you need a durable setup with bushings at the top of the hardness scale.
Bushing Brands and What They Do Best
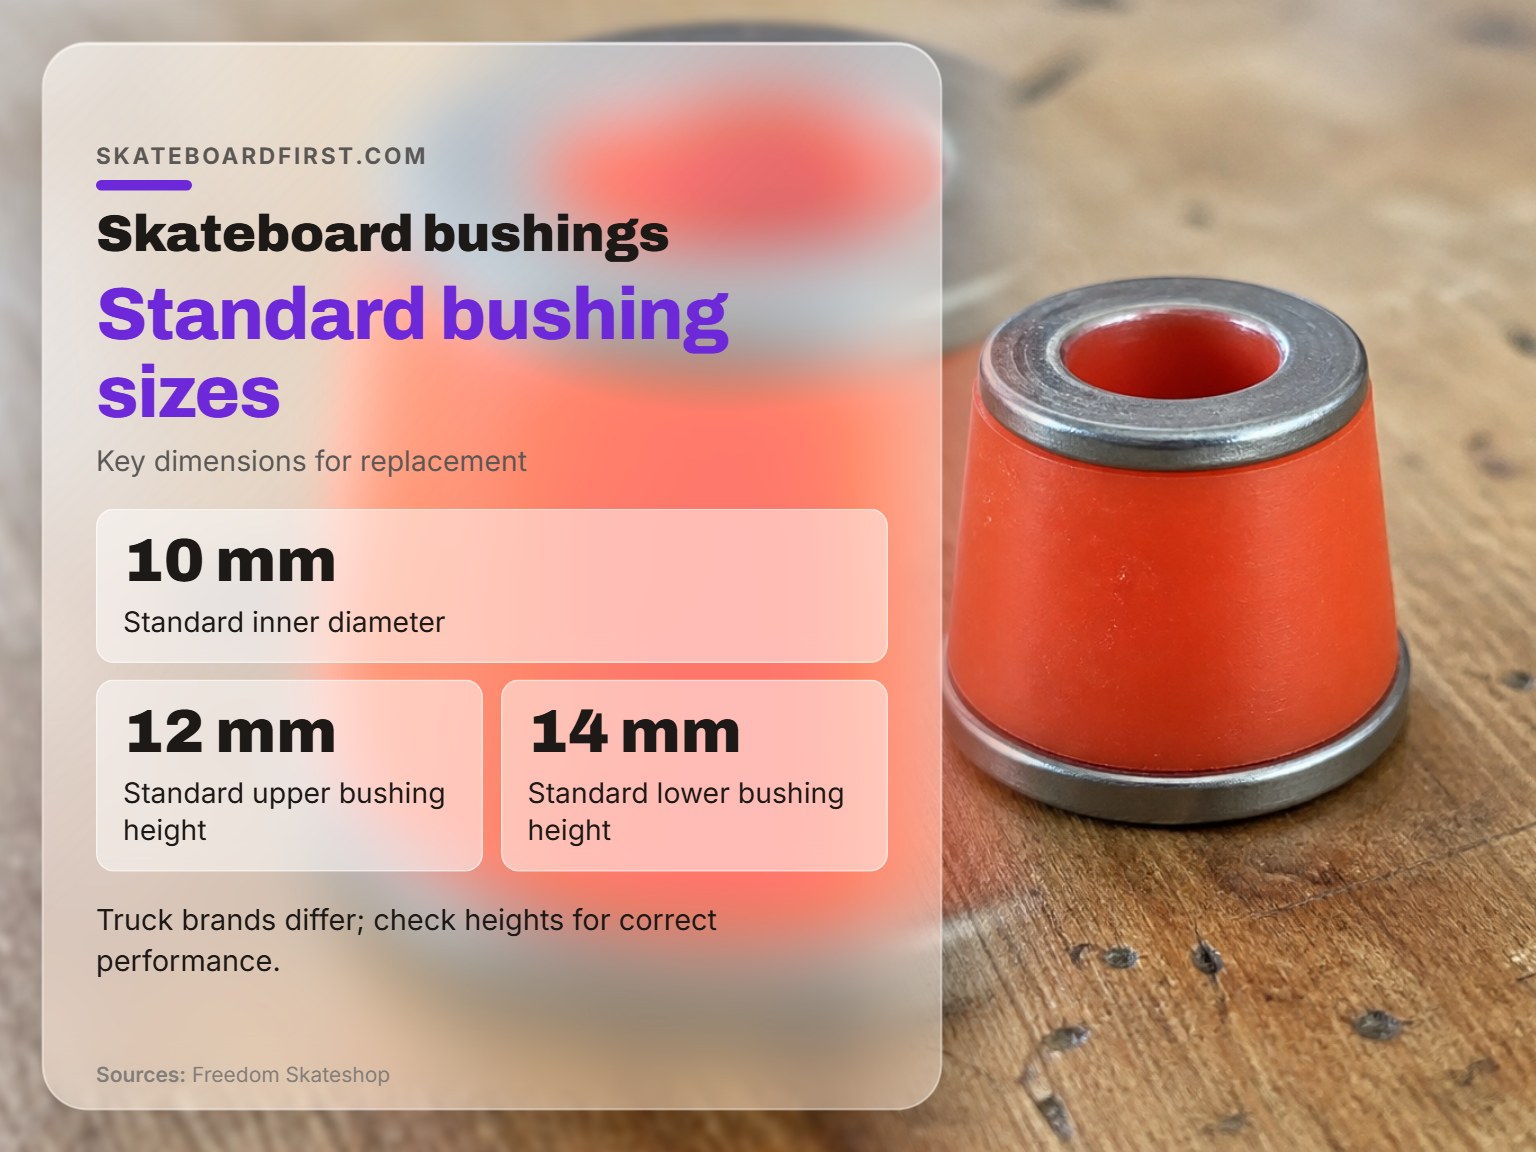
You don’t need to stick with your truck’s brand. While Freedom Skateshop states bushing size is largely standardized, RipTide Sports emphasizes trucks are designed differently by brand and need different heights to perform correctly. Here’s what the top brands offer.
- Bones Hardcore: The most popular street skating bushing. They’re designed with a “hard core”, the urethane gets harder near the kingpin. This provides a progressive feel that’s stable under heavy lean but still allows turn initiation. Bones Hardcore are currently the most popular street skating bushings.
- Independent/Thunder/Venture Stock: Usually 90A. They’re fine. If you’re happy with your stock feel, just replace them with the same. Independent’s aftermarket bushings come in soft (85A) and hard (94A) options.
- RipTide Sports: The aftermarket tuning brand. Their APS formula is high-rebound and recommended for higher performance. WFB is lubricated for speed. KranK changes hardness with tightness. They offer precise durometers (e.g., 92.5A) for fine-tuning.
- Blood Orange: The stock bushing inside Caliber Trucks. Good quality, available in multiple durometers.
- Shorty’s Doh-Doh: Very hard bushings designed to help the board straighten up on impact for freestyle skating.
For a first change, Bones Hardcore or your truck’s brand replacement is the simplest path. If you want to experiment, RipTide APS is recommended for higher performance. Check out reviews and comparisons of skateboard bushings for more detail.
Difference between roadside and boardside bushings
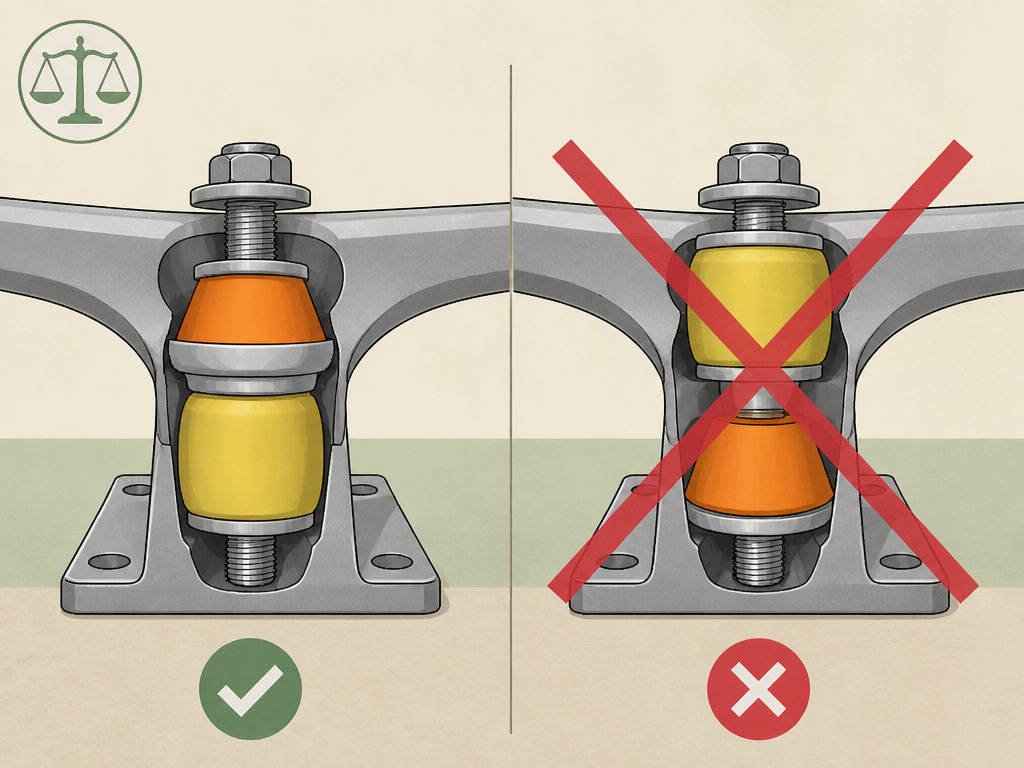
Your trucks have two bushings per truck, and their positions are not interchangeable. The boardside bushing sits in the truck baseplate, directly against the metal. It is typically taller to fill the deeper seat. The roadside bushing sits under the kingpin nut and washer, exposed to the elements. This bushing is usually shorter. Their different heights mean you need to match the correct bushing to the correct location for your truck to function properly. Using the wrong one can lead to poor performance or damage.
Bushing shapes (cone, barrel, etc.) and their effects
Bushing shape directly changes how your truck turns and feels. A barrel bushing provides more stability and a progressive lean, meaning it resists more as you turn deeper. A cone bushing offers a quicker, more carvy initiation to the turn with less initial resistance. Combinations are common, like a barrel boardside for stability paired with a cone roadside for quicker steering. The shape works with the bushing’s hardness; a soft barrel can still feel stable, while a hard cone can feel twitchy. Your weight affects how these shapes perform under pressure.
The role of washers (cup vs. Flat)
The washer between the kingpin nut and the roadside bushing is critical. A cup washer, which has a raised lip, cups around the bushing. This contains the bushing, providing more support and stability, especially for softer bushings or heavier riders. It creates a more controlled, progressive turn. A flat washer allows the bushing to deform more freely, resulting in a looser, more surfy feel with a quicker turn initiation. If your bushings look deformed where the washer presses down, or you see kingpin threading, a cup washer or harder bushing may be needed.
Frequently Asked Questions
What bushings should I get for my weight?
Use the weight chart in section 2 as your starting point. If you’re 70kg (154 lbs), start with 90A-92A. If that feels too stiff, try a softer durometer. If it’s too loose, try a harder one. Your current bushings are your best reference point.
Can a 250 lb person skateboard?
Absolutely. Focus on a setup for heavy riders with a wider deck and hard bushings. Hard bushings prevent bottoming out, which is the main issue heavier riders face.
How do I change skateboard bushings without a skate tool?
You can use an adjustable wrench or a socket set that fits the 3/8″ kingpin nut. It’s more awkward and you might scratch your nuts, but it works. A proper skate tool costs less than a pizza and makes the job trivial.
Are hard or soft bushings better for beginners?
It depends on the beginner’s weight. A light beginner benefits from soft bushings (85A-90A) because they make turning easier and build confidence. A heavier beginner needs harder bushings (92A+) for stability. The worst thing is a heavy beginner on soft bushings, the board will feel terrifyingly wobbly.
Why do my new bushings squeak?
New urethane can squeak against the washer or hanger. It’s normal and usually fades as the bushing breaks in. If it bothers you, a tiny drop of speed cream or bearing oil between the bushing and the metal parts will silence it. Don’t drown it in oil.
How tight should the kingpin nut be?
Tighten until the nut is snug against the washer, then add a quarter-turn to a half-turn. You should be able to turn the truck by hand with moderate pressure. If you need to stand on the board to make it turn, it’s too tight. A guide to proper truck tightness covers this in detail.
The Bottom Line
Changing bushings is the cheapest, fastest tune-up for your board. The job is quick with a single tool. The real work is picking the right durometer, which is why understanding how to change skateboard bushings for your weight is the first filter, your preference is the final one.
If you remember one thing: softer for easier turning, harder for more stability. Start with the manufacturer’s recommendation for your weight, then adjust the kingpin nut in tiny increments. Ride for a session between adjustments.
Don’t overthink brand loyalty. Standard sizing means you can try Bones, RipTide, or anything else. If your board feels off and you haven’t checked your bushings in a year, that’s your next session sorted. Grab a skate tool, a set matched to your weight, and get back to a board that responds.
