
Electric Skateboard Belt Maintenance: Step-by-Step Guide
This post contains affiliate links. As an Amazon Associate, we earn from qualifying purchases.
Electric skateboard belt maintenance requires matching three things: correct tension, regular cleaning, and timely replacement based on visible wear. The target tension varies by brand. Evolve aims for 5mm of play, ONSRA for 2mm, and Meepo recommends 3-4mm of give. A belt that is too tight strains the motor and cuts range; a belt that is too loose skips under hard braking.
That variance in manufacturer specs isn’t a mistake. It reflects different pulley designs, motor mounts, and even the rubber compounds in the belts themselves. A one-size-fits-all finger-push test doesn’t work across every board.
What follows is a breakdown of the signs your belt needs attention, the exact tools you need, and the step-by-step procedure for electric skateboard belt maintenance to adjust tension or swap in a new belt. We’ll also cover how riding in wet conditions changes the maintenance schedule and what to pack in your on-the-go repair kit.
Key Takeaways
- Target belt tension varies by brand. Evolve specifies ~5mm play, ONSRA ~2mm slack, and Meepo 3-4mm of give. Using the wrong spec can damage components.
- Check belts before every ride for embedded debris and inspect for missing teeth, fraying, or cracks. Noise alone isn’t a reliable failure indicator.
- A slightly loose belt is safer than a too-tight one. Overtightening adds friction, reduces range, and can burn out the motor or bearings prematurely.
- Store spare belts and a multitool in your bag. A belt swap can be done roadside if you have the parts.
- Wet riding demands an immediate post-ride clean and dry. Water attracts grit that acts as sandpaper on belt teeth and pulley surfaces.
Why Belt Tension Is Everything (And Why It’s Not Universal)
You can have the most powerful motor and the grippiest tires, but if the belt connecting them is wrong, the board feels broken. The belt is a timing belt, not a V-belt. Its teeth must mesh precisely with the grooves on the motor pulley and the wheel-side drive gear. That meshing is what transfers power without slip.
Get the tension wrong and two things happen. A belt that is too tight puts a constant drag on the motor shaft. You’ll feel it as reduced acceleration and shorter range, and you’ll hear a faint, high-pitched whine from the drivetrain. Over weeks, that extra load overheats motor bearings and can warp the motor mounting plate.
A belt that is too loose makes a different sound: a sharp click-clack during hard acceleration or braking. That’s the sound of teeth skipping over each other. It feels like a momentary loss of power, a stutter. If you ignore it, the skipping wears down the tooth profiles on both the belt and the pulley. Once that wear starts, the belt will skip more easily, even at correct tension. It’s a feedback loop that ends with a snapped belt.
Common mistake: Assuming “snug” means cranking the motor bolts until the belt feels like a guitar string. That’s how you get the whine and the heat. Correct tension has deliberate, measurable slack.
So why don’t all brands agree on a number? The Evolve GTR manual targets “approximately 5 mm of play.” The ONSRA Velar manual says “about 2 mm slack is good.” Meepo advises “about 3-4mm of give when pressed with moderate force.” These aren’t typos. They account for differences in belt length, pulley size, and the stiffness of the motor mounting system. Your board’s manual isn’t a suggestion; it’s the spec for your specific hardware.
The 5-Step Belt Tensioning Procedure
This is the core hands-on work of electric skateboard belt maintenance. It’s simpler than most people fear, but rushing it leads to mistakes. You’ll need a skate tool or a set of Allen keys (usually 4mm or 5mm for motor bolts) and a flathead screwdriver for prying off the belt cover if it’s clipped on.
Step 1: Power off and secure the board. Turn the board and remote completely off. Some guides say to disconnect the battery; if your model allows easy battery access, do it. This isn’t just about avoiding an accidental throttle touch, it’s about ensuring the electronics are safe while you’re applying force near the motor wires.
Step 2: Remove the wheel and belt cover. Use your skate tool to loosen the wheel nut and pull the rear wheel off. Then, remove the two or three small bolts holding the plastic belt cover in place. Gently pry it off if it’s snug. This exposes the belt, motor pulley, and the larger drive gear on the axle.
Step 3: Loosen the motor mounting bolts. Find the four bolts that hold the motor to its mounting plate. They will be in slotted holes, not round ones. Loosen each one by about half a turn to a full turn, don’t remove them completely. This allows the motor to slide forward or backward in the slots.
Step 4: Adjust, check, and repeat. Slide the motor slightly to change tension. For a belt drive system, the rule is: moving the motor away from the wheel tightens the belt; moving it closer loosens it. After each tiny adjustment, temporarily refit the wheel. This pulls the drive gear into its proper alignment and gives you a true tension reading. Press the belt midway between the pulleys. Compare the deflection to your brand’s spec (2mm, 5mm, etc.). It takes a few back-and-forth tries to nail it.
Step 5: Final tighten and reassemble. Once the tension is correct with the wheel on, remove the wheel again. Fully tighten the four motor bolts in a criss-cross pattern to ensure even pressure. Re-fit the belt cover, then the wheel. Hand-tighten the wheel nut firmly, then back it off an eighth of a turn so the wheel spins freely. Give the wheel a hard spin by hand, it should rotate smoothly for several seconds with no rubbing or grinding sounds.
A properly tensioned belt on a Meepo board should have about 3-4mm of give when pressed with moderate force. If you’re unsure, it’s better to err slightly on the looser side rather than too tight. A slightly loose belt might be noisy, but a too-tight belt can damage your motor and bearings. Source: Meepo Board Maintenance Guide
The whole process takes about ten minutes per wheel after your first time. The key is the iterative adjust-check loop. Skipping the step of refitting the wheel to check tension is the most common reason people end up with belts that are still too tight or loose.
How to Inspect Belts for Wear (What to Actually Look For)
Belts don’t always snap without warning. They usually show physical distress first. After a ride, especially on gritty or wet pavement, take two minutes to look.
Visual Cues:
- Missing or Sheared Teeth: A bald spot on the belt where teeth have torn off. This causes immediate skipping.
- Longitudinal Cracks: Deep cracks running along the length of the belt, often on the inner, toothless side. These indicate the rubber is fatigued and drying out.
- Significant Edge Fraying: The outer edges of the belt are unraveling, exposing the internal fiber cords. This often happens from rubbing against a misaligned pulley or cover.
- Glazing: A shiny, polished look on the tooth surfaces. This is from slipping and creates a slick surface that promotes more slipping.
Physical and Sensory Checks:
- Run your finger along the belt. You’re feeling for embedded grit, small stones, or a sticky, tar-like residue. This debris acts like sandpaper.
- Listen after cleaning. A clean, correctly tensioned belt should be relatively quiet. A persistent clicking, grinding, or whining noise after cleaning points to a problem beyond dirt, likely wear or misalignment.
- Smell after a long, hard ride. A faint burning-rubber smell near the motor is a dead giveaway of a belt that’s too tight and overheating from friction.
| Symptom | Likely Cause | Immediate Action |
|---|---|---|
| Clicking under braking | Belt too loose or worn teeth | Check tension; inspect for missing teeth |
| High-pitched whine | Belt too tight | Loosen tension immediately |
| Reduced range/acceleration | Belt too tight (increased drag) | Loosen tension; check motor temperature |
| Belt slips off pulley | Severe misalignment or incorrect belt length | Check pulley alignment; verify belt size |
| Visible cracks/fraying | Age, dry rot, or physical damage | Replace belt before next ride |
Where this goes sideways: Replacing a belt without checking pulley alignment. A new belt on misaligned pulleys will wear out in a fraction of the normal time. The old belt’s wear pattern can be a clue, if one edge is more frayed than the other, your pulleys are not parallel.
Belt Care for Wet Conditions and All-Terrain Riding
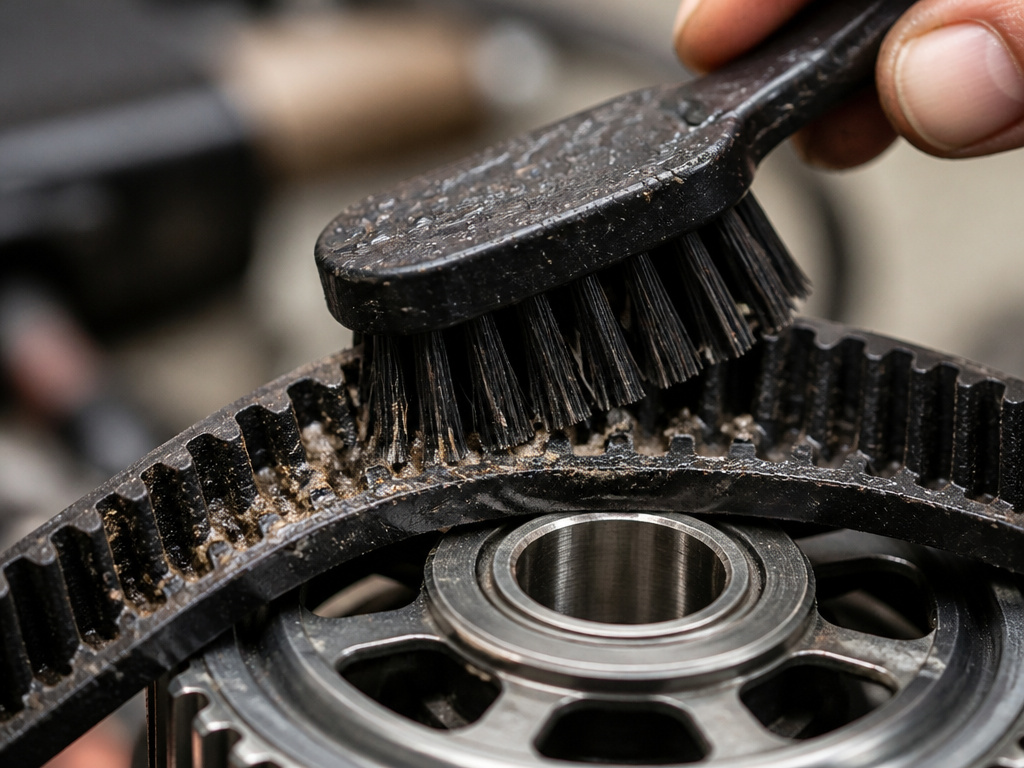
Riding through puddles or on wet roads isn’t an instant death sentence for belts, but it changes the maintenance equation completely. Water itself isn’t the main issue; it’s the grit and fine debris that water carries and then deposits as a paste inside your belt cover.
The Post-Wet-Ride Ritual is Non-Negotiable:
- As soon as you’re home, remove the wheels and belt covers.
- Use a stiff-bristled brush (an old toothbrush works) and a rag to scrub all visible grit off the belt teeth, both pulleys, and the inside of the cover.
- Let everything air-dry completely before reassembling. Putting a damp belt and pulleys back together invites rust on the pulley teeth and accelerates belt degradation.
All-terrain wheels, with their higher clearance, ironically kick up more debris towards the drivetrain. If you run all-terrain tires, you should be checking belt condition and cleaning out debris every other ride, not every other month. The Evolve and ONSRA manuals recommend keeping all-terrain tire pressure between 30–45 PSI, while Meepo suggests 35-45 PSI for most pneumatic tires. Under-inflated tires create more rolling resistance, which makes the belts work harder and heat up faster.
Your Essential Belt Maintenance Toolkit
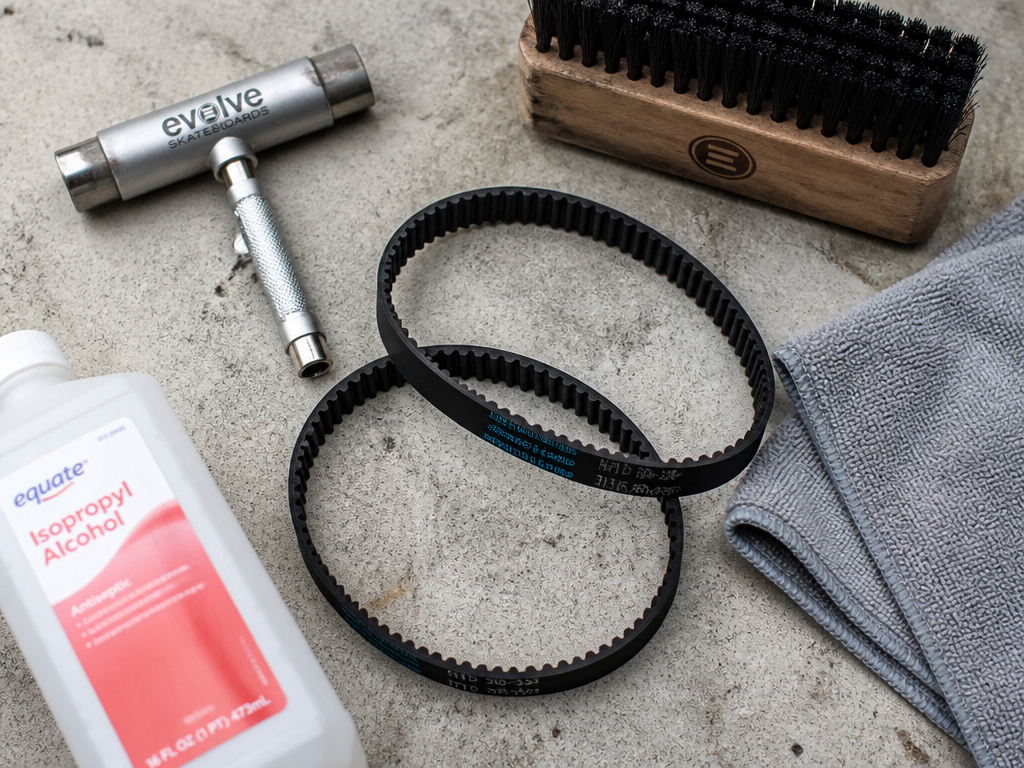
You don’t need a workshop. A small kit that lives in your backpack covers 95% of belt issues.
- Skate Tool: The T-tool style with multiple Allen/hex sizes. This handles wheel nuts, belt cover bolts, and motor bolts.
- Stiff-Bristle Brush: For scrubbing grit from belt teeth.
- Microfiber Rag: For drying and wiping down pulleys.
- Spare Belts (2): Always carry a full set. Don’t buy generic “5M” belts; get the exact length and tooth profile for your board (e.g., 335-5M, 280-5M). Brands like OMW Boards provide detailed charts matching belt size to specific wheel and pulley combinations.
- Small Container of Isopropyl Alcohol: Helps dissolve sticky grime without damaging rubber.
This basic skate tool kit is your first line of defense. The ten minutes it takes to do a visual check and brush out debris can add months to your belt’s life. It’s the difference between a planned, calm replacement and a stranded, frustrated walk home.
Diagnosing Frequent Belt Breakage
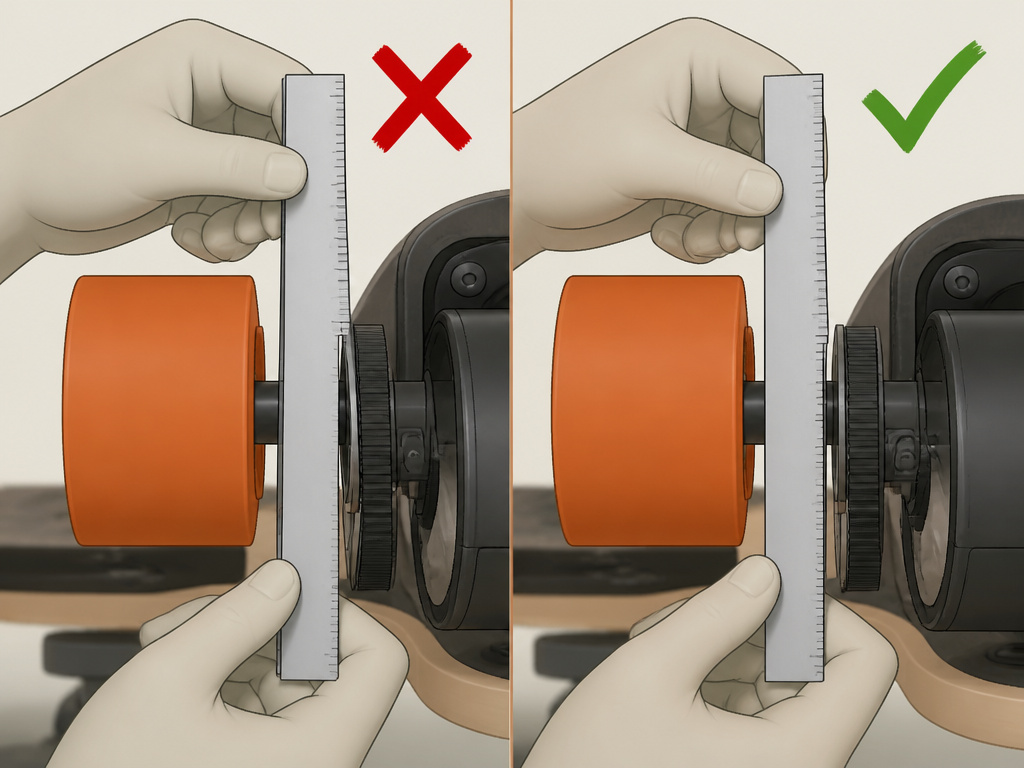
If you’re replacing belts every few weeks, tension is usually the culprit, but not always. Here’s a quick diagnostic tree:
- Are you following your brand’s tension spec? Re-check using the procedure above. Guessing “by feel” is notoriously inaccurate.
- Are the pulleys aligned? Place a straightedge against the side of both pulleys. They should be perfectly parallel. If not, your motor mount may be bent or installed incorrectly.
- Are you using the correct belt? A belt that’s even 5mm too short will be under extreme tension even with the motor slid all the way back. Consult your board’s manual or, for brands like Linnpower or OMW, their online gear ratio guides.
- Is the belt rubbing the cover? A misaligned or warped belt cover can create friction points that generate heat and weaken the belt.
A belt drive skateboard is reliable, but it’s a mechanical system. It communicates problems through sound, feel, and performance. Learning that language, the click of a loose belt, the whine of a tight one, the soggy acceleration of a debris-clogged drivetrain, turns maintenance from a chore into a quick, satisfying fix.
Frequently Asked Questions
How long do electric skateboard belts last?
There’s no single mileage figure. With proper tension, clean riding conditions, and regular checks, a belt can last a long time on pavement. Riding in wet, gritty, or off-road conditions can significantly reduce belt lifespan. Inspect visually every few weeks, not just by mileage.
Can I ride my electric skateboard in the rain?
You can, but it requires immediate and thorough post-ride cleaning to prevent accelerated belt and bearing wear. Water itself is less harmful than the grit it deposits in the drivetrain. For most riders, avoiding wet roads is the simpler waterproofing strategy.
What’s the difference between belt drive and hub motor maintenance?
Belt drive systems require this regular hands-on attention to tension and cleaning. Hub motors are sealed and require virtually no maintenance until the polyurethane sleeve wears out, at which point replacement is more complex. Belt drives offer more torque and easier tire changes; hubs offer a simpler, quieter experience.
How do I find the right replacement belt for my board?
First, check your user manual. If it’s lost, look for a belt size code printed on the belt itself (e.g., 335-5M). The number is the length in mm; “5M” is the 5mm tooth pitch. Brands like OMW and Linnpower publish detailed charts online matching board models, wheel sizes, and pulleys to exact belt lengths.
Does belt maintenance affect my battery life?
Indirectly, yes. A belt that’s too tight creates extra drag on the motor, forcing it to draw more current for the same speed. This can reduce your per-charge range by a noticeable margin. Correct tension is part of extending battery life.
The Bottom Line
Belt maintenance is less about advanced mechanics and more about consistent, simple habits. Check tension with a measured push, not a guess. Clean out grit before it becomes grinding paste. And replace belts at the first sign of cracking or missing teeth, not after they snap.
Keep a pair of spare belts and a skate tool in your bag. The confidence that comes from knowing you can handle a roadside fix changes how you ride. You’ll push a little further, explore a little more.
Finally, match your care to your riding. A weekly pavement commuter needs a different schedule than a weekend trail rider. Let the condition of your belt, not the calendar, tell you when it’s time for a brush-down or a change. That’s how you keep the drive smooth for the long run.
