
How to Coleman Slide on a Longboard: Step-by-Step Guide
This post contains affiliate links. As an Amazon Associate, we earn from qualifying purchases.
To do a Coleman slide on a longboard, you need moderate speed, a setup carve, a low “box” stance with weight forward, and a powerful swing of your shoulders and free arm to initiate the slide. The board follows your upper body rotation, not a push from your feet, and you bring it back by reversing the shoulder swing. This 180-degree heelside slide, invented by Cliff Coleman, is a fundamental skill for speed control.
That sequence, speed, carve, crouch, swing, is the mechanical blueprint. But the Coleman slide isn’t a checklist you tick off. Learning how to Coleman slide on a longboard is a physical negotiation between your body’s momentum and the board’s grip, and the point where that grip breaks is where most beginners either freeze up or overcommit.
What follows is the breakdown of each phase, the gear that matters, and the specific tweaks for when the slide won’t start or won’t stop, all centered on the core question of how to coleman slide on a longboard. We’ll also tackle the single biggest point of confusion: whether you should grab the board’s rail.
Key Takeaways
- Approach with a moderate or significant amount of speed; a Coleman slide kills a lot of momentum, and going too slow is the top reason beginners can’t complete the pendulum swing back. Sources disagree on the exact feeling, with Downhill254 recommending moderate/significant speed and Lush Longboards suggesting ‘faster than you feel comfortable.’
- Initiate the slide with an aggressive shoulder and arm rotation, not by pushing the board out with your feet, which leads to inconsistent and often uncontrolled slides.
- Sources disagree on weight distribution: Downhill254 and Titus advise keeping weight on the front foot/leg, while Lush Longboards recommends keeping your weight centered.
- Learn the slide without grabbing the rail first. While grabbing can feel safer, it makes initiating the slide and steering out of it much harder because you lose the counterbalance of your free arm.
- Practice a full shutdown to a stop before trying to pendulum back; this builds the muscle memory for the hand placement and weight shift without the pressure of recovering.
What Is a Coleman Slide?
A Coleman slide is a 180-degree heelside braking slide, also known as a shutdown or heelside pendulum slide. It was developed by the legendary skater Cliff Coleman in the 1970s.
The Coleman slide is more of a turn initiated by the swinging of your shoulders and arms, rather than a slide where you push the board out. You CAN push the board out with your feet, but this usually results in an inconsistent and uncontrollable slide. . Downhill254
LongboardsUSA considers it one of the best slides for beginner longboarders. Cliff Coleman himself said, “If you can crouch down and ride a skateboard, then you can learn this slide.” Its purpose is straightforward: control. On a downhill run, it’s your emergency brake and your primary tool for managing speed without burning up your shoes footbraking.
Prerequisites: Skills You Need First
Before you point your board down a hill and try to swing it sideways, you need a stable foundation. Trying a Coleman without these skills is how people get hurt.
You must be able to:
- Carve comfortably: Linking turns across the width of a road builds the board feel you need. A Coleman starts with a carve.
- Perform a setup carve (precarve): This is a specific, deliberate carve in the opposite direction of your intended slide. It “winds up” your body and helps break the wheels’ traction. If you can’t do it, you’ll have a lot of trouble initiating the slide.
- Stop reliably: At minimum, you need a solid foot brake. Even better is knowing a push-up (or shutdown) slide. The point is, if the Coleman goes wrong, you need a safe, automatic way to stop. Fear of speed kills confidence.
- Get low and stable: The “box” position, crouched with knees bent, back straight, weight centered, is the launchpad for all heelside slides. If you can’t hold this comfortably while rolling, you’ll struggle.
If any of these sound shaky, spend another session or two there. Rushing this is how a friend of mine dislocated a shoulder and was off the board for three months.
Gear and Setup for Learning
You don’t need a top-tier race board, but your setup makes a difference. Here’s what to look for and what to avoid.
Essential Gear:
- Slide Gloves: You must have these. You need gloves with hard, low-friction pucks on the palms. Your hand will be sliding on pavement. Making your own is an option, but a basic pair from a brand like Landyachtz is a reliable starting point.
- Helmet: This is also mandatory. See the Instructables commenter’s all-caps advice: “WEAR——–YOUR———EFFFING———–HELMET.”
- Longboard: Any stable deck works.
Board Setup Tips:
- Trucks: Keep them “pretty loose, but not super duper loose.” Loose trucks make initiating the carve and slide easier, but too loose can feel twitchy and unstable.
- Wheels: Harder wheels slide more predictably than soft, grippy cruising wheels.
- Bearings: Be prepared to possibly wreck them, especially if learning on wet pavement. It’s a trade-off for easier sliding.
Where to Practice:
An empty parking lot with a gentle slope is ideal. You need space to push up speed and room to slide out. Many riders suggest a wet or damp day for your first tries, because the lower traction helps the board slide out. Just know it’s harder on your bearings.
The Coleman Slide Step-by-Step
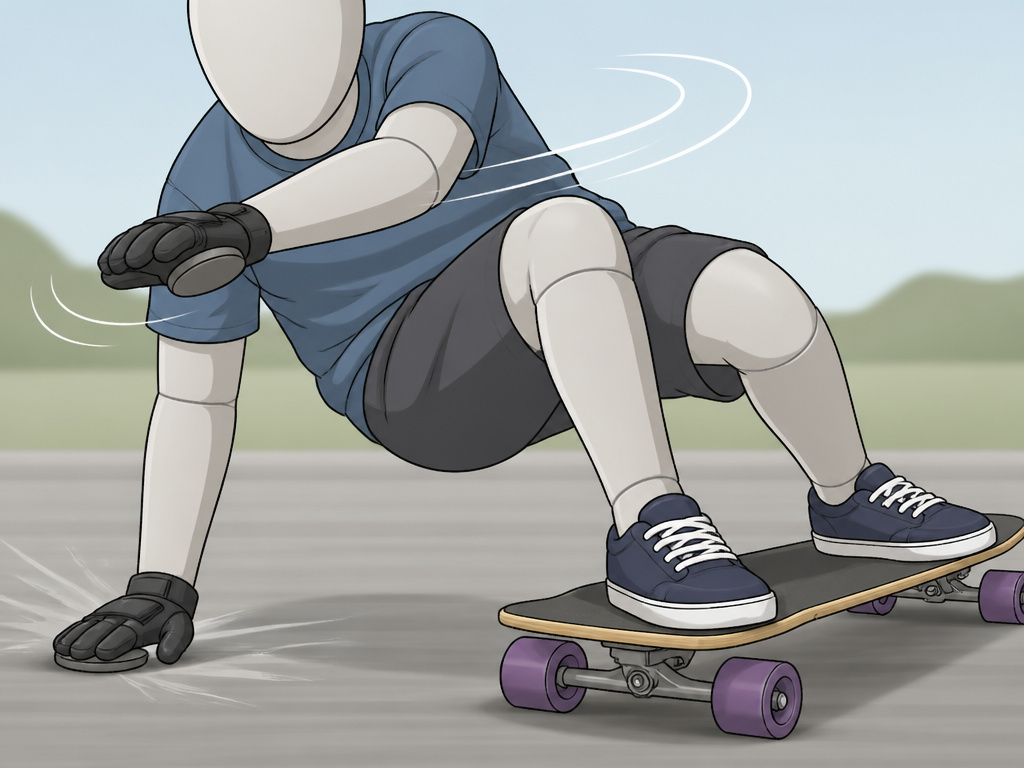
This is the core sequence. Read it, then watch yourself do it in your head a few times before you roll.
Step 1: Generate Speed and Setup Carve
You need momentum. Lush Longboards suggests approaching the slide faster than you feel comfortable. As you approach your slide zone, initiate a setup carve. If you’re a regular-foot rider planning a heelside slide (board swings to your left), first carve slightly to the right. This winds your body up like a spring.
Step 2: Get into the “Box” Position
As you come out of the setup carve, crouch low. Bend your knees deeply, keep your back relatively straight, and center your weight. This is a low, crouched stance. Your back foot should roll onto its side. The critical point here is keeping your weight forward, over your front truck. Don’t back away from the slide.
Step 3: Plant Your Hand and Initiate the Rotation
Place your gloved hand down on the pavement. According to a detailed community tip, your hand should be no farther than 18 inches from the board. Now, the initiation. Don’t push the board. Instead, powerfully swing your free arm and shoulders across your body.
Cliff Coleman tells his pupils to punch an imaginary parrot sat on their front shoulder. . Lush Longboards
The further you swing that arm, the more the board will come around. This shoulder-driven rotation is what cleanly breaks the wheels’ traction.
Step 4: Hold and Control the Slide
You’re now sliding sideways. Keep looking where you are going – not where the board is pointed. To slow down faster, hold the board more sideways. To style it out, let the rotation continue until you’re fully backwards.
Step 5: Bring the Board Back (The Pendulum)
To recover, reverse the motion. Swing your free arm and shoulders back in the direction of travel. Your body will come back over the board, and the wheels will regain grip. If you can’t swing back, you likely didn’t have enough speed to begin with.
| Phase | Key Action | Common Mistake |
|---|---|---|
| Setup | Carve opposite direction | Skipping it or making it too shallow |
| Initiation | Swing arm/shoulders hard | Pushing board with back foot |
| Slide | Look over back shoulder | Looking down at board |
| Recovery | Swing arm/shoulders back | Too little speed to complete rotation |
Before you start: Wear your helmet and slide gloves. Check your practice area for gravel, debris, or traffic.
To Grab the Rail or Not? The Big Debate

This is the most divided piece of Coleman slide advice. Here’s the breakdown so you can choose.
The Standard Advice (Lush Longboards, Downhill254): Don’t Grab.
Most instructional sources strongly recommend learning without grabbing the board’s rail (edge). Why? Grabbing rail feels easier and safer initially, but it actually makes the slide harder to initiate and bring back. It also kills your control mid-slide because you can’t use your free arm to steer or counter-balance.
The Community Reality: Many Beginners Grab.
The same sources admit that “a lot of beginners learn this slide by grabbing rail.”
The Verdict and the Exception:
Learn it the right way first, without the grab. It teaches better body mechanics and control from day one. However, there’s one clear exception: very high speeds. As Lush Longboards notes, if you’re going fast enough to warrant a full-face helmet and leathers, grabbing the rail can help keep the board firmly under you.
Troubleshooting Common Coleman Slide Fails
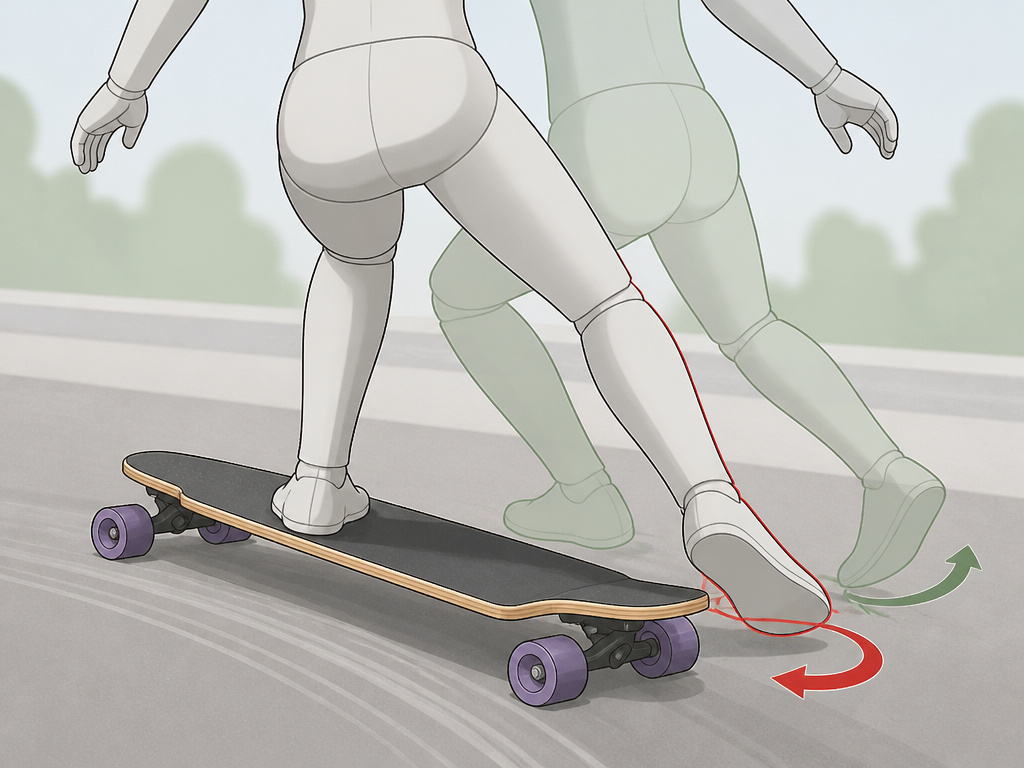
Your board isn’t sliding? You’re washing out? Here’s what’s likely happening and how to fix it.
Problem: The board won’t break traction (grip-up).
- Cause: Insufficient speed, weak shoulder rotation, or weight too far back.
- Fix: Go faster. Be more aggressive with your shoulder swing. Consciously shift more weight onto your front foot. Remember the “punch the parrot” visual.
Problem: The board kicks out violently and you fall (highside).
- Cause: You’re pushing the board out with your back foot instead of steering it with your shoulders. This creates a sudden, unweighted break in traction.
- Fix: Focus on the upper body. Initiate the slide by swinging your arm across your body, not by kicking your back leg. An Instructables commenter stresses: “An OFFICIAL Coleman slide is NOT a sharp slide. You have to SLIDE into it, not THROW your back foot into it.”
Problem: You can’t swing the board back to complete the pendulum.
- Cause: Almost always insufficient speed. The Coleman kills a huge amount of momentum.
- Fix: Practice doing a full shutdown slide to a complete stop first. Once you’re comfortable with that, add more speed. You need “quite a bit” to have enough momentum left to recover.
Problem: You keep dragging your back knee or sitting down.
- Cause: Weight is too far back, or you’re collapsing into the slide instead of staying active in your stance.
- Fix: Keep your weight centered or forward. Stay in your knees, don’t let your butt drop toward the ground. Think about extending your body away from the board slightly to de-weight it.
Progression: What to Learn Before and After the Coleman

The Coleman doesn’t exist in a vacuum. It fits into a logical skill ladder.
Before the Coleman:
- Confident pushing, carving, and foot braking.
- Push-up (or shutdown) slides. It’s the perfect lead-in to the Coleman, teaching you hand placement and the feeling of the board sliding.
After the Coleman:
- Coleman 180s: Making your pendulum slide a full 180-degree rotation and riding away switch.
- Stand-up heelside slides: Taking your hands off the ground for a stand-up slide.
- Toeside slides: Learning the other side of the board, which is often trickier for beginners.
- Linking slides for freeride: Using consecutive slides to control speed on a technical hill.
Mastering the Coleman opens the door to downhill longboarding where precise speed control is everything. It’s the foundational brake that makes faster riding safe.
Practice Drills Off the Board
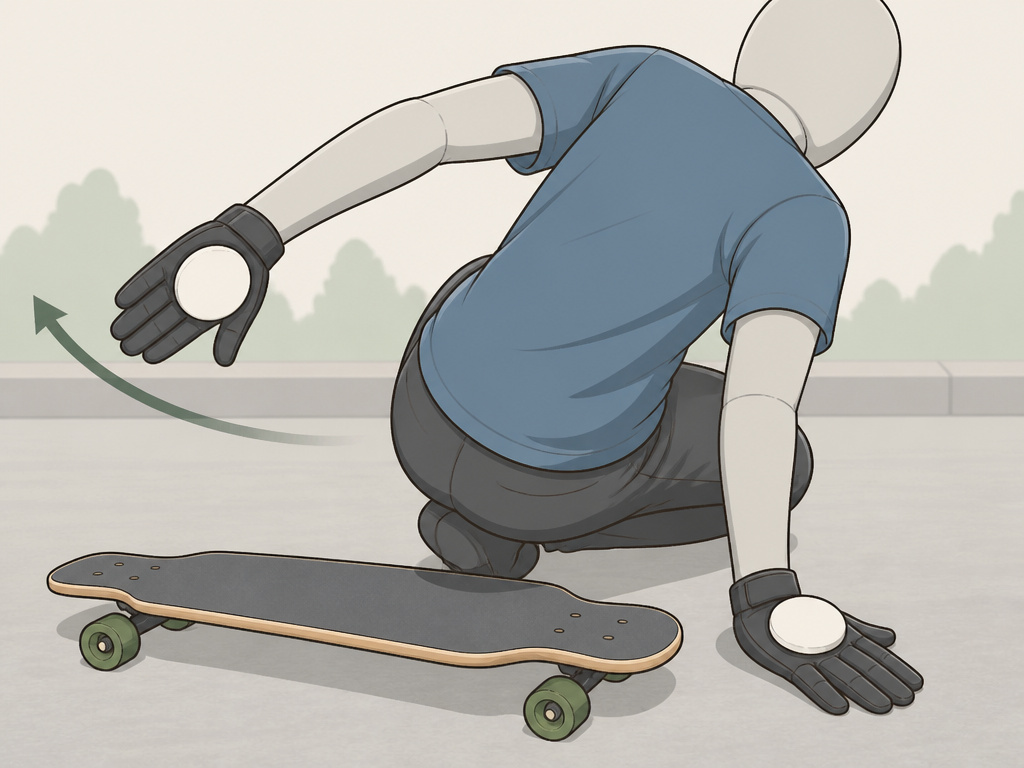
You can build the muscle memory without rolling. This is especially useful for the initiation sequence.
- The Carve and Crouch: On flat ground, mimic the setup carve and drop into the “box” position. Hold it. Feel where your weight is.
- The Shoulder Swing: In your box stance, practice the powerful arm swing across your body. Exaggerate it. Feel how your hips want to follow.
- The Hand Placement: With gloves on, practice placing your hand down beside an imaginary board. Work on keeping your torso up and your head looking forward, not down.
These drills solidify the movements so when you add speed, your body already knows the shapes.
Do you need to be flexible to do a Coleman slide?
You don’t need to be a gymnast, but a basic level of mobility helps. The core movement involves a deep crouch, bending your knees low, and reaching a gloved hand down to the pavement. Your free arm swings across your body to initiate the turn, so comfortable shoulder rotation is useful. The legendary Cliff Coleman himself said, ‘If you can crouch down and ride a skateboard, then you can learn this slide.’ The key is keeping your posture relaxed and staying low in your knees until you have control over the board. Focus on a smooth, controlled motion rather than forcing your body into an extreme position.
Frequently Asked Questions
Is the Coleman slide the easiest longboard slide?
LongboardsUSA considers it one of the best slides for beginner longboarders.
How fast do I need to go?
Faster than you think. Downhill254 recommends a moderate or significant amount of speed. Too-slow attempts simply won’t have the momentum to complete the slide.
Why do I keep falling toward my back when I try it?
This is often a weight distribution error. You’re likely leaning back or “sitting” into the slide, putting your weight over your back foot. This makes the board grip instead of slide, and your body continues moving without it. Focus on keeping your chest up and your weight centered or over your front truck.
Can I learn this on a skateboard?
The core mechanics are identical.
How long does it take to learn?
The key is consistent, focused practice on how to coleman slide on a longboard, not just cruising around hoping it happens.
The Bottom Line
The Coleman slide is your first real tool for controlled aggression on a longboard. It turns fear of speed into managed power. Start by mastering the push-up slide to build confidence. Then, find a gentle slope, gear up, and commit to the shoulder swing, not the foot push.
A critical rule: if you can’t reliably stop on a longboard with a foot brake or push-up slide, go back and practice that first. Every piece of sliding advice assumes you have a safe “off” switch already wired in. Everything else, including the stylish recovery, comes from that one moment of letting the board go sideways.
