
How to Learn Transition Skating: The Two Worlds Explained
This post contains affiliate links. As an Amazon Associate, we earn from qualifying purchases.
Learning transition skating starts by knowing which of two completely different sports you’re asking about. For skateboarding, ‘transition’ means riding curved surfaces like quarterpipes and bowls, where pumping and dropping in are the core skills. For inline, roller, or ice skating, ‘transition’ means changing your direction of travel from forward to backward or vice versa, using pivots like the mohawk. Your first move is to pick your sport, then follow its specific progression from the smallest, gentlest slope available.
That definition split marks the line between learning to pump on a mini ramp and learning to pivot on a flat parking lot. Get it wrong and you’re following advice for a world you’re not in, which is why understanding how to learn transition skating is crucial.
What follows is a split-screen guide. We’ll walk through the skateboard path: pumping, dropping in, and carving bowls. The guide then explains the inline or roller path, including forward-to-backward pivots, the mohawk, and hockey-specific turns. Each section is built from primary instructional manuals and medical safety guidelines, because the fundamentals here are also the safest way to learn how to learn transition skating.
Key Takeaways
- Clarify your sport first: “Transition” means ramps in skateboarding, but direction changes in inline/roller/ice skating.
- Start on the smallest slope. For skateboards, find a mellow bank or tiny quarterpipe. For inline transitions, the Get Rolling guide says you need a slight downhill to practice the backward-to-forward move.
- Lean forward to drop in. The SkateLabs guide calls leaning back the number one mistake; commit your weight over the front foot toward the ramp.
- Inspect your gear every session. The POSNA statement says to look for loose, broken, or cracked parts before you start, a critical step most skip.
- Learn to fall before you fly. Medical guidelines say to crouch down, land on fleshy parts, and roll, stiffening up guarantees a harder impact.
The First Step: Understanding Which “Transition” You’re Learning
You can’t follow a map for the wrong city. The word “transition” points to two different skill sets depending on your wheels.
Skateboard transition, per the SkateLabs guide, is any skating on curved surfaces: quarterpipes, mini ramps, halfpipes and bowls. Your goal is to ride the walls, use gravity, and stay on top of the board. The primary skills are pumping for speed, dropping in from the deck, and carving around a bowl. It’s a vertical conversation with the ramp.
Inline, roller, or ice skating transition, as defined by sources like Get Rolling and Competitive Edge Power, is the ability to change direction (forwards to backwards OR backwards to forwards). Your goal is to pivot smoothly while rolling, often to maintain momentum or react in a game. The primary skills are specific footwork patterns like the heel-lift pivot or the mohawk.
Where this goes sideways: Mixing the advice. Trying to “drop in” on inline skates using skateboard form will send you over the front wheels. Trying to do a “mohawk” on a skateboard in the middle of a quarterpipe is a fast track to catching a wheel and slamming.
Your entire learning plan branches here, which is the core of how to learn transition skating. The next sections are divided by sport, so you can follow the one that matches your equipment.
Skateboard Transition: Pumps, Drops, and Carves
This path is about building a relationship with a curved wall. It starts with the most fundamental skill: generating speed without pushing.
Pumping: How to Gain Speed on a Ramp
Pumping is how you gain speed on transition without pushing. It feels unnatural at first, a push-and-relax rhythm timed with the ramp’s curve.
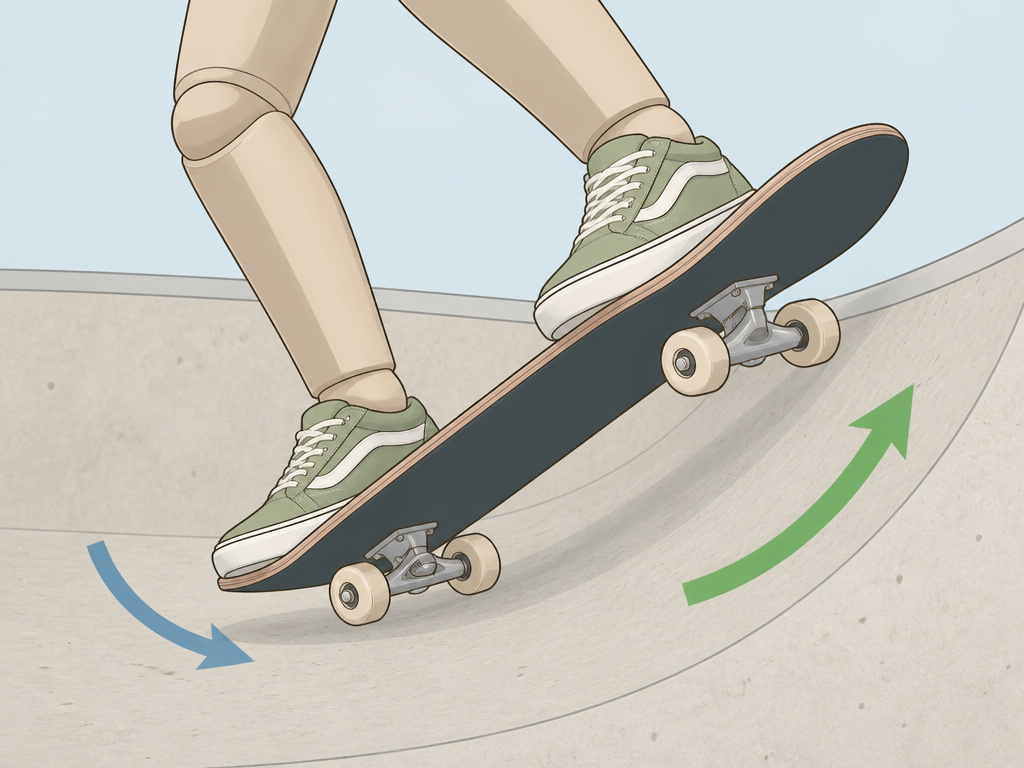
The SkateLabs guide breaks it down: As you go down a wall, you push down into the board, like you’re standing up hard. As you go up a wall, you relax and let your knees bend. That compression and extension adds a little speed each time. Start on a mini ramp, rolling from one side to the other. You’ll know it’s working when you go a little higher on each wall without any foot pushes. The sound of your wheels gripping the transition on the down-push is a quiet, steady buzz, if you hear a skid, you’re leaning too far sideways.
Dropping In: The Scary First Time
Dropping in is the rite of passage. It’s going from the deck at the top of a ramp into the transition. The fear is real, and your body will scream at you to lean away from the drop. That scream is the problem.
The SkateLabs progression is essential: Start dropping in on the smallest ramp you can, like a little quarterpipe or a low mini ramp. The steps are simple but precise:
- Place your tail on the coping, back wheels hanging over the edge.
- Hold the tail down with your back foot.
- Place your front foot on the front bolts.
- Lean forward. Push your weight onto your front foot, over the nose, toward the ramp.
- Let the front wheels touch and ride down.
Common mistake: Leaning back. When you’re scared, your body wants to lean away from the drop. If you do, the board shoots out in front and you fall backward onto the deck. The cure is a mental commitment: you must fall into the ramp, not away from it.
I learned this on a quarterpipe so small it was almost a bank. I still leaned back on my first try. The board shot forward, I landed on my hip, and the lesson cost me a week of soreness. The next session, I committed to falling forward if I had to fall at all. The front wheels touched, and I rolled away. The difference wasn’t courage; it was accepting where the weight needed to be.
Carving Bowls and Finding Lines
Once you can pump and drop in, bowls open up. A bowl is a continuous loop of curved walls. The skill here is carving, making long, smooth turns to maintain speed and flow.
In a bowl, carving around corners is how you keep moving. Look ahead around the corner, not at the wall right in front of you. Your board goes where you look. Lean into the turn and let the bowl’s curve guide you. Every bowl has natural lines, paths that flow from one wall to the next. Watch other skaters to see them, then try to follow one. The sensation is less like doing tricks and more like driving a go-kart on a banked track, the physics do the work if you trust them.
| Skateboard Transition Skill | The Core Movement | What Happens If You Skip It |
|---|---|---|
| Pumping | Push down as you descend, relax as you ascend. | You’ll stall in the flat bottom every time, unable to reach the coping without pushing. |
| Dropping In | Commit weight forward over the front truck. | You fall backward onto the deck, a shorter but often harder impact than sliding down the transition. |
| Carving | Look ahead and lean into the bowl’s curve. | You’ll hit each corner square, killing your speed and flow, making the bowl feel like a series of dead-ends. |
For more on flowing through larger curved terrain, our guide on how to skate a halfpipe builds directly on these fundamentals.
Inline/Roller Transition: Pivots, Mohawks, and Hockey Turns
This path is about changing your facing direction while maintaining roll. The techniques are precise, and sources disagree on the best first step.
The Forward-to-Backward Pivot (Heel-Lift Method)
Sources disagree on the first transition to learn for inline skating: Get Rolling states the easiest transitions to learn first are forward-to-backward and backward-to-forward, while the Boy Scouts of America requires learning the mohawk first. Their prescribed technique is a specific heel-lift.
Here’s the sequence: Coast forward at a moderate speed and look over your left shoulder into an A-frame turn. In the half second when your weight has transferred to your right skate, lift the left skate’s heel (only!) and shift it quickly into a heel-to-heel position. Pivot on the right toe wheel. Complete the transition by pushing off into a backward swizzle. The move has a distinct, soft click-clack sound as the heel wheels tap together, if you hear a scraping drag, you’re pivoting on the whole foot, not just the toe wheel.
The Mohawk Transition (BSA Requirement)
The Boy Scouts of America merit badge pamphlet has a different starting point. For in-line skating, you are required to perform a mohawk.
Their steps are:
- Skate into a moderate speed.
- Begin a spin stop to the left. As soon as your left heel wheel touches the pavement, shift onto the left skate.
- Pivot on the right toe wheel to make the skates parallel as your hips rotate backward, and begin skating backward.
This disagreement on the “first” transition is a gift. It means there’s no single right answer. The mohawk might feel more natural if you’re comfortable with spin stops. The heel-lift might click faster if you have good one-foot balance. Try both.
Sport-Specific Transitions: Hockey’s “Heels First” and “Toes First”
The Competitive Edge Power hockey guide adds a layer of strategy. Transitions aren’t just skills; they’re tools for specific in-game moments.
Their Forwards to Backwards (Heels First) turn is the ‘go-to’ technique when having to quickly transition to backwards staying with a player breaking up the ice. It’s a sharp, aggressive cut.
The Forwards to Backwards (Toes First) transition is useful in transitioning when skating in the same direction (e.g., skating up the boards, transitioning to protect the ring and escape a player). This is a niche edge case for general fitness skaters, but it shows how deep the technique rabbit hole goes when a sport demands it.
The part nobody mentions: The Get Rolling guide explicitly states that to practice the backward-to-forward transition, you need to find a slight downward slope. No slope, no momentum. This environmental dependency breaks the “just practice anywhere” assumption.
Safety First: Gear That Fits and How to Fall
The techniques above are useless if you’re hurt. Safety in transition skating, both definitions, rests on two pillars: equipment that works and knowing how to hit the ground.
Helmet and Pad Fit Is Non-Negotiable
The SkateLabs guide is blunt: Wear a helmet, and pads are a great idea while you learn (especially knee pads). This isn’t optional decoration. For inline skating, the Boy Scouts of America rules are strict: No street or pavement skating is authorized without helmets.
A helmet must meet a recognized standard like those from the CPSC or Snell Memorial Foundation of the American National Standards Institute (ANSI). Fit is everything:
- It sits low on the forehead.
- The buckle fastens tightly (with room to put only two fingers between the strap and the chin).
- Replace it when damaged, outgrown, or at least every 5 years.
For inline skates, the POSNA advice on boot fit prevents blisters and lost control: Kick both feet into the back of the boots before buckling and skating. Be certain the heel does not move up and down in the boot during skating. A lifting heel feels like a subtle shuffle; it’s actually your foot fighting for control on every push.
The Art of the Safe Fall
Learning how to fall is a skill as deliberate as pumping or pivoting. The POSNA statement outlines the physics:
- If you are losing your balance, crouch down so you will not have so far to fall.
- Try to land on fleshy parts of your body (like your thigh or buttock) rather than wrists or elbows.
- Try to roll as you fall, which prevents your hands, wrists, and arms from absorbing all the force.
- Try to relax, rather than remaining stiff when falling.
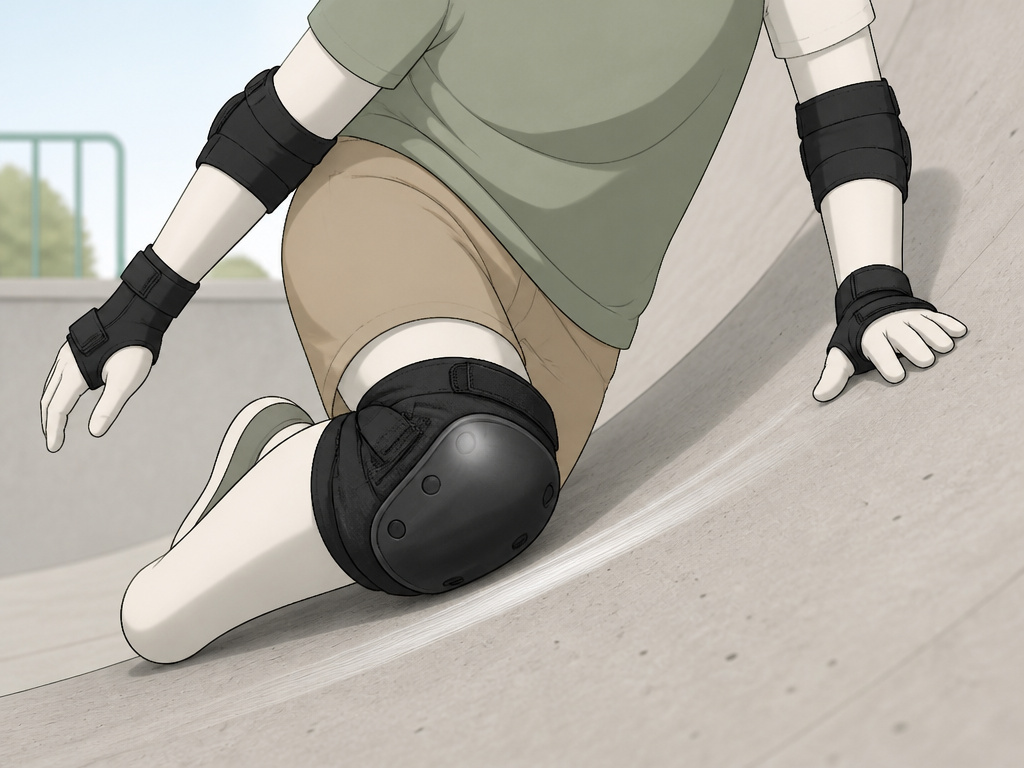
For skateboard transition, SkateLabs adds a ramp-specific technique: Learn to knee slide out of falls on ramps: drop to your knee pads and slide down the transition. This turns a high-impact bail into a controlled, low-friction slide.
Your gear is only as good as its condition. The POSNA rule is to inspect the equipment before every use. Look for problems that need repair: loose, broken, or cracked parts; sharp edges on metal boards; a slippery top surface; wheels with nicks and cracks, or missing hardware. A five-second visual check catches the failure that happens on your fifth push.
For a dedicated drill on managing impacts on ramps, see our guide on how to fall on a mini ramp.
Choosing Your Path and First Session
Now you have the maps. Your job is to pick one and take the absolute first step.
For skateboard transition, that means finding a mellow bank or the smallest quarterpipe at your local park. Don’t even think about the coping. Just ride up and down, feeling the curve. Then try the pumping motion: stand as you go down, soften as you go up. Session that for a week. Your first drop-in attempt should feel like a minor escalation from this, not a leap into the unknown. A well-chosen transition deck with a slightly longer wheelbase can add stability for these early forays.
For inline/roller transition, your first session needs two things: a smooth, open pavement area and, for the backward-to-forward move, a slight downhill slope. Start by practicing the heel-lift foot position stationary. Then, rolling slowly, try the forward-to-backward pivot. If the mohawk from the Boy Scouts skating merit badge pamphlet calls to you, master the spin stop first. The goal isn’t elegance; it’s completing the direction change without stopping your roll.
Frequently Asked Questions
What’s the very first transition trick I should learn on a skateboard?
It’s not a trick. It’s pumping. Before any drop-in, axle stall, or rock to fakie, you must learn to generate and control speed on a curved wall by pumping. Mastery here makes every subsequent trick possible and safer.
I keep leaning back when I try to drop in. How do I stop?
Your brain is protecting you from a perceived cliff. Trick it. Practice on the smallest possible ramp until it feels trivial. Then, physically point your front hand and shoulder down into the transition as you commit. Your body follows where you point. If you still lean back, have a friend stand in the flat bottom and hold your hands as you drop, the external support can override the panic reflex.
Are wrist guards or knee pads more important for beginners?
For inline/roller skating, the POSNA inline skating position statement lists wrist guards, and elbow/knee pads as essential alongside a helmet. Wrist fractures are the most common inline skating injury. For skateboard transition, knee pads take priority because of the recommended knee-slide bail technique. The answer is both, but your sport tilts the scale.
How long does it take to learn to transition from forward to backward on inlines?
With regular practice, the basic heel-lift pivot can start to feel controlled. Smooth, integrated transitions at speed take months. The variable isn’t just practice time; it’s the quality of your one-foot balance. If you can’t comfortably coast on one foot, the transition will always feel shaky. Work on that single-foot glide first.
Can I learn transition skating on a cheap department store skateboard or inline skates?
You can try. But the equipment will fight you. Stiff, unresponsive trucks on a skateboard won’t let you carve or turn smoothly in a bowl. Soft, unsupportive boots on inline skates will flex and rob you of the precise foot control needed for pivots. A low-quality setup can make learning more difficult. Invest in entry-level gear from a skate or sporting goods shop.
Before You Go
One threshold decides your progress: the size of your starting point. Whether it’s a one-foot-high quarterpipe or a gentle parking lot decline, your first terrain must feel almost too easy. The rush to graduate to “real” ramps or faster pivots is how most people stall, or fall hard. The medical guidelines and instructional manuals all point to the same principle: control precedes commitment. So your task for the next session is to find that easy slope and repeat the first fundamental move until it feels boring. Boring is the platform courage is built on.
