
How to Wear Skateboard Pads: Step-by-Step (Without Slips)
This post contains affiliate links. As an Amazon Associate, we earn from qualifying purchases.
To wear skateboard pads correctly, follow a specific sequence: helmet first, then wrist guards, knee pads, and elbow pads last. Each piece must fit snugly, with the hard plastic cap centered directly over the joint it protects, and all straps secured tight enough to prevent sliding but loose enough to avoid cutting off circulation. Skipping this order or a loose fit means the pad shifts on impact, turning a simple fall into a bad scrape or break.
That sequence isn’t just about tradition. It’s a functional rule born from how the gear interacts. Wrist guards go on before knee pads because their long straps wrap around your forearm, and trying to fit a knee pad strap over a bulky wrist guard never works right. The helmet comes first because adjusting its chin strap with bulky pads on your elbows and wrists is a clumsy, frustrating fight you’ll skip, and a loose helmet is worse than none at all.
What follows is the breakdown of each step, the common mistakes that ruin the protection, the manufacturer specs that decide whether a pad is actually rated for the skating you do, and the core principles of how to wear skateboard pads. By the end, you’ll know how to gear up in under a minute and spot when a pad has aged out of its job.
Key Takeaways
- Secure your helmet first, a loose helmet flies off on impact, leaving your head unprotected. The CPSC states it should fit level and snug with the chin strap fastened.
- Center the hard cap over the joint for knee and elbow pads. If the plastic isn’t directly covering your kneecap or elbow bone, the pad will slide on impact and you’ll take the full force on skin.
- Wrist guards go on before knee pads. Their design wraps around your forearm, and a knee pad strap won’t fit cleanly over them.
- Inspect pads before each session for cracks, dents, or worn straps. The InSportline manual says damage from a previous fall can reduce protection the next time.
- Match the pad’s certification level to your skating. TSG states its pads can be certified to Level 2 for acrobatic roller sports, while Roces states its Level 1 pads are not suitable for acrobatic or high-speed skateboarding.
The Gear You Actually Need (And What “Skateboard Pads” Means)
Skateboard pads aren’t the soft, cloth-covered ones you see in volleyball. They have a hard plastic or composite shell, called a cap, over a foam liner. That cap is designed to slide on concrete, dispersing the impact force so your knee or elbow doesn’t. Wrist guards include a splint to keep your hand from bending too far back. A skate helmet has a hard, smooth outer shell and a dense foam interior that crushes on impact to absorb energy; it’s different from a bike helmet, which is ventilated and meant for a single high-speed crash.
The full set is four pieces: helmet, wrist guards, knee pads, elbow pads, and knowing how to wear skateboard pads correctly makes them work as a system. The CPSC is clear: wear them all. Their skateboarding safety fact sheet calls out wrist guards as especially important for reducing fractures, and knee and elbow pads for general protection. For beginners, I consider wrist guards and a helmet essential. An elbow scrape heals; a broken wrist or head injury doesn’t.
Before you start: Pads are not force fields. The TSG manual states their protector pads are not intended to provide protection in a serious fall at speeds over 13km/h. The Roces manual says its pads are for normal roller sports, not acrobatic or high-speed skateboarding. Pads reduce injury severity; they don’t make you invincible.
The 5-Step Sequence That Keeps Gear Secure
Putting gear on in the right order saves time and prevents a bad fit. This is the opposite of what I did for my first year. I’d wrestle with knee pads, then realize I couldn’t get my wrist guard strap tight. Follow this sequence every time.
- Helmet. Buckle the chin strap first. The CPSC says the helmet should be level with the head, not tilted back. The helmet should fit snugly. A helmet that is not snug is too loose.
- Wrist Guards. Identify the left and right, most have an “L” or “R” marking inside, as the InSportline manual notes. Slide your hand in, thumb through the hole, and secure the straps starting from the one nearest your palm. The plastic splint should sit flat against the inside of your wrist.
- Knee Pads. Open the straps, center the hard cap directly over your kneecap, then wrap the top strap around your thigh first. This stops the pad from sliding down. Then secure the bottom strap. The pad should not rotate around your leg.
- Elbow Pads. Like knee pads, center the cap over the point of your elbow. Secure the top strap around your bicep first, then the lower strap around your forearm. If the pad slips when you bend your arm, the straps are too loose.
- Final Check. Stand up and move. Make a pushing motion, bend your knees, rotate your arms. Nothing should slide or pinch. If a strap digs in, loosen it one notch. If the pad rotates, tighten it.
Technical Snippet: According to European standard EN 14120, protectors are certified for specific user body mass ranges: Range A (up to 25 kg), Range B (25–50 kg), and Range C (over 50 kg). Performance is also graded: Level 1 for normal roller sports, Level 2 for acrobatic roller sports. Always match the pad’s certified range and level to the skater’s weight and intended activity.
How to Put On and Secure Each Piece (Without Guesswork)
A generic “make it snug” instruction fails. Here’s exactly what to do for each piece, and what happens if you skip the detail.
Your Helmet: The Two-Finger Rule
A skate helmet should sit level on your head, with the front edge about two finger-widths above your eyebrows. Fasten the chin strap so it is snug. Any looser, and it can come off on impact. Any tighter, and it’s uncomfortable enough that you’ll unbuckle it the moment no one’s looking, which defeats the whole point. The CPSC emphasizes a helmet designed for skateboarding, a hard shell with a foam interior. That multi-impact design is what you need for the repeated, lower-speed falls common in skating.
Wrist Guards: Splint Position Is Everything
The most common mistake is putting them on backwards. The rigid plastic splint belongs on the inside of your wrist, running from your palm down your forearm. This prevents your hand from bending back too far during a fall. Once your thumb is through the hole, pull the longer strap snug across the back of your hand and around your forearm. The guard should feel tight but not cut off blood flow to your fingers. The guard should feel tight but not cut off blood flow.
Where this goes sideways: Wearing wrist guards with the splint on the outside of your wrist. On impact, your hand folds the wrong way, and the rigid plastic can act as a lever, potentially spraining your wrist instead of protecting it.
Knee Pads: The Thigh Strap Is Your Anchor
The top strap, the one around your thigh, does most of the work. If you only tighten the lower calf strap, the pad will slide down your leg the first time you bend your knee. Center the cap, pull the top strap firm, then do the same with the bottom strap. The pad should not slide when you walk or squat. For a more detailed fit guide, our article on how to size knee pads walks through measuring for different brands.
Elbow Pads: Watch for Arm Hair
Elbow pads are the easiest to put on wrong. The cap must sit directly on the point of your elbow. If it is off-center, the pad may not protect properly. Secure the top strap first, then the bottom. A frequent annoyance: the Velcro on the straps catching and pulling arm hair. It’s a small thing, but that sting is enough to make people wear them loose. Look for pads with a soft fabric lining over the strap ends.
| Pad Type | Critical Fit Check | Consequence If Wrong | Timeline to Failure |
|---|---|---|---|
| Helmet | Two-finger chin strap tightness | Comes off on impact | Immediate on first fall |
| Wrist Guard | Splint on palm-side of wrist | Increases sprain risk | Immediate on first fall |
| Knee Pad | Top thigh strap tighter than calf strap | Slides down on knee bend | Within 1-2 pushes |
| Elbow Pad | Hard cap centered on elbow point | Elbow hits cap edge | Immediate on first fall |
Common Fit Mistakes That Defeat the Point

You can have the best gear and still get hurt if the fit is off. These are the errors I see every week at the park.
Pads Over or Under Clothing?
This changes the fit. Pads worn over baggy pants or a hoodie will slide more. The strap has to grip loose fabric, not your limb. Worn directly against skin or tight-fitting clothing, they stay put better. The trade-off is sweat and comfort. For street skating, I wear them under my skate pants. For the park, I usually wear them over knee-length shorts. Just know that if you choose “over,” you need to cinch the straps down tighter.
Buying Pads That Are Too Big
It’s tempting to buy a size up for growth room or comfort. A pad that’s too large cannot center its cap over your joint. The protection floats around your limb, and on impact, it slides out of the way. Use the manufacturer’s sizing chart, like the body mass ranges in the TSG manual (Range A: ≤25kg, Range B: 25-50kg, Range C: >50kg), not your age or a guess. Our guide on how to choose pads explains how to read these charts.
Ignoring the “L” and “R” Markings
Wrist guards and many knee/elbow pads are asymmetrical. The InSportline manual explicitly says the guard for the left wrist is marked “left.” Putting a right guard on your left wrist twists the splint and straps into awkward, ineffective positions. It might feel okay standing still, but it won’t work in a fall.
Not Checking for Damage After a Slam
You take a hard knee slide, get up, and keep skating. At home, you toss your pads in a bag. The InSportline manual warns that safeguards must be examined for damage after any fall. A cracked shell or stretched strap won’t protect you next time. The Roces manual is stricter: if the shell has a dent, crack, or discoloration, replace the protector immediately.
Are Your Pads Actually Rated for Skateboarding?

Not all protective gear is the same. A certification label tells you what the pad is designed to handle. This is the most overlooked part of buying gear.
The European standard EN 14120 defines two performance levels:
- Level 1: For normal roller sports.
- Level 2: For acrobatic roller sports (like aggressive inline or vert skateboarding).
Here’s where sources disagree openly. The Roces manual states its pads are suitable for Level 1 and are not suitable for acrobatic, high-speed roller sports or skateboarding, while the CPSC, InSportline, and TSG list skateboarding as a suitable activity. Meanwhile, the TSG manual says its pads can conform to either Level 1 or Level 2, and explicitly lists skateboarding as an intended use. The CPSC and InSportline also list skateboarding as a suitable activity. This isn’t a minor detail, it’s a fundamental disagreement on what “skateboarding” means to a pad standard.
| Brand / Source | Certification Claim | Suitable for Skateboarding? | Speed/Impact Limitation |
|---|---|---|---|
| Roces | EN 14120, Level 1 | No (explicitly states not suitable) | For “normal roller sports” only |
| TSG | EN 14120, Level 1 or 2 | Yes (listed as an example activity) | Not for serious falls >13 km/h |
| InSportline | ČSN EN 14120, Category 1 | Yes (lists skateboards as suitable) | Not for serious falls at “higher speed” |
| CPSC | N/A (Government Guideline) | Yes (context of entire fact sheet) | No specific speed qualification |
Expert Tip: If you’re skating bowls, vert, or attempting high-speed downhill, you need pads certified to Level 2. For street skating and learning basics on flat ground, some sources consider a Level 1 pad appropriate, while Roces states its Level 1 pads are not suitable for skateboarding.
Pads for Kids vs. Adults: The Fit Adjustments That Matter
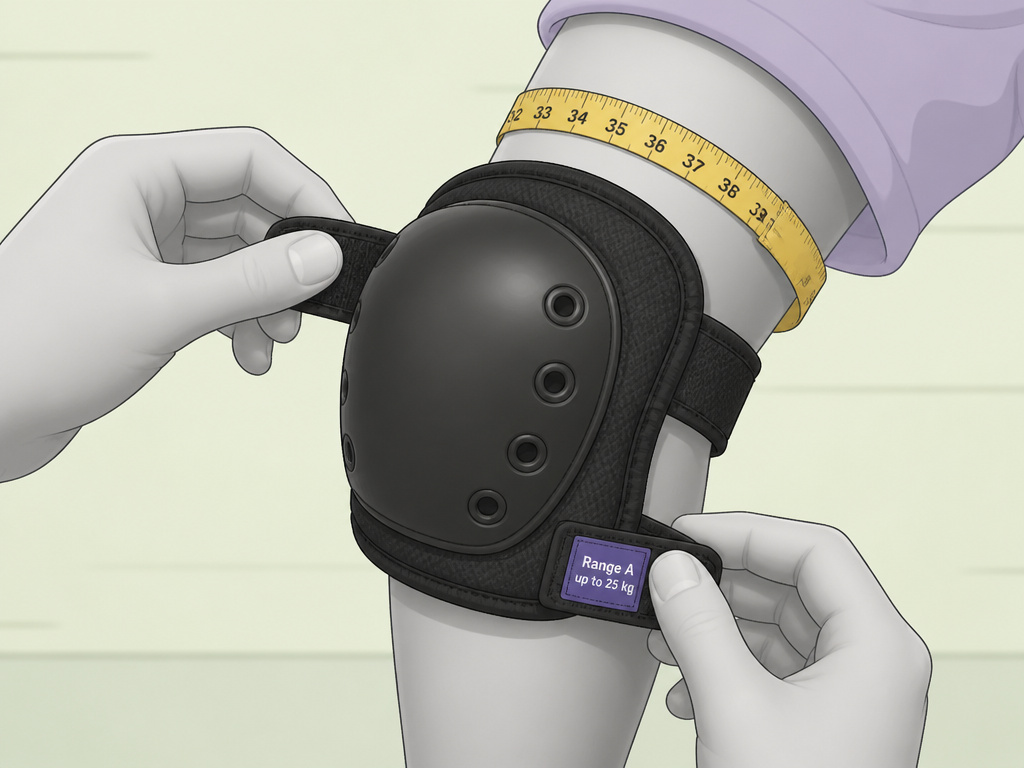
Kids’ pads aren’t just smaller adult pads. Their proportions are different, and they grow fast. The main thing is the strap system.
Kids’ limbs are narrower relative to the joint. A knee pad might have the right circumference for their thigh, but the hard cap could be too large for their kneecap. Look for youth-specific models where the cap size is scaled down. The TSG manual’s Range A (for users up to 25 kg) is designed for this. Always use the weight range, not age.
Check the fit every month. A pad that fit perfectly in spring might be dangerously tight by fall, cutting off circulation. The opposite is also true: a pad that’s become too loose is useless. This is why buying for “growth room” is a bad idea with safety gear. It’s better to buy a properly fitting, affordable set now and replace it in six months than to buy one oversized set that never works right. For a full list of options, see our roundup of the best skateboard pads for different ages and skill levels.
Maintenance, Storage, and When to Replace
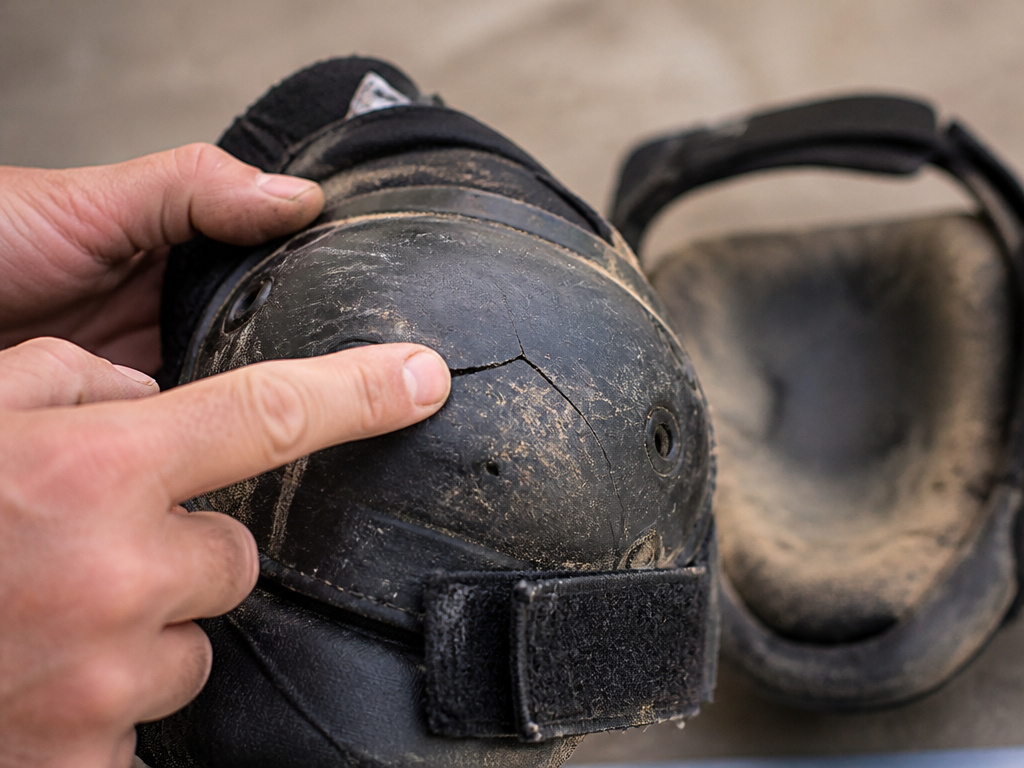
Pads are consumable gear. Heat, cold, and impacts degrade them.
Temperature Warnings
The InSportline manual gives a hard range: don’t use the product below 5°C or above 50°C, as protection could be reduced. Leaving pads in a hot car can make the plastic shells brittle and the foam liner break down. The Roces manual also warns against exposure to extreme temperatures. If your pads have been baking in a trunk, inspect them closely before the next session.
Cleaning
Never machine wash or use harsh chemicals. Wipe down with a damp cloth and mild soap. Submerging them can break down the foam and rust metal buckles. For a deeper clean, our guide on how to clean skateboard pads has safe methods.
Replacement Triggers
Replace your pads when:
- The plastic shell has any crack, dent, or deep scratch (per Roces manual).
- The foam liner is compressed and no longer springs back.
- The Velcro no longer holds securely.
- The straps are stretched, torn, or frayed.
How to Wear Skateboard Pads Without Restricting Movement

The Roces manual advises that the protector should fit tightly (not too lightly or too loose) and the length of the straps have to be correct (not too short or overlapping). A fit that is not too light or too loose allows you to bend your knees and elbows fully and move your wrists naturally. Before you start skating, do a few practice movements to make sure you can crouch, push, and turn without the pads pinching or shifting.
Frequently Asked Questions
Should you wear pads when skateboarding?
Yes. The CPSC, orthopedic surgeons, and every equipment manufacturer in our research recommend it. Wrist guards reduce fracture risk, knee and elbow pads prevent abrasions and impact injuries, and a helmet protects against head trauma. The debate is about style, not safety.
Which way round do knee pads go?
The hard plastic cap goes on the front, centered over your kneecap. The longer, usually padded, flap should be above the knee (on your thigh), and the shorter flap below (on your shin). The top strap is for your thigh, the bottom for your calf.
What pads does Tony Hawk wear?
Tony Hawk typically wears knee pads and a helmet when skating vert ramps or bowls. For street skating, many pros skate without pads, but they also have years of falling technique most beginners lack.
Can I use volleyball or football pads for skateboarding?
No. Sport-specific pads lack the hard, low-friction cap needed to slide on concrete. They’re designed for impact on grass or gym floors, where sliding isn’t the goal. Using them on concrete can cause them to grab the ground, increasing the risk of twist injuries.
How tight should skate pads be?
Tight enough that they don’t slide when you move, but loose enough that they don’t cut off circulation or cause numbness. The straps should be tight enough to prevent sliding but not so tight as to cut off circulation. If the skin around the strap turns white or you feel a tingling sensation, the strap is too tight.
The Bottom Line
The right pad worn wrong is as good as no pad at all. Center the caps, follow the helmet-wrist-knee-elbow sequence, and crank those straps down until nothing slides. Then forget about them and skate.
One rule most guides skip: if you’re skating in temperatures below 5°C or above 50°C, know that the InSportline manual says your pad’s protection could be reduced. That’s a real, manufacturer-stated limit almost nobody mentions. Everything above assumes a pad that’s intact, correctly sized, and used within its rated conditions, a truly worn-out or misused pad is faster to replace than to regret.
Start your next session with this one change: put your wrist guards on before your knee pads. That small order flip fixes half the fit problems beginners have.
