
How to Drop in on a Skateboard: Step-by-Step
This post contains affiliate links. As an Amazon Associate, we earn from qualifying purchases.
To drop in on a skateboard, you hook the tail on the coping, place your front foot over the front bolts, lean your weight forward over the front truck, and press the nose down while keeping your knees soft to absorb the ramp’s curve. The sequence turns a scary lean into a controlled roll, if you commit.
That forward lean is the whole trick. Your brain screams to lean back, but the board only rolls forward when your weight is over the front wheels. A key part of learning how to drop in on a skateboard is overcoming this instinct. Hesitate, and you fall straight down the transition.
What follows breaks that lean into four physical steps, explains why each one matters, and walks you through the gear checks and ramp practice for how to drop in on a skateboard that make your first attempt less of a leap. We’ll also settle the debate on what board to use and how to pad up smartly.
Key Takeaways
- The drop-in is a forward commitment; leaning back guarantees a fall straight down the transition.
- Set your front foot over the front bolts before you tip in, throwing it on late is the most common cause of a slip-out.
- Keep both knees soft to let your legs absorb the ramp’s curve; locking them straight throws you off balance.
- Your first attempts belong on a small ramp with a friend watching, not the big bowl alone.
- Inspect your board for loose trucks or cracked parts before you try; a wobbly setup multiplies the fear.
Before You Start: Safety and Setup
Before you start: A helmet is non-negotiable. The U.S. Consumer Product Safety Commission (CPSC) states wearing one can mean the difference between life and death. Wrist guards are also flagged as especially important for skateboarding. Knees and elbows are next, new skaters scrape them constantly.
Your board needs a quick once-over. The CPSC says to always check for excessive play and any broken or cracked parts before you ride. On a ramp, a loose truck or a wheel that doesn’t spin freely isn’t just annoying; it can dump you mid-lean.
Here is a five-point checklist. Do this at the bench before you even step onto the ramp.
- Truck tightness: Push the board side-to-side. There should be resistance, not floppy looseness. The CPSC notes that keeping trucks tightened properly improves stability.
- Wheel spin: Lift the board and spin each wheel. It should spin freely with almost no side-to-side play. The SkateLabs guide says to tighten the axle nut all the way, then back it off a touch for this result.
- Hardware: Check the 8 bolts and 8 nuts holding your trucks to the deck. Are any missing or loose? A 7/8-inch size fits most setups without risers.
- Deck integrity: Look for cracks, especially around the truck mounts. A cracked deck can snap under the pressure of a drop-in.
- Grip tape: Is it peeling? A slick spot under your front foot will ruin your day.
A board that fails any of these checks isn’t ready for drop-ins. The CPSC recommends serious defects get fixed by a qualified shop.
The Gear Debate: How Much Padding is Enough?
Sources disagree here, and your choice depends on your risk tolerance. The official stance from organizations like the CPSC is clear: wear a helmet, wrist guards, knee pads, and elbow pads. Many product manuals and medical guides echo this.
However, a significant portion of the skateboarding community, particularly in street and park skating, often foregoes full pads for greater freedom of movement, accepting the increased risk. For your very first drop-ins, the community on Reddit is unanimous: pad up, heavily. The added confidence is worth it. As one user put it, “Pad up, I mean every pad there is. I’d even consider gaskets for the knees so the pads don’t come off.”
My stance? As an adult beginner, wearing a helmet and wrist guards is smart, not embarrassing. For drop-ins, I add knee pads. The first few slams are almost guaranteed, and sliding out on your knees beats scraping them raw. Some brands make low-profile pads that don’t feel as bulky.
Finding Your Practice Ramp
Don’t hunt for the biggest quarter-pipe. The LandTheTrick.com tutorial is explicit: your first drop-ins belong on a small ramp with someone watching who can call for help. A “mini-ramp” is the ideal classroom.
If your local park only has steep ramps, the community advice is to first get dangerously comfortable just rolling up and down them. This is called pumping, and it’s a fundamental skill for how to pump on a skateboard. It teaches you how the transition feels under your wheels and builds the muscle memory for leaning back into the ramp, the opposite motion of the drop-in, but just as critical.
The 4-Step Drop-In Sequence (and Why It Works)
This isn’t a leap of faith. It’s a mechanical process. The LandTheTrick.com breakdown gives us four concrete steps.
Step 1: Hook the Tail on the Coping
Place your back foot on the tail and set it flat on the metal coping at the top of the ramp. Your weight is still mostly on your back foot. This “hooks” the board in place, giving you a stable platform to get your front foot ready. The sound is a solid clunk, not a scrape.
Step 2: Front Foot Over the Front Bolts
Now, put your front foot firmly on the deck, right over the front truck bolts. Don’t place it in the middle of the board. This gives you direct control over the front truck the moment you need it. This step is where most people rush. They throw the front foot on late as they’re already tipping in. The LandTheTrick.com correction is clear: set the front foot over the bolts first, then tip in with everything already in place.
Step 3: Commit and Lean Forward Over the Front Truck
This is the moment. Shift your gaze down the ramp. Now, lean your chest forward. Your weight must move over the front truck. Press the nose down with your front foot. Your back foot will naturally lift the tail off the coping as you go. If you lean back, even a little, the board will pivot and you’ll fall straight down onto the transition. The forward lean is what connects the level board to the sloped ramp.
Step 4: Ride Out with Soft Knees
As the front wheels hit the transition, keep both knees soft and bent. Let your legs act as shock absorbers, soaking up the curve of the ramp. The LandTheTrick.com guide warns against locking your knees straight, which prevents this absorption and throws off your balance. Stay low and ride it out to the flat bottom.
The part nobody mentions: That initial forward lean feels like you’re diving headfirst. Your body will fight it. The trick is to understand that the board can’t roll forward until the front wheels are weighted. You’re not falling; you’re directing the board’s path.
Here is how those steps translate into a single fluid motion:
| Step | Action | Physical Why | Risk If Skipped |
|---|---|---|---|
| 1. Hook Tail | Back foot flat on tail, tail set on coping. | Creates a stable pivot point. | Board slips off coping before you’re set. |
| 2. Front Foot Placement | Place front foot over front bolts. | Establishes direct control over the front truck. | Foot slips on grip, causing a slip-out on impact. |
| 3. Commit & Lean | Lean chest forward, press nose down. | Shifts center of gravity over front wheels, initiating roll. | Board pivots on tail, rider falls straight down transition. |
| 4. Ride with Soft Knees | Keep knees bent to absorb ramp curve. | Maintains balance and control through the transition. | Board bounces or wobbles, throwing rider off. |
Why Your Board Choice Matters (The Length Debate)
Here’s a sourced disagreement that changes your first attempt. Two major authorities give opposite advice for beginners.
- The American Academy of Orthopaedic Surgeons (AAOS) states that shorter decks are best for beginners because they are easier to balance and handle.
- The U.S. Consumer Product Safety Commission (CPSC), however, says longer boards increase stability, especially relevant for speed and ramp riding.
Which one is right for dropping in? For the drop-in itself, stability is king. A longer board (even an inch or two longer than a standard street deck) will feel less twitchy when you’re leaning into that transition. The CPSC also notes that boards with wider hangers (wheels farther apart) give riders greater control. So, for your first drop-ins, a slightly longer, wider board is the safer bet. Once you’re comfortable, you can switch back to whatever deck you prefer.
For the drop-in, where stability is key, the U.S. Consumer Product Safety Commission (CPSC) advises that longer boards increase stability, while the American Academy of Orthopaedic Surgeons (AAOS) states shorter decks are best for beginners because they are easier to balance and handle. That extra stability matters more than looking pro on a narrower board. It’s a small change that makes learning to build confidence skateboarding much easier.
Pre-Drop-In Drills: Building Muscle Memory on the Ground

Standing at the top of a ramp and thinking is the enemy. The LandTheTrick.com guide says to count to three and go, because the longer you stand there the harder it gets. To shorten that hesitation, practice the motion on flat ground first.
- The Stomp: With your board on grass or a soft surface, practice the “commit” step. From your normal stance, quickly shift all your weight to your front foot and stomp the nose down. Get used to that aggressive weight transfer.
- Bank Roll-Downs: Find a gentle slope or a bank (a mellow inclined surface). Roll up it a little, then let yourself roll back down fakie (backwards). This gets you comfortable with the feeling of a transition without the drop-in commitment. It directly helps you learn to ride off a curb on a skateboard later, too.
- Pumping Practice: As mentioned, spend a session just rolling up and down a small ramp without dropping in. Learn to generate speed by pumping, pushing down on your trucks at the bottom of the curve and lifting up at the top. This is the single best way to overcome fear of dropping in because it makes the ramp familiar.
These aren’t just warm-ups. They’re reprogramming your instincts so that when you’re at the coping, your body already knows what “forward” feels like.
How to Fall (Because You Will)
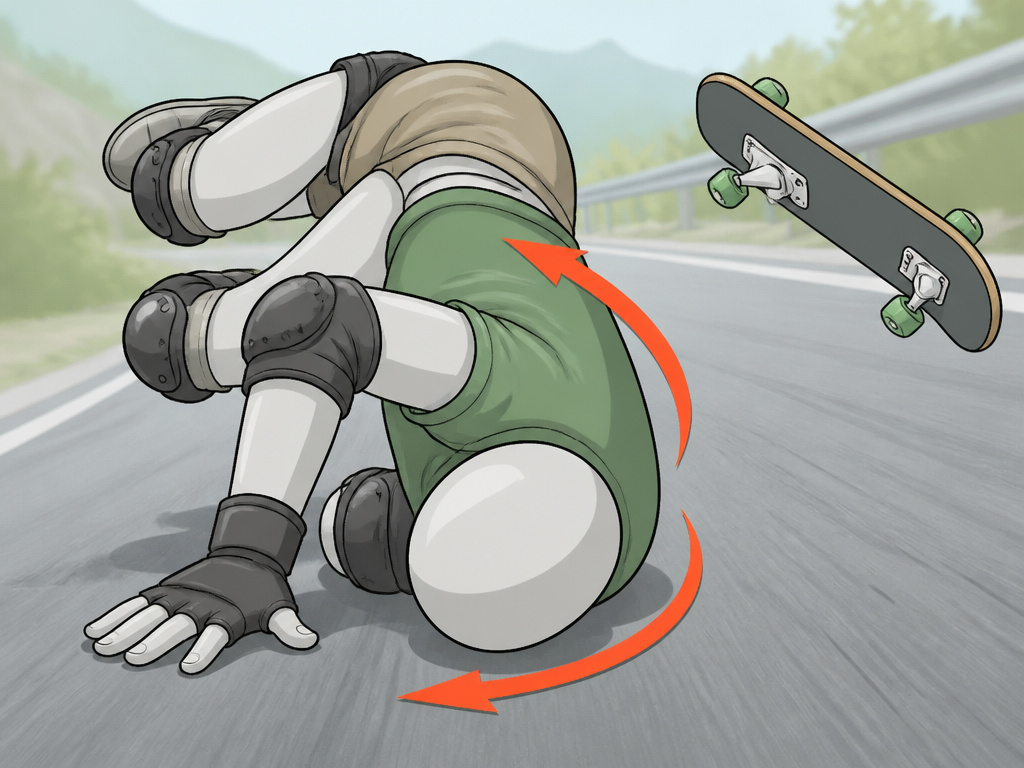
You will fall. Planning for it removes half the fear. The goal is to turn a high-impact slam into a controlled, low-friction slide.
- Knee Slide: If you feel yourself going forward, drop to your kneepads and slide down the transition. This is why proper knee pads are essential. Practice this on a small ramp by just dropping to your knees from a standing position.
- Roll Out: If you’re thrown backwards, try to tuck your chin, round your back, and roll with the impact. Don’t stick your arms out straight to catch yourself, that’s a great way to sprain a wrist or break a collarbone. Learning to fall safely on a ramp is a skill in itself.
- Run It Out: Sometimes, you can just step off the board and run down the ramp. It looks goofy, but it’s effective.
The Reddit community’s top tip for progressing to higher ramps was to master the knee slide. As one skater advised, “Learn to knee slide down the ramp you are practicing on. The main benefit for me was that it helped me fall better even when I didn’t manage a knee slide.”
Having a friend watch isn’t just for moral support. They can see if you’re leaning back and call it out, and they’re there to call for help if you take a bad spill. The U.S. Consumer Product Safety Commission (CPSC) recommends never riding alone.
What Comes After the Drop-In

Landing your first drop-in is a huge milestone. It opens up the whole world of transition skating. The next tricks build directly on this skill.
| Next Trick | Why It’s Next | Key Link |
|---|---|---|
| Rock to Fakie | Uses the same tail-on-coping start, but you rock the board back into the ramp instead of dropping in. It’s the logical first trick after a clean drop-in. | Learn the rock to fakie |
| Pumping for Speed | Now that you can get into the ramp, you need to generate speed to get back up. Pumping is the engine of transition skating. | Master the pump |
| Axle Stall / Tail Stall | These are stationary tricks where you lock your trucks or tail on the coping. They teach you balance and control at the ramp’s edge. | Foundational for all stall tricks |
| Intro to Vert | Once you’re comfortable on a mini-ramp, the principles transfer directly to larger vert ramps. The drop-in is the same, just taller and faster. | Start skating vert |
The feeling after your first successful drop-in is pure electricity. That’s the moment you stop being a spectator at the park and become a participant.
Frequently Asked Questions
How do I stop being scared to drop in?
Fear is normal. It’s your brain correctly identifying a risky situation. The antidote is controlled exposure. Pad up heavily, start on the smallest ramp you can find, and practice the pre-drop-in drills on flat ground and banks. The CPSC skateboarding safety fact sheet emphasizes protective gear as a critical risk reducer. Mentally, count to three at the top and then go, deliberation makes it worse. Building a foundation of safe falling skills also removes the fear of the consequence.
Why do I keep falling straight down the ramp?
This is the classic beginner fall, and it has one cause: leaning back. Your weight must be forward over the front truck when the tail leaves the coping. If your chest is behind your hips, the board pivots and dumps you. Focus on looking down the ramp and driving your shoulders forward. It feels wrong, but it’s the only way the physics works.
Should my trucks be tight or loose for dropping in?
Tighter is better for your first attempts. The CPSC advises keeping trucks tightened properly to improve stability at higher speeds, and a stable board is less likely to wobble as you commit. You can always loosen them later for easier turning. For now, prioritize a solid, predictable feel.
Can I learn to drop in on a cruiser or longboard?
You can, but it’s harder. Cruisers and longboards often have softer, larger wheels and more flexible decks, which can feel squirmy on a ramp’s transition. A standard skateboard with harder park wheels and a stiff maple deck will give you the most control and predictable feedback. The SkateLabs guide notes that a standard deck is usually seven layers of maple for a reason: pop and stiffness.
How long does it take to learn to drop in?
It varies wildly. Someone with prior board sports experience might get it in a session. For a complete beginner who has mastered pushing and turning, it could take multiple sessions. The timeline for learning how to drop in on a skateboard depends more on your commitment to the pre-drills and your willingness to pad up and try than on innate talent. Don’t compare your day one to someone else’s day ten.
Before You Go
The drop-in is a gatekeeper trick. It feels impossible until you do it once, and then the mechanics click. The difference between slamming and rolling is a few inches of forward lean.
One rule most guides skip: if you haven’t successfully dropped in on a small ramp after multiple committed tries, walk away for the day. Frustration tightens your muscles and clouds your judgment. Come back tomorrow. Your subconscious will have processed the movements, and that next attempt often just works.
Everything above assumes you’re on a board that’s been inspected and you’re wearing a helmet. If you’re skipping those two things, you’re not learning to drop in, you’re gambling. Start with the small ramp, bring a friend, and commit forward. The other side of that fear is the best feeling in skateboarding.
