
How to Ollie on a Skateboard: The 5-Step Breakdown
This post contains affiliate links. As an Amazon Associate, we earn from qualifying purchases.
To ollie on a skateboard, you combine a jump with a precise footwork sequence: pop the tail down with your back foot, jump, slide your front foot up the grip tape to level the board, then land with knees bent. The whole motion takes about a third of a second, and mastering it stationary on grass first prevents the common slip-outs that stall beginners.
That sequence, pop, jump, slide, land, is the gateway. Every flip trick, grind, and obstacle clearance builds on it. But the timing feels alien until your muscles learn the rhythm. The ollie is about linking three separate actions into one fluid motion, which is its core.
What follows: the exact foot positions sources disagree on, the physics of why the board sticks to your feet, a biomechanical look at the forces involved, and a practice plan that moves you from safe grass to rolling concrete without eating it.
Key Takeaways
- Place your front foot between the middle of the board and the front bolts, sources disagree on the exact spot, but too far forward kills your slide and control.
- Pop the tail with the ball of your back foot, not flat-footed; a flat-footed pop makes the ollie “much harder to do” and can cause the board to rotate.
- Practice your first stationary ollies on grass or carpet to eliminate board slip, a tip directly from instructional guides that most beginners skip.
- The entire trick happens in about 0.33 seconds, per PBS Design Squad, which is why breaking it into slow-motion parts is essential.
- Land with knees bent to absorb impact; a peer-reviewed study found landing forces can spike to nearly five times your body weight, so a stiff-legged landing is a direct path to sore joints.
The Foundation: What an Ollie Actually Is
The ollie is a physics hack, not a magic trick. Named after Florida skater Allan “Ollie” Gelfand and later named by Rodney Mullen, it’s the building block of almost every street trick. When you see a board seem to glue itself to a skater’s feet in mid-air, you’re watching a rapid transfer of force from the tail to the ground and back.
Before you start: A stationary ollie on concrete can slip out from under you if your pop is off-center. Some sources, like Tactics.com, recommend practicing stationary ollies in the grass or on carpet, while Skateboarding.com’s Dominick recommends starting out on the grass. Also, make sure your trucks are tight enough that the board doesn’t wobble wildly when you crouch; a stable platform is non-negotiable.
This foundation matters because without it, attempts at a rolling ollie or trying to ollie over obstacles become a frustrating cycle of chasing the board when learning how to ollie on a skateboard. You’re learning a mechanical skill, not just hopping.
The 5-Step Ollie Breakdown (with Science)
Break the trick into isolated parts before chaining them together. Think of it like learning a dance move: you practice the footwork without music first.
1. Stance and Foot Placement
Sources disagree on the exact spot: PBS Design Squad Nation says “your front foot just above the screws,” while Skateboarding.com recommends “your front foot in the middle of the skateboard just below the bolts.”
- PBS Design Squad says “your front foot just above the screws.”
- Skateboarding.com recommends “your front foot in the middle of the skateboard just below the bolts.”
- Red Bull suggests placing it “just after the middle of the board but before the front truck bolts.”
The common thread: your front foot starts behind the front bolts, not on top of them. If your foot is too far forward on the nose, you have no room to slide it upward, which is what levels the board. I kept my front foot too close to the nose for a week. The board never popped right. Moving it back to the middle of the deck fixed the issue instantly. Foot placement matters more than effort.
Your back foot sits on the tail, centered side-to-side, with the ball of your foot near the edge for the pop.
2. The Crouch and Load
Bend your knees. Crouch down like you’re preparing to jump, because you are. Your weight should be centered, maybe slightly more over your front foot. Keep your shoulders aligned with the board, not twisted. If your shoulders turn, the board will turn with them, killing a straight pop.
This is the “load” phase. You’re coiling the spring.
3. The Pop and Jump
This is the simultaneous moment that most people get wrong. You don’t pop then jump. You jump and pop as you’re leaving the ground.
- Action: Spring upward from your crouch. As you begin to rise, snap your back ankle down to drive the tail into the ground. Use the ball of your foot, not your whole flat foot. A flat-footed pop, as Tactics.com notes, makes the ollie “much harder to do.”
- Physics: The downward force of the tail hitting the ground creates an equal and opposite upward force, popping the nose of the board upward. This is the “pop” that gives the ollie its height.
The vertical ground reaction force during the pop has a characteristic propulsive peak of about 2.22 times your body weight, according to a study in the Journal of Applied Biomechanics. That’s the literal snap you’re trying to create.
Your back foot should rebound off the tail immediately after the pop, following your body upward.
4. The Front Foot Slide and Level
While in the air, drag the side of your front foot up the grip tape toward the nose. This “slide” is what pulls the rising tail up to meet your back foot and levels the board.
- Mechanism: The friction between your shoe and the grip tape literally drags the board higher. Your front foot acts as a hook, guiding the board into a flat position underneath you. Watch any PBS Design Squad video tutorial, they slow it down to show this exact force transfer.
The slide and the pop happen almost simultaneously. If you pop but don’t slide, the board rockets nose-up and leaves you behind.
5. The Landing and Absorb
As the board levels out underneath you, prepare to land. Bend your knees to absorb the impact. Land with both feet over the bolts, front foot near its starting position, back foot on the tail. A stiff-legged landing transmits all that force straight to your joints.
The initial phase of landing from an ollie onto a platform shows an impact force peaking at a mean of 4.74 times body weight within the first 30 to 80 milliseconds, per the same biomechanics study. Participants intentionally landed firm to stabilize. You don’t need to slam down, but you do need to be ready for the shock.
The whole sequence of how to ollie on a skateboard, from pop to landing, takes about a third of a second. Your brain can’t process it in real time at first. That’s why slow-motion practice and repetition are everything.
Common Mistakes and How to Fix Them
Most ollie problems trace back to a break in the pop-jump-slide chain. Here’s a quick diagnostic table.
| What You See | Likely Cause | The Fix |
|---|---|---|
| Board spins sideways | Angled back-foot pop or twisted shoulders | Keep shoulders straight, pop straight down with the ball of your foot. |
| Board rockets up, no level | No front foot slide | Focus on dragging the side of your front foot up the grip tape. Practice the slide motion stationary. |
| Low height, tail doesn’t pop | Jumping off the tail (weight stays down) | Jump first, then pop the tail as you’re rising. Think “jump, pop.” |
| Board shoots forward | Leaning too far forward | Center your weight during the crouch; don’t reach for the landing. |
| You land, board doesn’t | Not lifting your back foot after the pop | Pop and immediately pull your back foot up to meet the rising tail. |
Where this goes sideways: Rushing to ollie while moving before you can do it stationary. You add speed, balance, and commitment to a skill you haven’t automated. The result is a predictable slip-out and a hard lesson on concrete. Grass first. Always.
A kid at my local park landed his first clean ollie after three weeks. He spent the first two just practicing the pop and slide on a patch of grass behind his house. He didn’t skip the boring drills. His form was repeatable from day one because he removed the variable of the rolling board.
Practice Progression: From Grass to Concrete
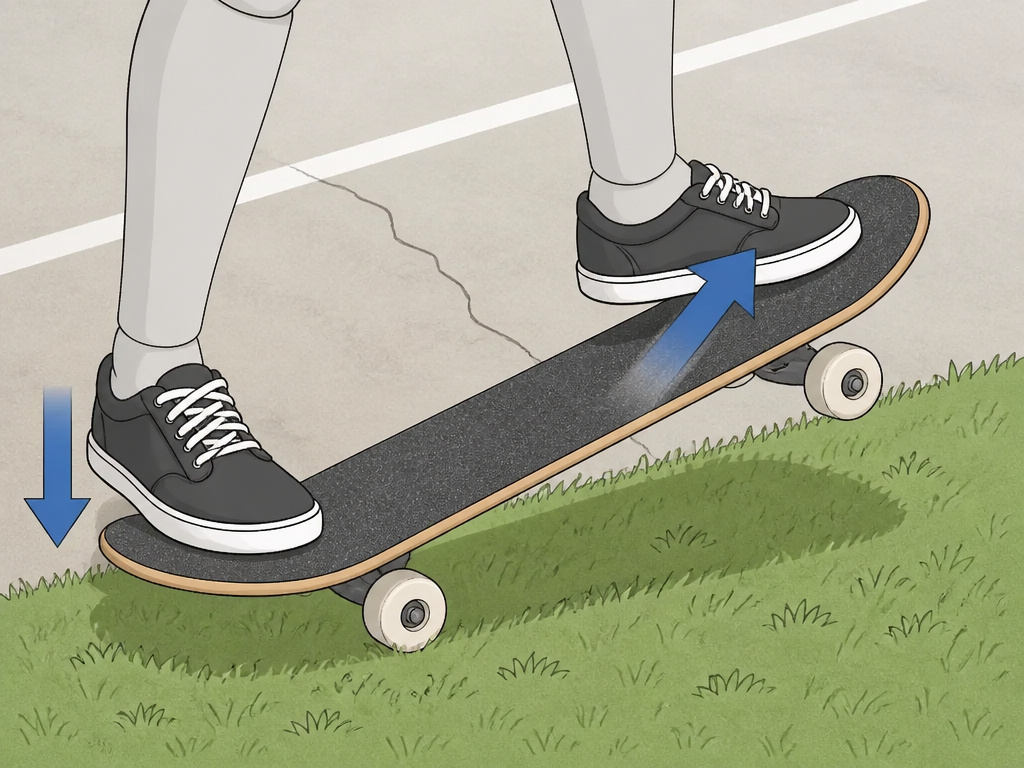
You wouldn’t learn a kickflip before an ollie. Don’t learn a rolling ollie before a stationary one. Follow this sequence.
- Stationary on Grass/Carpet: This is your lab. No board slip. Practice the pop and slide without the jump. Get the muscle memory for the foot motions. Do 20 reps where you just pop the tail and slide your front foot. Then add the small jump.
- Stationary on Concrete: Now the board can move. The goal is to keep it under you. Your pop will likely send it forward or backward at first. Adjust your weight. Aim for a clean, controlled pop where the board lands where it started.
- Slow Rolling: Start with a tiny push. The forward momentum changes the balance point. You’ll need to pop slightly backward to counteract the board shooting forward. This is where most people see their ollie height drop, focus on the technique, not the air.
- Over a Line/Crack: Once rolling ollies feel steady, ollie over a painted line on the ground, then a crack. This teaches you to commit and actually clear something.
- Onto and Over Obstacles: The final step is using the ollie functionally: ollie onto a ledge, over a curb, or across a gap. This requires more speed, more pop, and more confidence.
This progression builds competence without terror. Trying to ollie over obstacles on day two is a recipe for frustration and a banged-up board.
The Science of More Height and Control

Once the basic ollie is reliable, you’ll want more air. Height comes from two things: a more powerful pop and a more aggressive slide.
- Stronger Pop: Crouch lower for more spring. Snap your ankle down harder and faster. The tail needs to hit the ground with enough force to rebound sharply. This is where leg strength and explosive practice (like box jumps) pay off.
- Higher Jump and Tuck: Your body dictates the ceiling. Jump higher and pull your knees toward your chest. The board can only rise as high as your feet allow it to. If you don’t lift your back foot high enough after the pop, you’ll “catch” the board and limit its rise.
- Front Foot Commitment: Drag your front foot all the way to the nose. A timid slide stops the leveling process early. Scrape your shoe along the grip tape.
The world record ollie is 45 inches. You’re not chasing that. You want a consistent, controllable height for navigating streets and parks. The principles for a high ollie are the same for a basic one, just amplified.
Frequently Asked Questions
How long does it take to learn an ollie?
It depends entirely on your prior board comfort and practice consistency. A complete beginner who practices consistently might get a sketchy stationary ollie. A clean, rolling ollie that you can use to pop up curbs takes dedicated practice. The timeframe for learning ollies varies wildly, so measure progress by consistency, not calendar dates.
Why does my board turn when I ollie?
Your shoulders are turning. Keep them parallel to the board throughout the entire motion. Also, check that your back foot is popping straight down, not at an angle. An angled pop introduces rotation.
Should I learn stationary or rolling first?
Stationary. On grass, then concrete. Rolling adds complexity, you must manage balance, speed, and direction while executing the trick. Master the mechanics first where it’s safe. The confidence you build will make the transition to a moving ollie technique much smoother.
What’s the difference between an ollie and a pop shove-it?
An ollie is a vertical jump where the board stays aligned with your feet. A pop shove-it uses a similar tail pop but adds a spin of the board underneath you (180 or 360 degrees) while your body stays mostly facing forward. The ollie is the prerequisite.
Can I ollie on a cheap skateboard?
You can, but it’s harder. Cheap completes often have dead, non-responsive bushings in the trucks and heavy, slow wheels. This makes the board feel soggy and unresponsive. A shop-built complete with quality trucks and grip tape will give you a more predictable pop and better board feel, accelerating your learning.
Before You Go
Rushing the progression is the single biggest barrier to learning the ollie, not a physical limitation. Spend your first two sessions on grass, just popping the tail and sliding your front foot without even trying to leave the ground. Get that muscle memory down. The jump comes after.
One rule most guides skip: if you’ve been trying rolling ollies for a week and keep slipping out, go back to stationary for another 50 reps. Your brain needs the repetition without the fear of falling. Three days of deliberate, boring practice beats three weeks of frustrated attempts that teach you nothing but how to fall.
Your next session, try this: ten stationary pops on grass, focusing on the sound of the tail slap. Then ten more, adding the front foot slide. Then step onto concrete and try five stationary ollies, just focusing on keeping the board under you. Small wins count.
