
How to Nollie on a Skateboard: The 5-Step Motion
This post contains affiliate links. As an Amazon Associate, we earn from qualifying purchases.
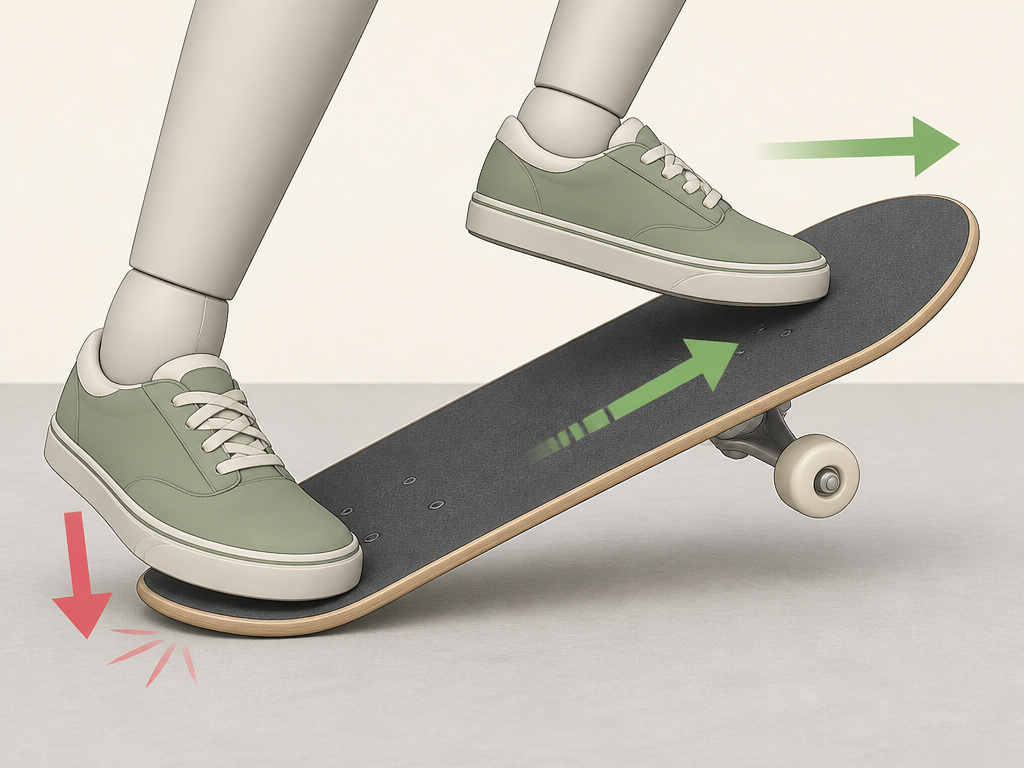
To nollie on a skateboard, pop the nose with your back foot while sliding your front foot up the board to level it out in the air. It’s a nose ollie, reversing the motion of a basic ollie, and requires you to lean forward into the trick, which is the main mental hurdle for most skaters.
The front foot placement is where personal preference comes in. Guides like SurferToday recommend putting it far up on the nose, while experienced skaters also play with angles and pockets. That small adjustment changes how the board reacts under you, which is a key detail when learning how to nollie on a skateboard.
What follows is a breakdown of the mechanics, the foot-placement arguments, and the drills that build the timing your body resists when learning how to nollie on a skateboard. By the end, you’ll have a plan for your next session that moves past the generic advice.
Key Takeaways
- The front foot placement is personal, experiment between the nose’s tip and the pocket to find what gives you control.
- Pop the nose with your back foot, not the tail; this reversal of the ollie motion is the trick’s core.
- Lean forward into the jump; fighting the instinct to lean back is the biggest psychological barrier.
- Practice the pop-and-slide timing stationary on grass or carpet before adding roll.
- A nollie is harder over obstacles, you need more speed so the board lifts off before you reach the ledge.
The Nollie Foot Position Debate
You can find two schools of thought on where your feet go. Official guides, like the one from SurferToday citing “Mastering Skateboarding,” give a precise recipe: front foot far up on the nose, back foot halfway between the middle of the board and the back truck bolts. However, other skaters disagree, suggesting variations like placing the front foot in the nose pocket and treating back foot placement as more trivial. It’s clean, measurable advice.
Place your front foot far up on the nose. Place your back foot halfway between the middle of the board and the back truck bolts.. Source: SurferToday, citing “Mastering Skateboarding”
Then you talk to people who actually land nollies daily. On forums like r/NewSkaters, the consensus is messier. “Some people pop in the heelside pocket, some point their foot straight forward, some hang their foot over the nose a bit,” one user writes. “Back foot is trivial. Put it like an Ollie, maybe a bit wider.”
So which is right? Both. The textbook placement is a perfect starting point. The lived-experience tweaks are how you make the trick your own after a dozen attempts. Your front foot’s job is to catch the board and guide it level. If it’s slammed against the very tip of the nose, you might get more height but less control. If it’s back in the pocket, you might level the board easier but sacrifice pop.
| Placement Style | Front Foot | Back Foot | Best For |
|---|---|---|---|
| Textbook Start | Far up on the nose | Halfway between board middle & back bolts | Learning the basic motion, ensuring a clean pop |
| Pocket Variation | In the dip where the nose starts, angled slightly | Similar to ollie stance, maybe wider | Skaters who find the nose too slippery, better for board control |
| Height-Focused | Hanging slightly over the nose edge | Closer to the front trucks | Maximizing pop and air, once timing is solid |
The back foot matters less for stance, more for the pop. The closer it is to the nose, the sharper your pop can be, but your balance gets trickier. Start with the textbook middle-ground. Your feet will find their own spots after a few slams.
The Mental Hurdle: Leaning Forward
Your body knows how to ollie. You lean back, pop the tail, and the board rises to you. A nollie asks for the opposite. You must commit your weight forward, over the nose you’re about to pop. It feels like you’re diving onto the pavement.
Where this goes sideways: Leaning back during the pop. The board will either rocket out behind you or simply not leave the ground, and you’ll stumble forward every time.
I spent a week trying to nollie stationary, and every attempt ended with the board shooting away. I was subconsciously shifting my hips back the moment I jumped, protecting myself from a forward fall. The fix wasn’t more practice, it was a different drill. I started just rocking my weight onto the nose while rolling slowly, not even trying to pop, to feel what forward commitment actually meant. That dull, five-minute drill did more than fifty popped attempts.
The fear is rational. Falling forward is less controlled than falling backward. Wrist guards help.
The 5-Step Nollie Motion
Break the trick into pieces. Do each one slowly, then chain them together.
- Roll and Set. Start with a comfortable, slow roll. Get your feet into your chosen stance. Your shoulders should be parallel to the board. Look ahead, not down.
- Bend and Load. Bend your knees. This isn’t just a crouch, you’re loading your back leg to spring upward and your front leg to snap forward. Your weight should be centered, but your mind is on moving forward.
- Pop and Jump. Slam the ball of your back foot down on the nose. Jump straight up, driving your back knee toward your chest. This is the moment: you must jump and pop simultaneously. A late pop drags the nose; an early pop kills your jump.
- Slide and Level. As you jump, drag the side of your front foot up the grip tape toward the nose. This foot drag is what pulls the board upward and levels it. Don’t just lift your foot, scrape it.
- Catch and Land. See the board level out beneath you? That’s your cue. Suck your knees up, catch the board with both feet over the bolts, and prepare to absorb the impact. Land with knees bent, ready to roll away.
The timing between step 3 and step 4 is everything. Pop too early without the jump, and the board bonks the ground. Jump without the pop, and you just hop off your skateboard. This sync is why stationary practice is gold.
A Stationary Practice Drill
Find grass or carpet. You don’t need roll.
- Step A: Stand on your board in nollie stance. Practice the pop-and-jump motion without worrying about the slide. Hear the nose snap against the ground? Feel the jump? Good.
- Step B: Now add the front foot slide. Pop, jump, and immediately drag your front foot. Don’t worry about height, worry about the sequence: pop then slide.
- Step C: Put it together. Aim for a single, clean motion where the board leaves the ground and levels. It will be a tiny hop. That’s fine.
Do this for ten minutes before your next rolling session. The muscle memory transfers.
Nollie vs. Ollie vs. Fakie
It’s easy to mix these up. They’re all variations of getting the board airborne, but the direction of travel and the popping foot change.
| Trick | Popping Foot | Direction of Travel | Feels Like |
|---|---|---|---|
| Ollie | Back foot (tail) | Forward (regular stance) | The foundation. You shift weight back, then forward. |
| Nollie | Back foot (nose) | Forward (regular stance) | An ollie in reverse. You commit weight forward from the start. |
| Fakie Ollie | Back foot (tail) | Backward (rolling switch) | Like a switch ollie, but your stance is natural because you’re rolling backward. |
| Switch Ollie | Back foot (tail) | Forward (switch stance) | An ollie with your opposite stance. Everything feels backwards. |
Per Welinder and Peter Whitley, authors of “Mastering Skateboarding,” put it well: “The nollie is a lot like doing a switch ollie while rolling backward.” That’s the best mental shortcut. If you can visualize a switch ollie, a nollie uses a similar unfamiliar foot motion, but you’re rolling forward.
Knowing the difference helps diagnose issues. If your nollie stance feels completely alien, spending a session on switch ollie drills can build the coordination. They’re sibling tricks.
Common Nollie Mistakes and Fixes
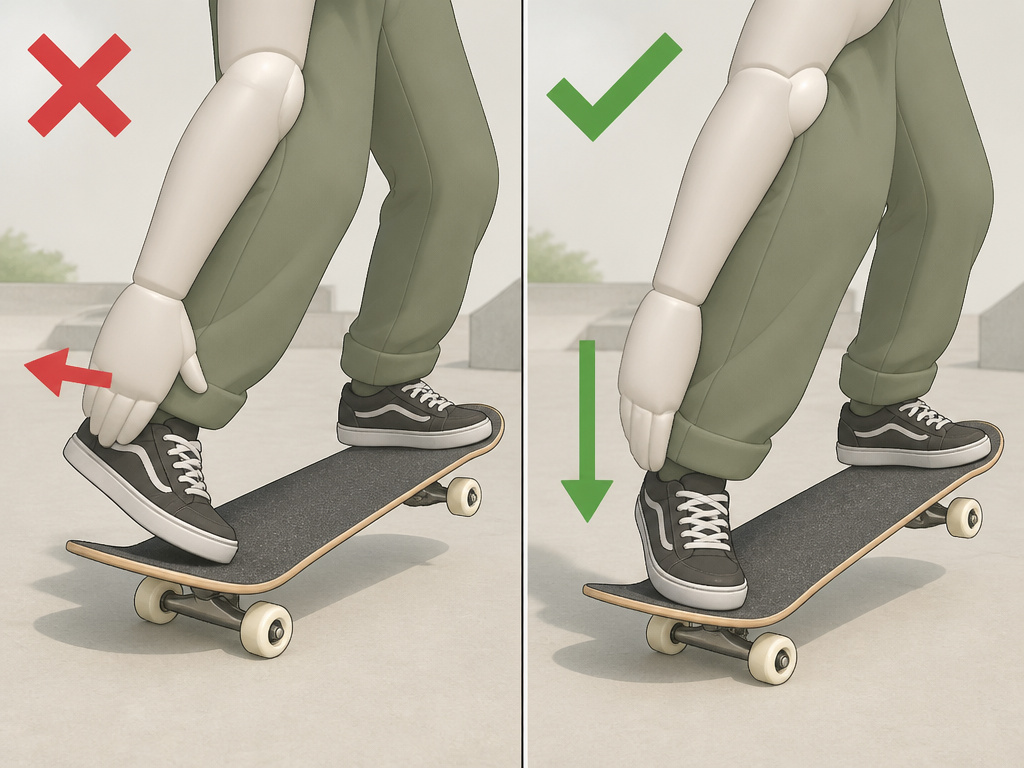
The board shoots out behind you. This is the classic sign. You’re pushing the board backward with your back foot instead of popping it straight down. Focus on a vertical, stabbing pop. Think “down, not back.”
You can’t get the board level. Your front foot isn’t sliding enough. You’re probably just lifting it. Concentrate on the scraping drag up the grip tape. The friction is what brings the tail up. Rougher grip tape can make this easier to feel.
The nollie is tiny and sketchy. You’re not jumping. Or you’re popping but not jumping. The pop gives the board energy; your jump gives you airtime. They must happen together. Practice the stationary pop-and-jump drill until the timing is one motion.
You land with the board sideways. Your shoulders are turning mid-air. Keep them parallel to the board throughout the entire trick. Look where you want to go, not at your feet.
Easy to miss: Not bending your knees enough on landing. A stiff-legged landing guarantees a bumpy ride and lost control. Bend those knees every time, even on small hops.
Gear and Setup Tips for Better Nollies
Your equipment won’t teach you the trick, but it can remove unnecessary friction. A board that’s too stiff or has a worn-down nose makes life harder.
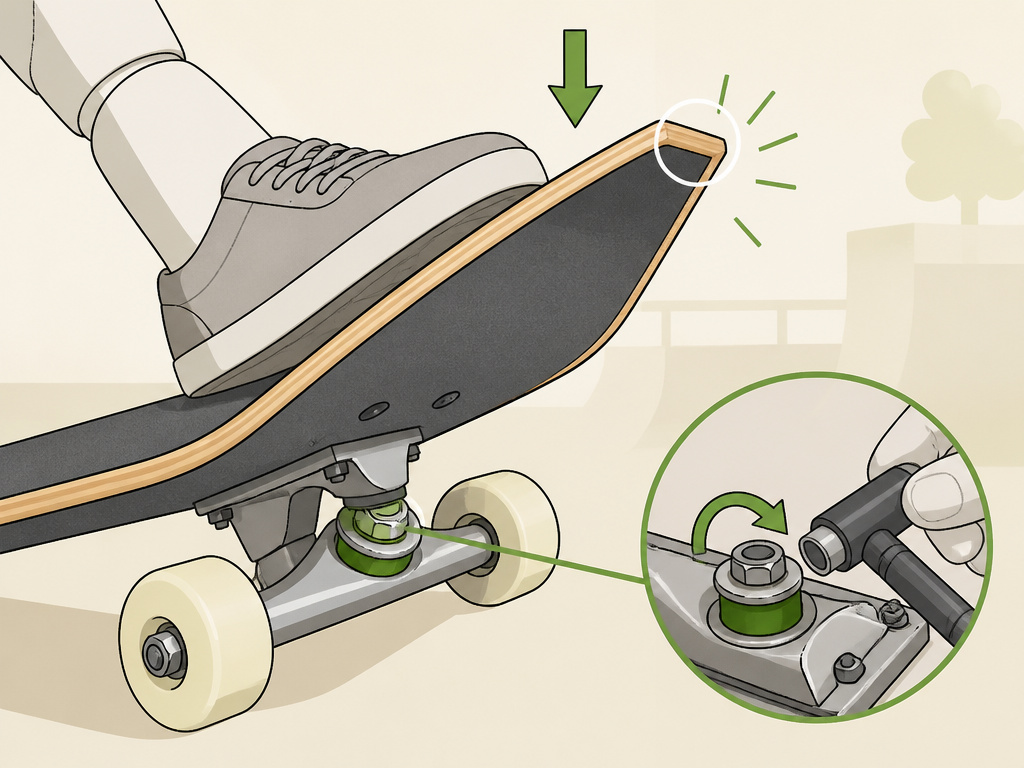
Nose Shape: A symmetrical board with a pronounced, steep nose is ideal. The nose should look and feel like the tail. If your nose is chipped or sanded down from manuals, consider a new deck. That defined corner gives your foot something solid to pop against.
Truck Tightness: Looser trucks can make the board feel less stable during the forward weight transfer, especially for beginners. If you’re wobbling, tighten your trucks a quarter-turn. Many trucks handle this adjustment well. Don’t crank them down, just find a setting where the board feels predictable.
Wheel Hardness: For flatground practice on smooth concrete, harder wheels are standard. They slide predictably and make the foot slide easier. Softer wheels might grip too much during the slide, making the board feel sticky.
The one thing that doesn’t matter much: Expensive bearings. As long as your wheels roll, your bearings are fine for learning nollies. Save that budget for a deck with a pronounced nose.
Putting Nollies Into Your Lines
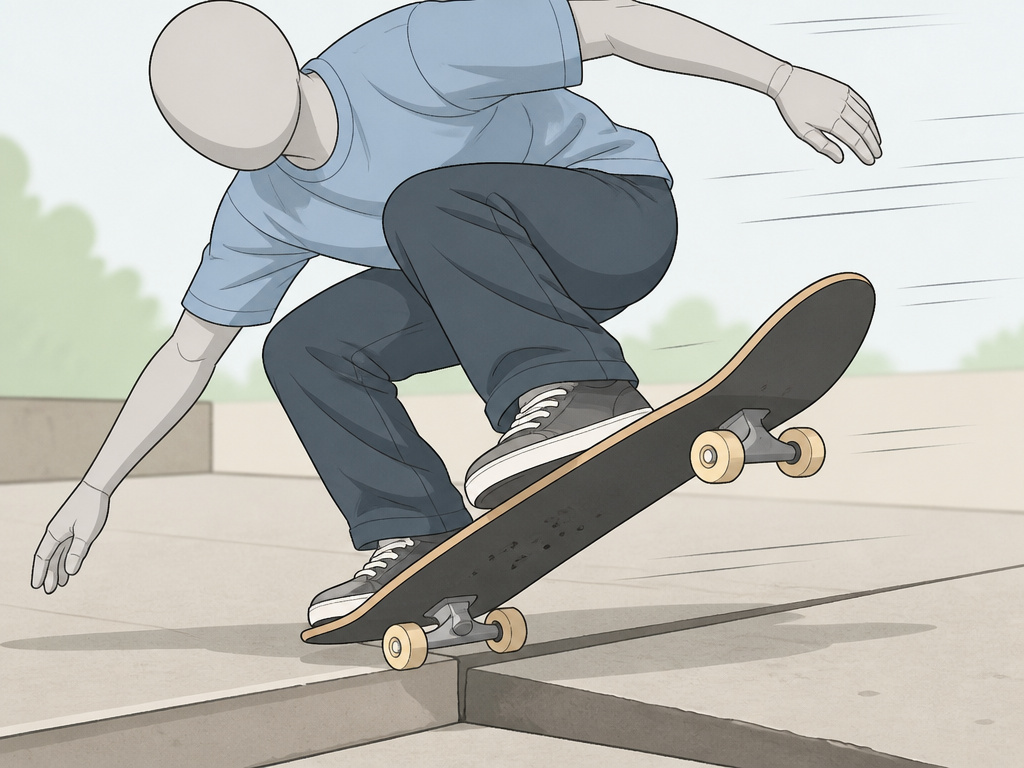
A nollie isn’t just a flatground trick. It’s a tool for navigating obstacles and linking tricks. Because you’re moving forward and popping the nose, it sets you up for certain maneuvers.
Nollie Over a Crack or Stick: This is your first application. The key is speed. As noted in the SurferToday source, a nollie over an obstacle requires the board to lift off before you reach it. You need more momentum than an ollie. Start rolling faster than feels comfortable, commit, and pop.
Nollie to Fakie: Land a nollie and immediately roll backward. This is a simple, stylish way to change direction and looks great on banks or small ramps.
Nollie 180: Once the basic nollie is solid, adding a frontside 180 rotation is the next logical step. Your shoulders initiate the spin as you pop.
Into a Manual: A nollie sets you up perfectly for a nose manual. As you land, shift your weight back to lift the tail. The transition feels natural because you’re already forward.
The goal is to stop thinking of it as a standalone trick. It’s a verb, a way to get from point A to point B while adding flair. Start by adding a single nollie over a painted line on your way to practicing your moving ollie.
Frequently Asked Questions
How hard is a nollie compared to an ollie?
It’s significantly harder for most people, but not because the mechanics are more complex. The mental block of leaning forward against your ingrained ollie instincts is the real barrier. If you have a solid ollie and have dabbled in switch ollie, the learning curve is shorter. Expect to spend a few dedicated sessions before it clicks.
Can I practice nollies stationary?
Absolutely. In fact, you should. The Tactics.com guide recommends practicing stationary ollies on grass or carpet to avoid slipping out, and the same logic applies doubly to nollies. This method isolates the pop-and-slide timing without the fear of rolling away. It’s the fastest way to build the muscle memory your body resists.
Why does my board always rocket away from me?
You are almost certainly “pushing” the board backward instead of “popping” it straight down. This is the most common failure mode. Focus on a sharp, vertical stomp with your back foot. Imagine trying to dent the ground with the nose, not sweep it behind you. The PBS Design Squad Ollie tutorial explains the physics of the pop well, that downward force is what creates the upward motion.
Do I need a special board setup to nollie?
Not special, but optimal. A board with a worn, flat nose is a disadvantage. A fresh deck with a defined, steep nose makes the pop easier. Truck tightness is personal, but a medium-tight setup can offer more stability as you learn the forward weight shift. Beyond that, your regular setup is fine.
How can I get more height on my nollies?
Height comes from three things: a harder pop, a more aggressive front-foot slide, and jumping higher yourself. Once the basic motion is clean, focus on sucking your knees up to your chest after the pop. This gives the board space to rise. Drills from guides on how to ollie higher apply directly here, it’s all about achieving a better pop and board control.
What’s the difference between a nollie and a fakie ollie?
Nollie is performed rolling forward; you pop the nose with your back foot. A fakie ollie is performed rolling backward (fakie); you pop the tail with your back foot. Even though you’re popping the tail in fakie, it feels more natural than a nollie because your stance isn’t switched.
The Bottom Line
The nollie is a patience trick. It rewards the skater who breaks it down, accepts the awkward lean, and drills the timing piece by piece. Don’t rush to clear a stair set. Your first goal is a single, controlled nollie on flat ground where the board stays under you.
One rule most guides skip: if you haven’t landed a clean, rolling ollie in the last week, go back and lock that in first. The nollie builds on that fundamental muscle memory; trying to bypass it just adds frustration. Everything here assumes you have that foundation.
Your next session should start with five minutes of stationary pop-and-slides on grass. Then take it to the pavement, rolling slowly, and focus only on committing your weight forward. Height and style come later. Small wins count.
