
How to Check Skateboard Hardware Tightness: Step-by-Step
This post contains affiliate links. As an Amazon Associate, we earn from qualifying purchases.
To check skateboard hardware tightness, perform a visual and physical inspection before every ride. Look for deck bolts poking above the grip tape and try to wiggle the trucks side-to-side. Tighten any loose mounting bolts with a skate tool, Phillips screwdriver, or 3/8-inch wrench until snug, but avoid cranking them down hard. The U.S. CPSC states keeping nuts and mounting screws tightened properly improves stability at speed.
That “snug, not cranked” line is where most guides stop. They don’t tell you how to find the line between a bolt that’s secure and one that’s crushing your deck’s plies, or how to check skateboard hardware tightness. Or why a truck that feels tight in your hands can still develop a dangerous speed wobble after five minutes of riding.
What follows is the difference between a generic safety tip and a usable routine. This section explains the two-minute pre-ride check, the specific feel of “tight enough,” what to do when hardware is damaged, and why a loose kingpin nut matters more than a loose deck bolt for your immediate safety.
Key Takeaways
- Perform a visual and hand check before every session, focusing on deck bolt flushness and truck wiggle.
- Tighten mounting hardware until snug, then stop; over-tightening cracks the deck’s top ply within weeks.
- Use a dedicated skate tool for consistency; a Phillips screwdriver and 3/8-inch wrench work in a pinch.
- A loose kingpin nut causes speed wobble, not just poor turning; keep it fully threaded on the bolt.
- Replace stripped bolts or cracked bushings immediately—they won’t hold a safe setting.
The Tools You Actually Need (And One You Should Carry)
You don’t need a mechanic’s socket set. According to Skateboards.com, the basics are a Phillips head screwdriver and a 3/8-inch wrench or Allen wrench. That covers most standard skateboard hardware.
But the reality is. Fumbling with two separate tools at the skatepark is a pain. This is why every skater I know eventually buys a single, T-shaped skate tool. It combines the screwdriver, the socket for the kingpin nut, and usually an axle wrench into one piece you can keep in your pocket. For checking tightness, consistency matters more than torque. Using the same tool every time helps you develop a feel for what “snug” means on your board.
If you’re at home and your board feels loose, those basic tools from the garage will work. For anything beyond a quick tune-up, a skate tool from your skate tool kit is the way to go.
The 60-Second Pre-Ride Hardware Safety Check
This is the routine you run through while lacing up your shoes. It’s not a full rebuild; it’s a safety scan that includes knowing how to check skateboard hardware tightness. The U.S. Consumer Product Safety Commission advises riders to “always check for excessive play (looseness) and any broken or cracked parts” before riding. Their official skateboard hardware inspection advice is a primary source for this protocol.
Here’s how to translate that into action:
- Deck Bolt Scan: Run your fingers over the eight bolts holding your trucks to the deck. They should be flush with your grip tape. If any bolt head is poking up or you can feel a sharp edge, it’s loose. According to Skateboards.com, screws that begin to rise need tightening immediately.
- The Truck Wiggle Test: Grab the board and try to wiggle a truck assembly side-to-side (not turning, but trying to rock it laterally). There should be zero lateral movement between the truck baseplate and the deck. If it moves, those four bolts need attention.
- Kingpin Nut Feel: Check the large nut in the center of each truck (the kingpin nut). It should be fully threaded onto the bolt. The Skate Labs guide warns to never loosen it so far that it barely hangs on.
- Wheel & Axle Check: Spin each wheel. It should spin freely for a few seconds without a grinding sound. Then, try to wobble the wheel side-to-side on its axle. Any noticeable play means the axle nut needs a slight tighten.
Common mistake: Only checking when something feels or sounds wrong. By then, a bolt may have fallen out or a truck may be dangerously loose. This check takes less than a minute and prevents the vast majority of hardware-related failures.
What ‘Tight Enough’ Actually Feels Like (and When to Stop)
This is the core skill of how to check skateboard hardware tightness. Tightening hardware isn’t about strength; it’s about finesse. The goal is snug contact, not compressive force.
For the eight deck bolts, tighten until you feel the first solid resistance, then give the nut a final quarter-turn. You’re compressing the bushing washer and seating the bolt head, not driving it into the wood. Over-tightening is a documented risk: Skateboards.com states it can make the hardware and deck more prone to cracking and breaking.
For the kingpin nut, the adjustment is different. This nut controls your turning feel and stability. The Skate Labs guide explains: “Tighten the kingpin nut and the board gets more stable and harder to turn. Loosen it and carving gets easier, but the board can wobble at speed.” They recommend going a quarter turn at a time and riding between changes.
The physical feel you’re after is a firm, seated connection with no “give.” If you’re using a skate tool, your wrist should do the work, not your shoulder. A bolt tightened with arm strain is almost certainly too tight.
| Hardware Component | Target Feel | Risk of Over-Tightening |
|---|---|---|
| Deck Mounting Bolts | Snug, flush with grip. No lateral truck wiggle. | Cracks deck plies, strips bolt threads. |
| Kingpin Nut | Firm, but allows bushing compression for turning. | Flattens bushings, restricts turning, stresses kingpin. |
| Axle Nuts | Wheel spins freely with no side-to-side wobble. | Creates bearing shield drag, overheats bearings. |
When Tightening Isn’t Enough: Inspecting for Damage
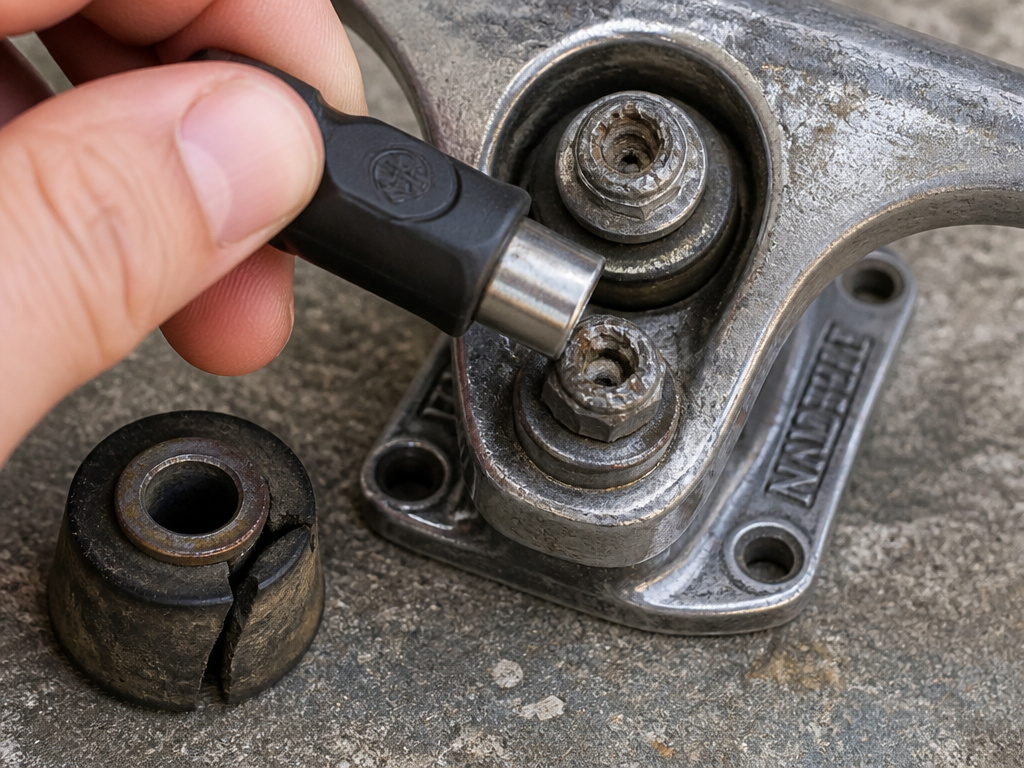
A pre-ride check isn’t just about tightness; it’s a damage survey. Some issues can’t be fixed with a turn of a wrench.
- Stripped Bolts: If the head of a screw is chewed up and your tool won’t grip, it’s stripped. Skateboards.com says if the screws on your deck are stripped, you need to replace them. This often requires techniques for how to remove stripped skateboard bolts.
- Cracked or Squashed Bushings: Those urethane rings around the kingpin are wear items. The Skate Labs guide is clear: “If they crack, squash flat or won’t hold a setting, swap in a new pair.” A cracked bushing won’t provide consistent rebound, making your truck feel dead or unpredictable.
- Sunken Hardware: This is common. As you skate, the wood under the bolt head compresses. Smaller-headed hardware sinks easier. A slightly sunken bolt isn’t a safety issue if it’s still tight, but a deeply countersunk bolt can be hard to remove later. This is mostly a cosmetic and longevity concern, not an immediate failure.
- Self-Locking Nut Failure: If a nut spins freely without tightening, replace it. If a nut spins freely without tightening, replace it.
Why This Matters Beyond Not Falling Off
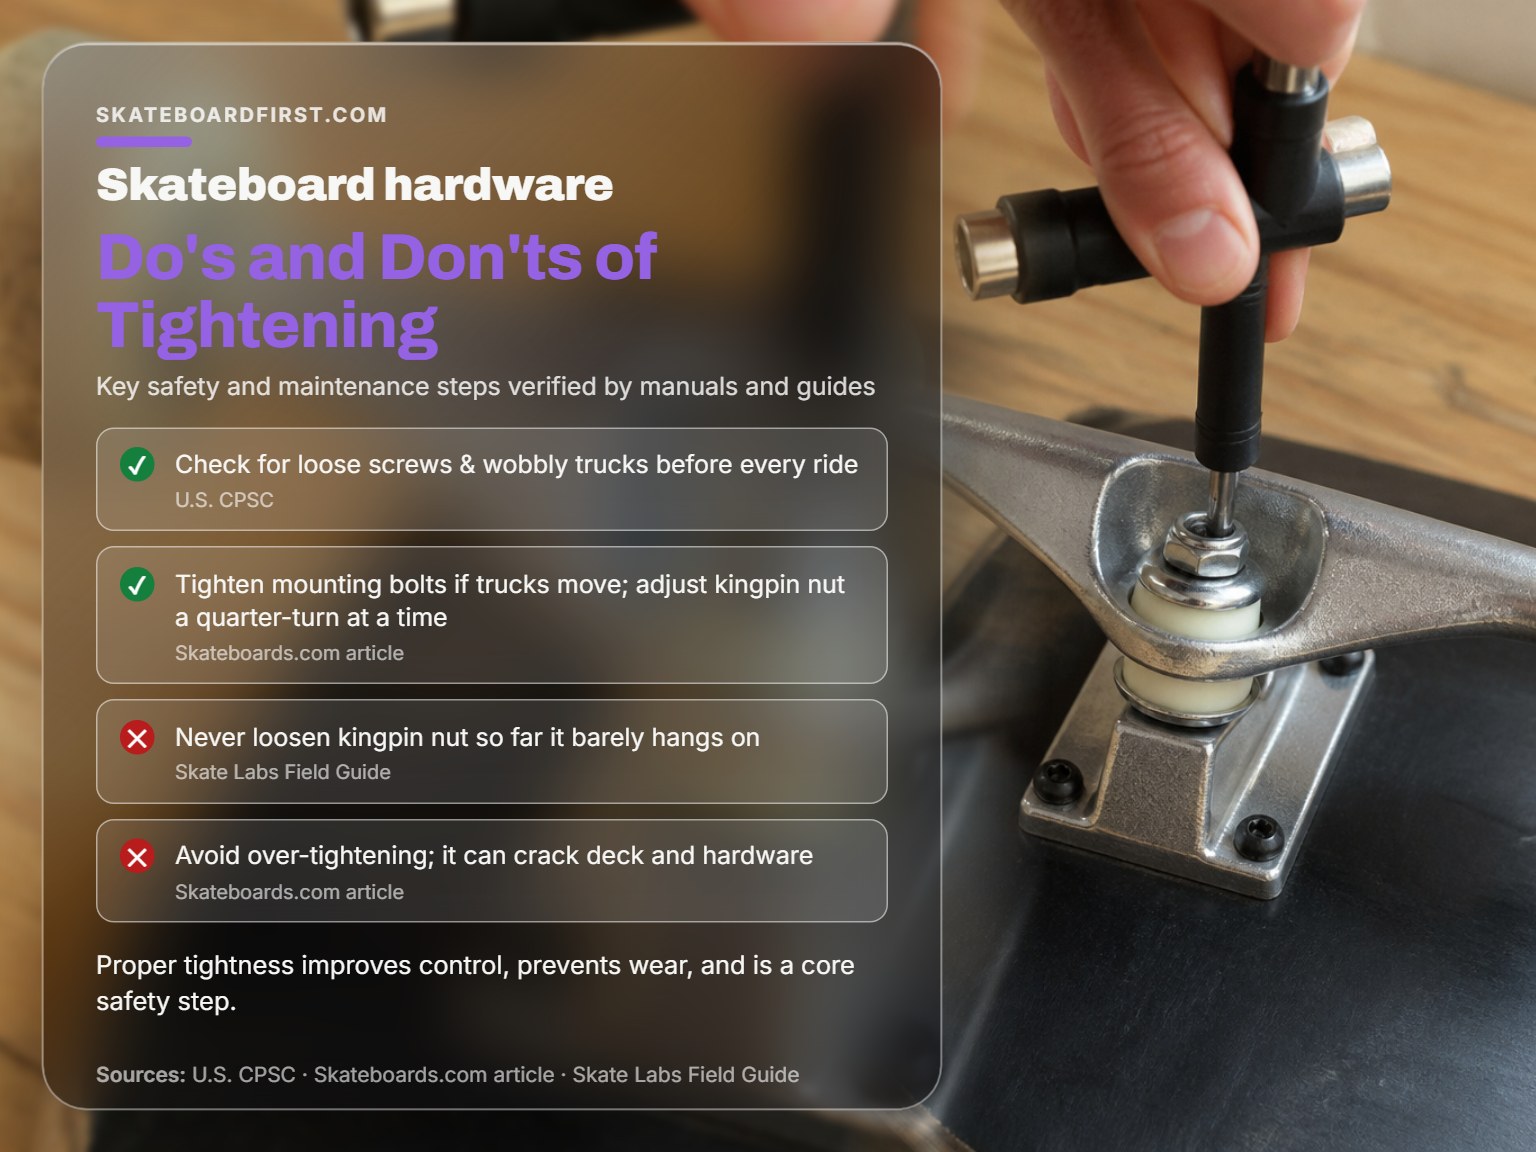
Loose hardware does more than just risk a bolt popping out mid-ollie. It’s a systemic problem that affects everything about your ride.
First, it kills your board’s consistency. A truck with one loose mounting bolt will pivot unevenly, making your turns feel vague and your board harder to control. You’ll compensate with your feet, which leads to bad habits.
Second, it accelerates wear on other parts. A wobbly truck puts lateral stress on the deck’s mounting holes, enlarging them over time. It also allows the hanger to shift against the bushings, wearing them down prematurely.
Finally, for electric skateboard riders, keeping components snug helps maintain reliability. The Evolve Hadean manual explicitly warns against storing the board in extreme temperatures to prevent battery damage. Keeping everything snug is a key part of the install hardware philosophy for a reason—it’s the foundation of a reliable setup.
The Kingpin vs. Mounting Hardware Confusion
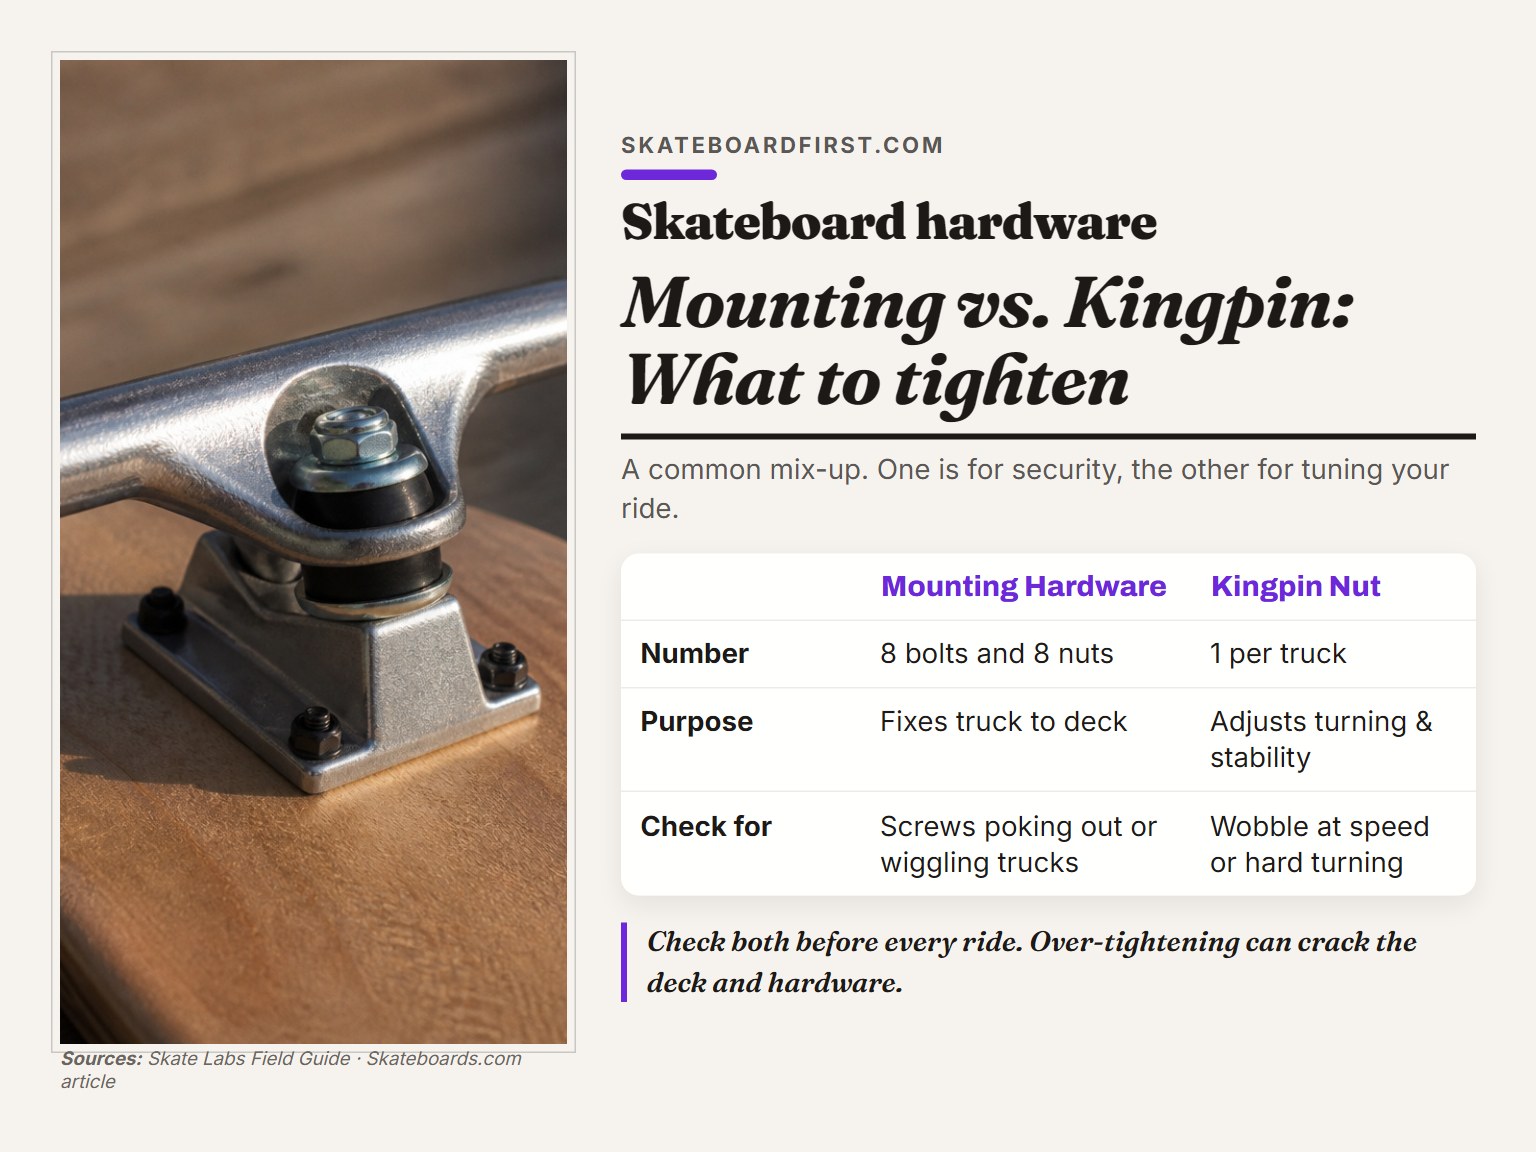
A common mix-up occurs when riders confuse adjustments. A rider was cranking down on his kingpin nut because his board felt “loose,” but the problem was actually two loose deck bolts. These are two different adjustments with two different purposes.
- Mounting Hardware (8 bolts & nuts): This fixes the truck to the deck. It should be tight and static. There’s no performance adjustment here—just security.
- Kingpin Nut (1 per truck): This adjusts the truck’s turning resistance and stability. It’s a dynamic, personal setting you tune for your riding style.
Checking one but not the other leaves a gap in your safety routine. The mounting bolts keep the truck on; the kingpin nut keeps you stable. When learning how to tighten skateboard trucks or how to loosen skateboard trucks, you’re only ever touching the kingpin nut, not the eight mounting bolts.
A nut had worked loose. Now, the two-minute check is non-negotiable, even if I’m just cruising to the store.
Frequently Asked Questions
How often should I check my skateboard hardware tightness?
Before every ride. It takes less than a minute. Skateboards.com advises checking often, noting that boards used more frequently need checking more often. A quick visual and hand test catches 99% of problems before they become dangerous.
What size hardware do I need for my deck?
For most standard setups without riser pads, you need 8 bolts that are 7/8 inch long. This is the standard cited in the Skate Labs field guide. If you use riser pads, you’ll need longer bolts. Our skateboard hardware size guide breaks down the exact lengths needed for different setups.
My bolts keep coming loose even after I tighten them. Why?
This usually points to one of three issues: worn bushings that can’t hold the setting, stripped bolt threads that won’t grip the nut, or a missing lock washer. It could also be that you’re not tightening them enough to begin with—”snug” means no movement, not just contact. If the problem persists with new, undamaged hardware, check that your deck’s mounting holes aren’t wallowed out.
Can I use regular tools from my garage?
Yes, but with caveats. A Phillips screwdriver and the correct size wrench (usually 3/8-inch) will work. However, using pliers or an adjustable wrench often rounds off the nuts. For a proper, consistent job, a dedicated skate tool is best. If you’re in a bind, we cover some tool alternatives that can work.
Is it bad if my deck bolts sink into the wood a little?
Small amount of sinking is normal as the wood compresses. It’s not a structural issue if the bolt is still tight. However, if a bolt sinks deeply and the head is below the grip tape, it can be harder to remove later. Using hardware with a larger head diameter can help distribute the pressure and slow this process.
The Bottom Line
Checking your hardware isn’t a monthly chore; it’s a pre-flight ritual. A bolt that’s flush and a truck that doesn’t wiggle.
The one threshold that changes everything: if you feel any new vibration or hear a new rattle while riding, that’s your cue to stop and check immediately. Don’t wait until the end of the session. That new noise is often the last warning before something comes completely loose.
So here’s your takeaway: grab your board right now. Run through the 60-second check. See if all eight bolts are flush. Try to wiggle the trucks. It’s the simplest, most effective habit you can build for safer skating. Your deck will last longer, your rides will be smoother, and you’ll spend a lot less time sitting on the ground wondering what just broke.
