
How to Place Your Feet When Pushing a Skateboard
This post contains affiliate links. As an Amazon Associate, we earn from qualifying purchases.
Place your front foot over the front truck bolts at about a 45-degree angle, push with your back foot, then bring that foot onto the board over the rear bolts and pivot your front foot sideways. Skateboard GB advises that feet should always be over the top of the bolts for balance, while Decathlon SG emphasizes avoiding feet together for better control.
That sequence is the blueprint, but the details inside it decide whether you feel stable or shaky. The angle of your front foot, where you place your weight, and the timing of your pivot change everything from your speed to your ability to stop. A key detail is knowing how to place your feet when pushing a skateboard.
What follows breaks down that blueprint into the exact foot positions you need, why they work, and where most guides leave you hanging on the how to place your feet when pushing a skateboard question. You’ll get the step-by-step from official sources, a clear map of where those sources disagree, and the one adjustment that fixes a wobbly push.
Key Takeaways
- Keep your feet over the bolts for control; letting your toes hang over the edge makes the board unstable.
- Push with your weight on your front leg; leaning back while you push throws your balance off.
- Find your natural stance first by stepping onto the board without thinking, your body usually knows.
- Wear a helmet approved by a testing group, with the Snell B-95 standard being best for skateboarding, and knee pads, elbow pads, and wrist guards every session.
- Practice the front foot pivot on grass or a rubber surface first to build the muscle memory safely.
Before You Start: Gear and Surface
You can’t focus on your feet if you’re worried about falling. Sources like the CDC and Decathlon SG strongly recommend wearing a helmet, knee pads, elbow pads, and wrist guards. The CDC specifies that your helmet should be approved by a testing group, with the Snell B-95 standard being best for skateboarding.
Your shoes matter too. The CDC and Decathlon both warn against slippery shoes, heels, or flip-flops. You need a flat, grippy sole. A pair of skate shoes with a flat, grippy sole works because the rubber grips the grip tape.
Where this goes sideways: Skipping pads to “look cool.” A beginner fall onto concrete without wrist guards can mean a hairline fracture and six weeks off the board.
Now, where should you practice? If you’re just starting, the CDC advises a smooth, flat surface. The guide from Nike.com recommends starting on grass or a rubber playground surface. The board moves slower and falls are softer. Get comfortable stepping on and off there before you hit pavement.
Finding Your Stance: Regular or Goofy
Your stance is which foot leads on the board. If your left foot goes forward and you push with your right, you’re regular. If your right foot goes forward and you push with your left, you’re goofy. Skateboard GB’s PDF uses those exact definitions.
Don’t overthink this. Most online quizzes are overrated. Here’s a better test: stand with your feet together and have a friend gently push you from behind. The foot you step forward with to catch yourself is likely your front foot. Or, just step onto the board naturally a few times. Your body usually picks one. Go with what feels stable, forcing your friend’s stance is a common beginner mistake.
Once you know, stick with it for a while. Finding your natural stance is the foundation for everything else.
The Pushing Sequence: Step-by-Step
This is the core technique. Sources agree on the overall flow but differ on specifics, which we’ll address in the next section. Here’s the consensus sequence, pulling from the CDC, Skateboard GB, and others.
Sources like the CDC and Skateboard GB advise placing your front foot on the board over the front bolts at about a 45-degree angle, while others like Sikana and Decathlon SG suggest a parallel position. Bend that knee. Push off the ground with your back foot, then place it on the board over the rear bolts. Once moving, pivot your front foot so both feet are sideways, perpendicular to the board.
Here is a breakdown of the steps.
-
Position Your Front Foot. Place your front foot on the deck. Guides disagree on front foot coverage: Skateboard GB and Nike.com say to cover bolts, while Sikana says toes should not cover bolts and Decathlon SG says toes should be between screws. Skateboard GB says “just overlapping the first two bolts.” Nike’s guide says cover two bolts, leave two visible. The key is having your foot over the bolts for balance. Your toes should not be hanging over the edge in a way that destabilizes the board.
-
Bend Your Front Knee and Push. Put your weight on that front leg and bend the knee. This is crucial. As Decathlon’s guide notes, you have to put your weight on your front leg to push straight. Now push off the ground with your back foot. Don’t just tap the ground; push off the ground with your foot for a solid stroke. Sikana’s guide says push once or twice from the toes.
-
Return Your Back Foot. After pushing, bring your back foot onto the board. Skateboard GB says place it “across the tail of the skateboard, just over the bolts,” while Decathlon SG recommends placing it “approximately at the level of the screws, or slightly behind them.” This gives you control of the tail for steering and stopping.
-
Pivot Your Front Foot. This is the magic move. Once both feet are on the board and you’re rolling, pivot your front foot. Use the ball of your foot, as Skateboard GB instructs, to swing your toes from pointing forward to pointing sideways. Now both feet are perpendicular to the board, giving you a stable, balanced riding stance.
-
Repeat to Gain Speed. To push again, reverse the pivot. Swing your front foot back to that 45-degree angle pointing forward, step your back foot off and push, then return and pivot. This transition between push stance and riding stance is the rhythm of cruising.
Your pushing technique improves with mileage, not magic. Go roll.
Where the Guides Disagree (And Why It Matters)
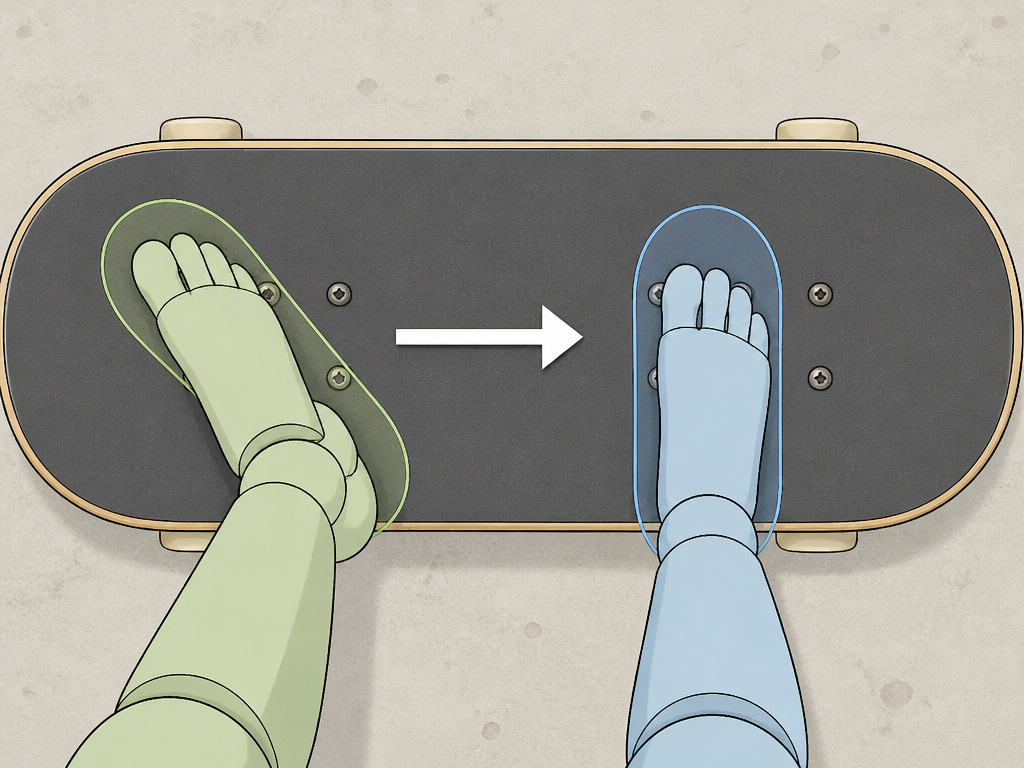
If you watch different tutorial videos, you’ll see variations. That’s because even official sources disagree on some specifics. Knowing this helps you experiment and find what works for you.
| Point of Disagreement | Position A | Position B | What It Means for You |
|---|---|---|---|
| Front Foot Angle During Push | CDC & Skateboard GB: Front foot at ~45° over bolts. | Sikana & Decathlon SG: Front foot parallel to board, toes between screws. | Try both. The 45° angle gives many beginners a more stable platform to push from. The parallel position can feel more natural for some. |
| Front Foot Pivot Timing | Nike/Sikana: Pivot after back foot is on the board. | Skateboard GB: Pivot “once moving,” which implies during or after foot placement. | This is often a feel thing. Pivoting a split-second after your back foot lands is generally smoother than waiting too long. |
| Back Foot Placement Post-Push | Skateboard GB: “Across the tail… just over the bolts.” | Decathlon SG: “At the level of the screws, or slightly behind them.” | “Over the bolts” is the safe target. “Slightly behind” shifts your weight back, which is useful for steering but less stable at first. |
The main takeaway? These are minor adjustments, not fundamental errors. Your complete foot placement guide should include these options so you can troubleshoot your how to place your feet when pushing a skateboard technique. If your push feels shaky, try changing your front foot angle. If you can’t pivot smoothly, check your pivot timing.
Common Beginner Foot Mistakes
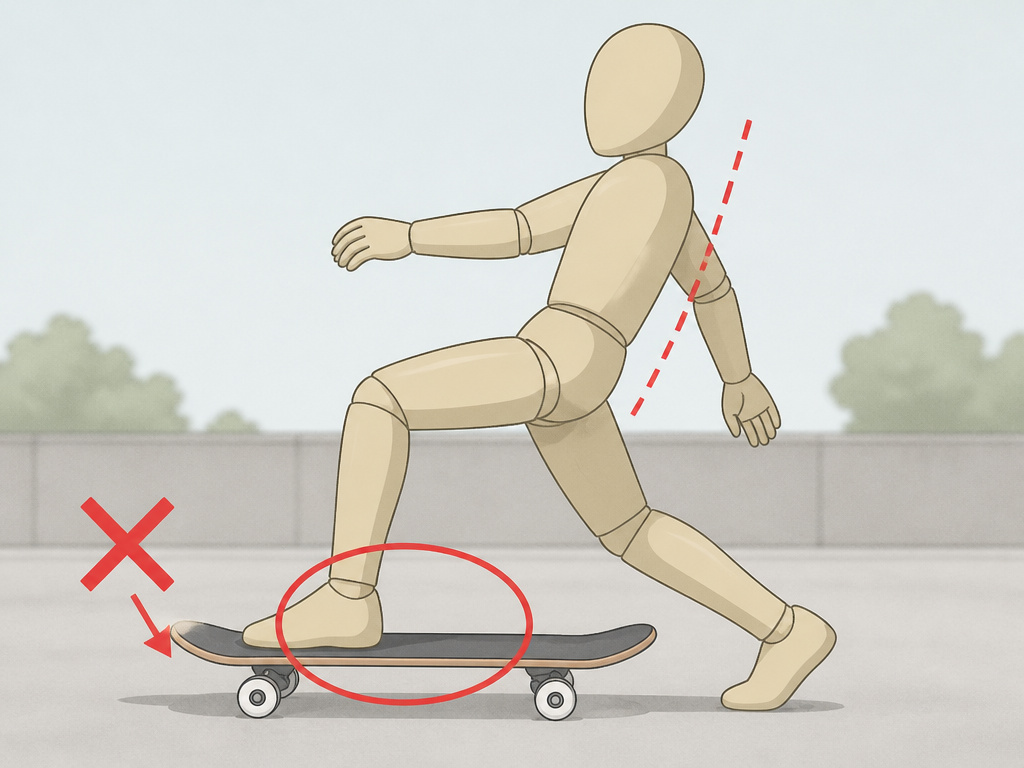
I’ve filmed myself pushing for years. The footage never lies. What I thought was a clean pivot was often a clumsy shuffle. Here are the errors I see most often, both in my own old clips and in forum posts.
- Toes Over the Edge. Letting your front toes creep past the nose of the board. This moves your center of gravity too far forward. Hit a pebble or lean forward, and you can lose balance. Keep your foot centered.
- Feet Too Close Together. Standing with your feet almost together on the board feels unstable. Decathlon’s guide explicitly says to avoid it. You need your legs apart and knees bent for control.
- Leaning Back While Pushing. This is a big one. You must keep your weight on your front leg. If you lean back onto your pushing foot, you can lose balance and fall. It feels like the board is running away from you.
- Not Pivoting at All. Some beginners push, put both feet on, but leave the front foot pointing forward. This twists your hips and shoulders, making balance and turning on a skateboard much harder. Force the pivot until it’s automatic.
- Pushing Mongo. This means pushing with your front foot instead of your back foot. It’s not a sin, but it’s less efficient and makes switching back to a riding stance slower. Most instructors recommend learning the standard push first. If you naturally push mongo, our mongo push guide covers the adjustments.
Easy to miss: Your back foot shouldn’t slam onto the board. Place it gently over the bolts. A heavy stomp can upset your balance and stop your momentum.
Leveling Up Your Push
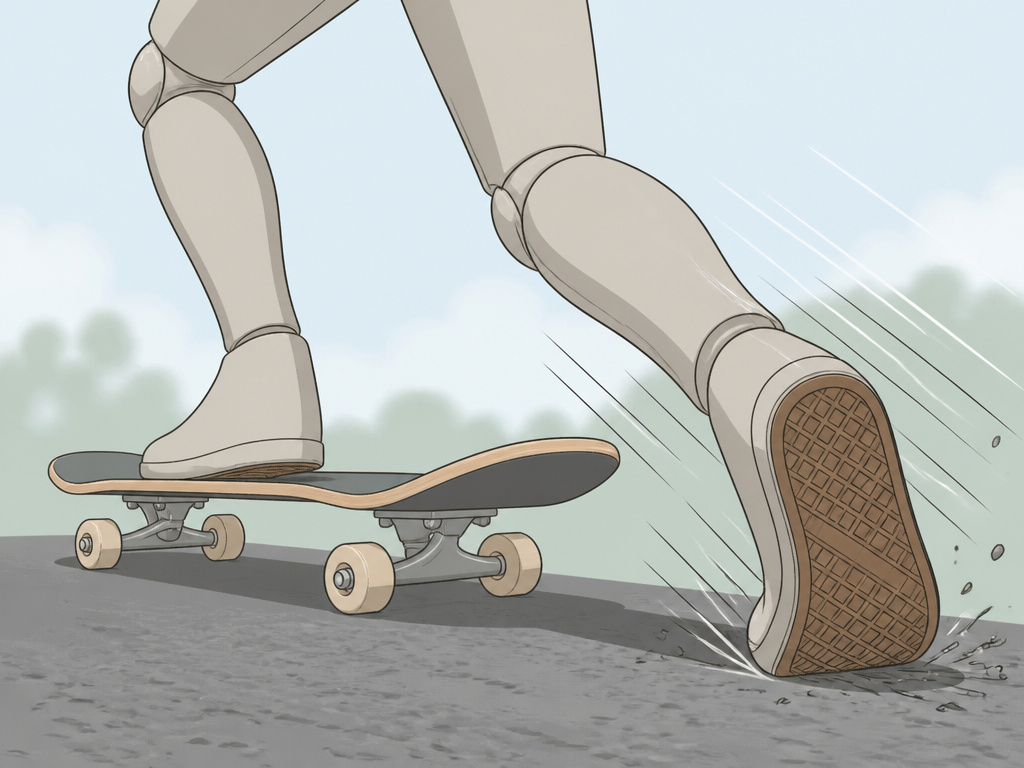
Once you’re moving comfortably, these refinements give you more power and control.
Weight Distribution for Power. As you push, think about driving your back foot down and back into the ground, not just tapping it. You’ll feel your thigh muscle engage. This is the difference between shuffling along and getting real speed.
Pushing Uphill or on Rough Ground. On rough terrain, you need quicker, shorter pushes to maintain momentum. You’ll also bend your knees more to absorb bumps.
Learning to Push Switch. This means pushing with your opposite stance. It’s awkward at first but invaluable for maneuvering. The UK governing body skateboarding manual from Skateboard GB doesn’t cover it, but the principle is the same: front foot over bolts, push with the other, pivot. Start on a smooth, flat surface and expect to feel like a beginner again. The board control it provides is worth the initial frustration.
Stopping Safely. The CDC’s simple method is to step off with your back foot if you’re going too fast. The more controlled method is foot braking: drag the sole of your pushing foot lightly on the ground. Skateboard GB calls this “gradually apply pressure to the ground until you come to a stop.” Learn this early. Knowing how to stop builds confidence to go faster.
Frequently Asked Questions
Where should my feet be when I’m just standing on the skateboard?
When standing still or riding, your feet should be over or just behind the truck bolts, with your knees bent. This “bolts for balance” rule from Skateboard GB gives you the most control. Your feet should be shoulder-width apart, not together.
How do I know if I’m regular or goofy?
The simplest way is the slide test: on a smooth floor in socks, take a running start and slide. The foot that naturally goes forward is likely your front foot. Or, have someone give you a gentle shove from behind; the foot you step out with is your lead foot. Your instinct for determining your skateboarding stance is usually right.
Why do I keep losing my balance when I try to push?
You’re probably looking down at your feet or leaning your upper body. Keep your head up and look where you’re going. Your weight needs to be centered over your front foot on the board, not hovering over your pushing foot. Practice the motion of shifting weight onto the front foot while stationary on grass.
Is it okay to push with my front foot (mongo)?
It’s okay, but it’s less efficient. Pushing mongo makes it harder to quickly get your feet into a stable riding position for steering or stopping. Most skaters learn the standard push for that reason. If mongo feels natural, you can make it work, but be aware of the trade-off in setup time.
How can I get more speed with each push?
Push deeper and follow through. A timid tap won’t do much. Bend your pushing leg more and drive your foot through the entire motion, from behind you to in front of you, like you’re kicking a soccer ball. The power comes from your thigh, not your ankle.
The Bottom Line
The correct foot placement isn’t a single frozen pose. It’s a dance between two positions: a forward-pointing foot for pushing and a sideways stance for riding. The pivot connecting them is the skill.
If you remember one thing, let it be “bolts for balance.” Keep your feet over those truck bolts whether you’re pushing, cruising, or stopping. That alone fixes most wobbles.
Now, take this off the page. Go find a flat, smooth piece of ground, a parking lot, a bike path, a tennis court. Don’t worry about going fast. Just work on the sequence: place, push, return, pivot. Do it a hundred times. Your feet will learn the rhythm long before your brain can explain it. That’s how you build the balance that makes everything else possible.
