
How to Kickflip on a Skateboard: The 5-Step Breakdown
This post contains affiliate links. As an Amazon Associate, we earn from qualifying purchases.
To kickflip on a skateboard, you combine a solid ollie with a precise front-foot flick off the nose’s corner. Pop the tail, slide that front foot up and out through the “sweet spot” where the nose curves, jump high, let the board spin, and catch it with your back foot before landing bolts.
That sequence is the modern standard, but it wasn’t always this way. The original 1970s version looked completely different, and even today, pro tutorials disagree on fine points like exactly how to flick or which foot should catch the board when learning how to kickflip on a skateboard.
What follows is a breakdown of the five essential phases, where the sources conflict, and the one mental shift that makes the trick click.
Key Takeaways
- Master the moving ollie first. A kickflip is an ollie with a flick; if your ollie isn’t consistent, your kickflip has no foundation.
- Front foot placement is your main control. Sources disagree on front foot placement: Skateboarding.com recommends placing it an inch below the bolts at a 45-degree angle, while Red Bull suggests having the foot off the board a bit with the ball behind the front trucks.
- The flick is a delayed, two-part motion. Slide your foot up the board, then flick your ankle outward through the nose’s corner pocket, don’t just kick straight down.
- Commitment beats technique every time. You must jump upward and stay over the board; bailing by kicking your back foot away is a common reason people don’t land it.
- Sources disagree on how to catch: Skateboarding.com recommends catching the tail with your back foot, while OnFlatTricks says you can catch with both feet if you prefer.
The Prerequisite: A Solid, Moving Ollie
You cannot build a house on sand. Trying a kickflip before your ollie is automatic is like trying to write a novel before you know the alphabet, frustrating and doomed.
The Red Bull editorial states it plainly: the ollie is the most important trick to master first. Learning how to kickflip on a skateboard is mechanically an ollie with an added flick. If you’re still thinking about popping, sliding your foot, and jumping in sequence, you don’t have the mental bandwidth to add the flip. Your ollie should feel boring. You should be able to do it rolling at a comfortable speed, over a crack, or up a curb. That muscle memory is the platform everything else sits on.
If your ollie is still theoretical, go learn that first. Everything here assumes you’ve checked that box.
The 5-Step Kickflip Sequence
Break the trick into these distinct phases. Practice each one deliberately before chaining them together.
1. Stance and Foot Placement
This is where your control is set. The consensus is clear on the goal: your front foot needs to be angled to flick the board efficiently.
According to Blair Alley’s tutorial on Skateboarding.com, your front foot should be placed an inch below the bolts at a 45-degree angle, with your heel slightly off the board. Your back foot is centered on the tail.
The Red Bull guide offers a slight variation, suggesting the front foot should be “off the board a bit and angled slightly, with the ball of your front foot behind the front trucks.” Both descriptions aim for the same outcome, your front toes need access to the board’s edge to flick it. The “inch below the bolts” is a measurable, repeatable starting point. Experiment from there.
2. The Pop and the Flick
This is the heart of the trick and the source of most confusion. It’s not one motion, but two connected actions.
First, pop the tail down hard with your back foot, just like a powerful ollie. You should hear that crisp snapping sound. As you pop, begin sliding your front foot up the board toward the nose. Now comes the critical part: the flick. As your front foot reaches the curve of the nose, the “pocket” or “sweet spot”, you flick your ankle outward and forward, driving the ball of your foot off the corner.
The OnFlatTricks tutorial emphasizes that “sliding with your foot and flicking with your ankle are two different movements that should be slightly delayed.” Don’t just slam your foot down; a quick, sharp ankle flick is what spins the board cleanly.
3. The Jump and Board Catch
Your body must go up, not out. A common mistake is to jump forward, which throws you off balance and sends the board flying away. As you execute the pop-and-flick, jump straight upward, bringing your knees toward your chest.
While you’re in the air, focus on the board. Your back foot’s job is to catch the tail and stop the rotation. The Skateboarding.com guide is explicit: “Catch the tail of your board with your back foot.” This gives you control. The Red Bull guide is less specific, saying to “guide your feet to position them over the hardware.” For learning, aiming to catch with your back foot provides a clear, actionable target.
4. The Landing
A proper landing is silent and stable. As you catch the board, extend your legs to meet it. Aim to land with your feet positioned over the bolts, knees bent to absorb the impact. All four wheels should touch down simultaneously. If you hear a “slap,” that’s your feet catching the board firmly, a sign of a firm catch.
5. Practice and Adjustment
The first kickflip is a milestone, but consistency is the real goal. You must drill it. Ride around and attempt them regularly. Pay attention to what changes: a stronger pop, a sharper flick, a higher jump. As you get comfortable, you’ll start adjusting for different speeds and obstacles.
| Phase | Key Action | Common Error | The Fix |
|---|---|---|---|
| Stance | Front foot 1″ below bolts, 45° angle. | Foot too flat or too far back. | Mark the spot with chalk; feel the heel off the edge. |
| Pop & Flick | Hard tail pop + delayed ankle flick off nose. | Kicking foot straight down, not flicking. | Practice the flick motion stationary, foot on the tail. |
| Jump & Catch | Jump upward, catch tail with back foot. | Jumping forward or bailing back foot away. | Hold a railing to practice the jump and catch without moving. |
| Landing | Land bolts, knees bent, wheels simultaneous. | Landing on heels or toes first, causing slip-out. | Focus on staying centered over the board during the entire trick. |
Common Kickflip Mistakes and How to Fix Them
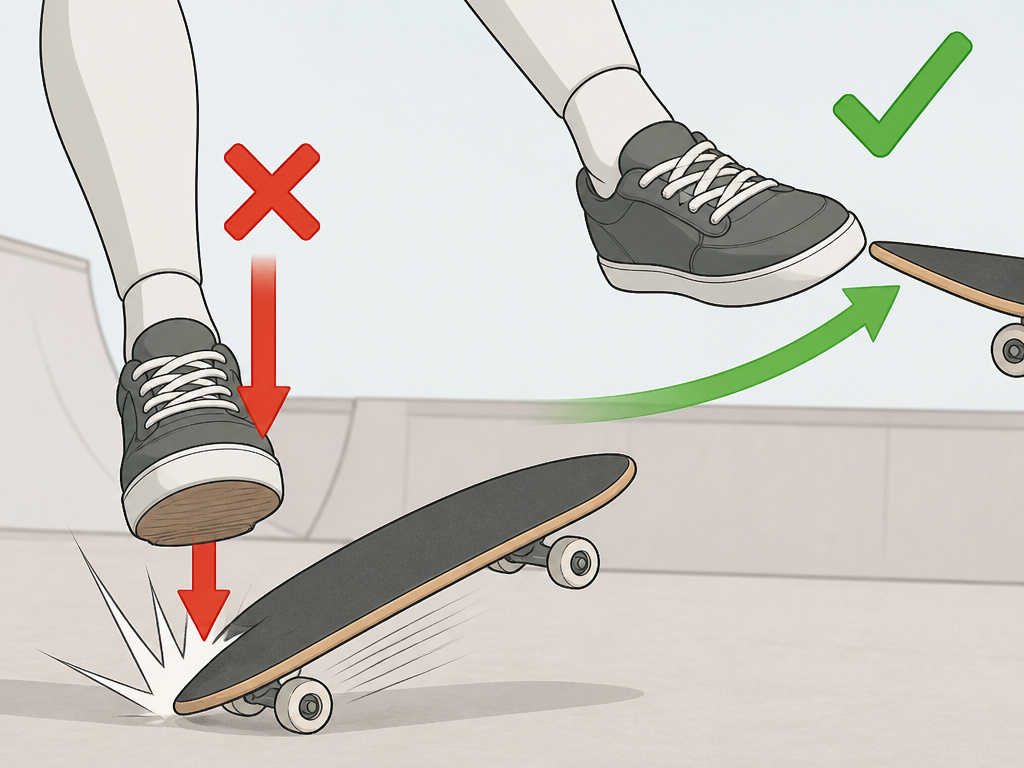
Most struggles come from a small handful of errors. Identify yours here.
The board rockets away (doesn’t flip).
You’re kicking straight down, not flicking out. Your foot is acting like a brake, stopping the board’s spin before it starts. The fix is to mentally separate the slide from the flick. Practice the ankle motion while stationary.
The board flips but shoots out in front of you.
You’re not jumping upward, or you’re kicking the board away with your flick. Your shoulders might also be turning. Focus on a vertical jump and keeping your shoulders parallel to the board. The flick should be light and quick, not a powerful shove.
You land with the board upside-down or only one foot on.
This is a commitment issue, often called “foot braking.” You’re not committing your back foot to the catch and landing. Your brain is protecting you from a fall by refusing to put that foot down. The harsh truth? You have to decide to land it, even if you fall.
Where this goes sideways: Bailing your back foot away from the board. You’ll land on the ground every single time, often slamming the board into your shins. Commit to putting that foot on the board, even if you fall trying.
The flip is slow and mushy.
Your pop is weak. A kickflip needs a strong, snappy ollie to create the airtime and board tension for a fast flip. Go back to practicing higher, more powerful ollies. A board that’s level in the air, as the Red Bull guide notes, is a sign of good pop.
The History and Mechanics of the Flip
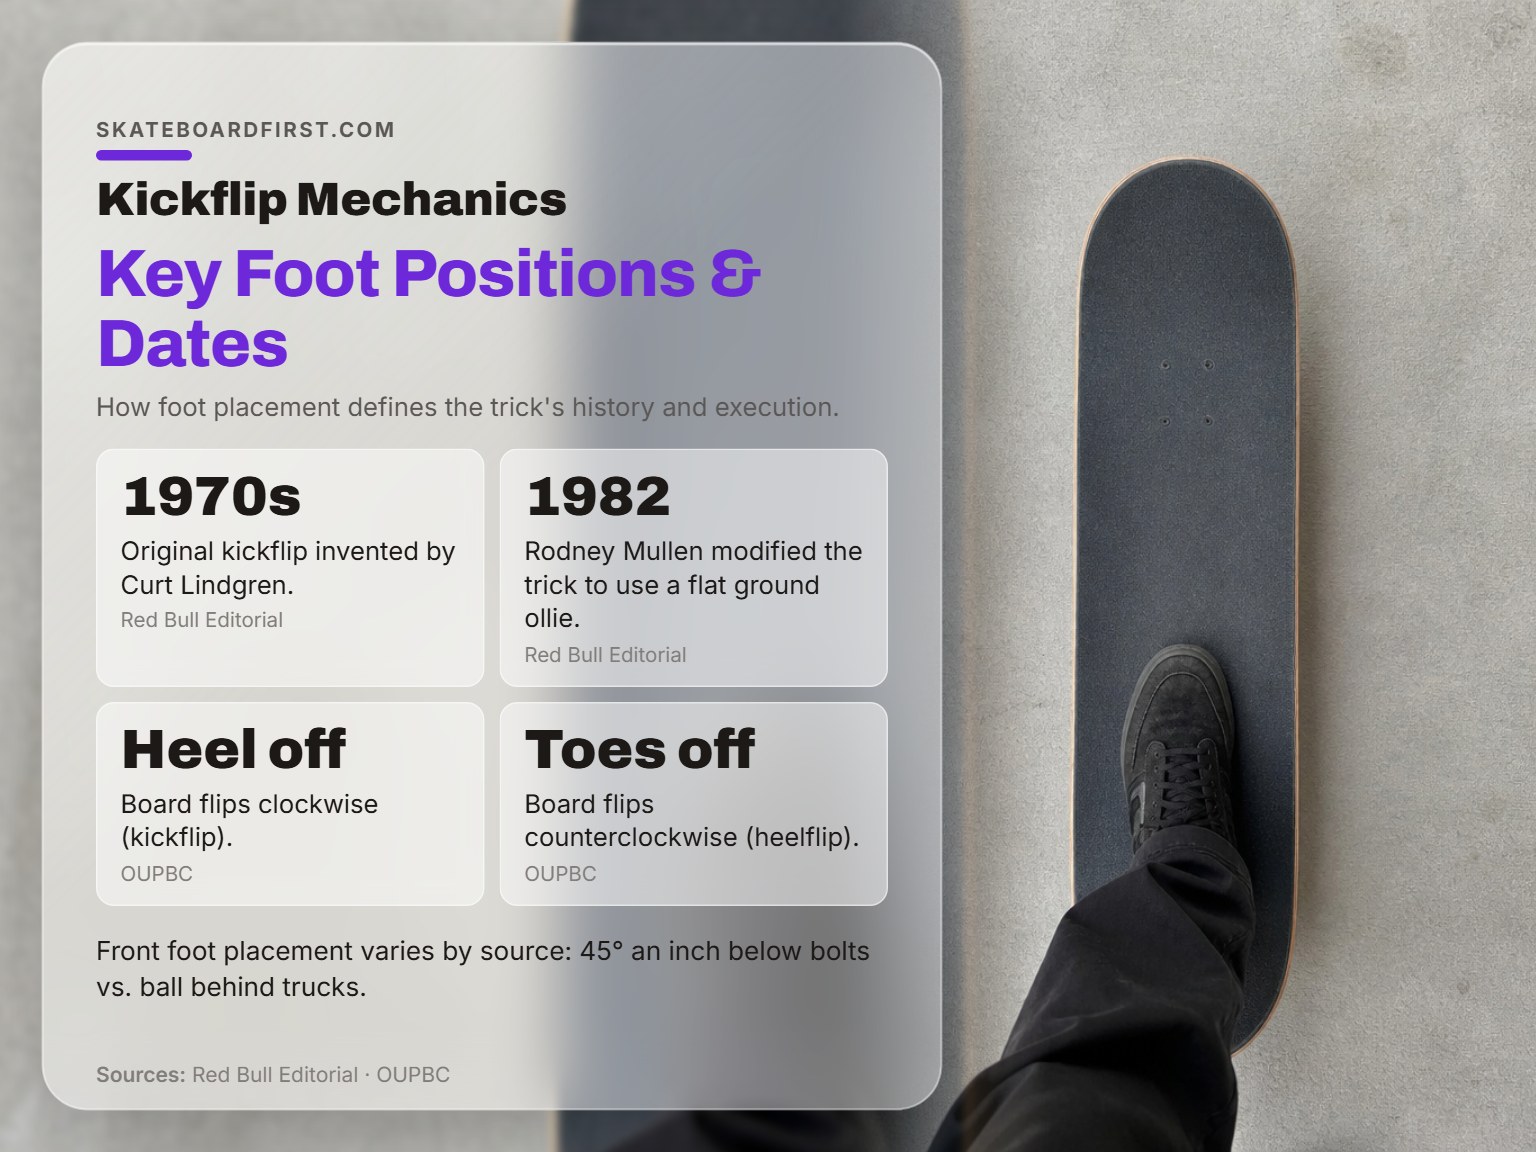
Understanding why your foot position matters can demystify the trick. The modern kickflip is a specific mechanical invention.
He performed it by “placing the top of his toe under his board and flipping it upwards,” as noted in the Red Bull article. It was more of a foot-powered scoop.
Rodney Mullen changed it in 1982 by adapting it to the flat-ground ollie. This created the controlled, high-flying trick we know today. The core mechanical principle is simple: hanging your heel off the edge of the board makes it flip clockwise (a kickflip); hanging your toes off makes it flip counterclockwise (a heelflip). This is the fundamental physics behind how to kickflip on a skateboard. This fundamental insight, noted in an Oxford University Press academic chapter on skateboarding trick grammar, explains why your foot’s position relative to the edge is everything.
Kickflip Next Steps: Variations and Related Tricks
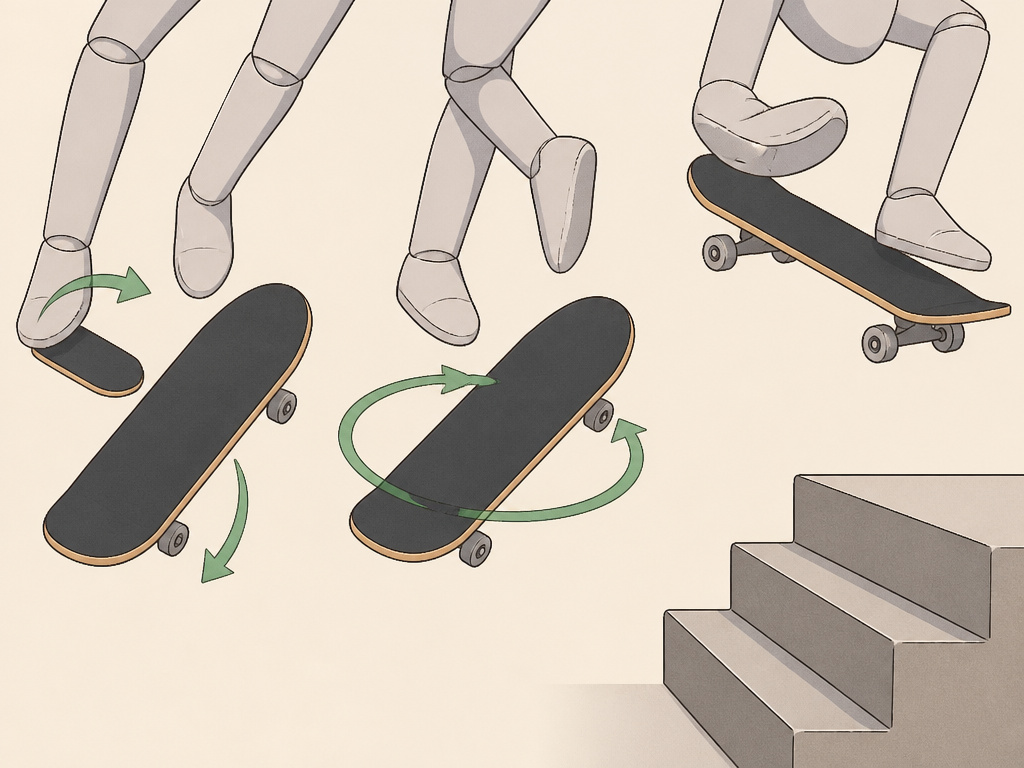
Once your standard kickflip is on lock, the world of flip tricks opens up. Each one modifies a variable in the basic formula.
- Heelflip: The mirror-image cousin. Your front foot placement shifts so your toes hang off, and you flick with your heel. It’s a natural progression once you understand the flip mechanic.
- Varial Kickflip: A combination trick. You add a slight backside 180 shuv-it motion with your back foot as you kickflip. It’s less about a harder flick and more about coordinating both feet to spin and flip the board simultaneously.
- Kickflip Down Stairs: The ultimate test of commitment and pop. You need exceptional height and timing to clear the stair gap while completing the flip.
Your first heelflip or varial kickflip will come much faster after mastering the basic flip motion here.
Frequently Asked Questions
Why does my skateboard only flip halfway?
You’re likely flicking too early, before the board has fully popped. This kills the board’s upward momentum. Focus on a stronger pop and delay your flick until your front foot is almost at the nose. The board needs air to complete the rotation.
Should I learn kickflips stationary or while moving?
Always learn them while moving, even if it’s just a slow roll. A stationary kickflip is an unnatural balance test. When rolling, the board’s momentum helps stabilize it, and the landing is more natural. It’s scarier, but it’s correct.
How long does it take to learn a kickflip?
There is no standard timeline. It depends entirely on the consistency of your ollie, your practice frequency, and your willingness to commit. For some, it clicks in a session. For others, it takes months of daily attempts. The key is focused practice, not just mindless repetition.
What’s the difference between a kickflip and a heelflip?
The flip direction and the flicking foot. For a kickflip, your heel hangs off, and you flick with your toes to spin the board clockwise (from your perspective). For a heelflip, your toes hang off, and you flick with your heel to spin it counter-clockwise. The foot mechanics are mirror images.
My kickflips always rocket (stay vertical). How do I fix it?
This is the most common problem. You are not flicking through the nose’s corner. You are kicking your foot straight down the side of the board, which stops the flip. Concentrate on pointing your flick out and off the nose, not down. Visualize kicking something away from you with the side of your foot.
Before You Go
The kickflip is a rite of passage, but it’s not a magic trick. It’s a mechanical process of pop, flick, jump, and catch. The biggest barrier isn’t skill, it’s the fear of committing both feet to a spinning board.
One rule most guides skip: if you find yourself stuck for weeks, put the kickflip away for a few days. Work on landing kickflips consistently later, but for now, go skate. Do ollies over things, practice kickflips while moving at speed, or learn a shuv-it. Often, the breakthrough comes when you stop grinding and let your subconscious work on the problem. Then, when you come back, your body has figured out the timing.
Go roll, pop, and flick. The landing is worth the slams.
