
How to Ride a Skateboard for Beginners: Step-by-Step
This post contains affiliate links. As an Amazon Associate, we earn from qualifying purchases.
To ride a skateboard for beginners, start by finding your stance (regular or goofy), then practice balancing and pushing on a forgiving surface like grass or a rubber playground. Wear a helmet designed for skateboarding, wrist guards, and other protective gear. According to the American Academy of Pediatrics, one-third of skateboard injuries happen in the first week, so mastering controlled stops before gaining speed is critical.
That first-week injury stat isn’t a scare tactic. It’s a mechanical reality. A new skater’s muscles haven’t built the micro-adjustments for balance, and their reflexes haven’t learned how to fall. The board rolls, they tense up, and a simple wobble becomes a hard landing. This is why understanding how to ride a skateboard for beginners is so critical.
What follows is a progression built from official coaching manuals and government safety sheets on how to ride a skateboard for beginners, not just park lore. This guide explains the gear that actually works, the surface sequence that prevents early slams, and how to translate ‘lean back slightly’ into something your feet can actually do.
Key Takeaways
- Sources disagree on the best starting surface: a USSEA-certified educator recommends starting on grass, then a rubber playground surface, while the CDC recommends a smooth, flat surface.
- One-third of injuries happen in the first week, so focus on pushing, turning, and stopping before any tricks.
- Sources disagree on front foot positioning: SkateboardGB says to overlap the first two bolts, Nike.com says to cover two bolts, and Skateboarding.com recommends a 45-degree angle.
- A cruiser or longboard (32–36 inches) with large, soft wheels (60–70mm) is more stable for beginners than a standard trick board.
- The Consumer Product Safety Commission states a helmet must be designed for skateboarding (hard shell with foam) and worn level, not tilted back.
Safety Gear Is Non-Negotiable
You can debate truck tightness or wheel hardness, but the CPSC skateboarding safety fact sheet leaves no room for argument on gear. Their directive is simple: wear it, and wear the right kind.
A skateboard helmet isn’t just any helmet. The CPSC specifies it must be designed for skateboarding (hard shell with foam interior). A skateboard helmet should be designed for skateboarding (hard shell with foam interior), per the CPSC. It should fit snugly with the chin strap fastened and sit level on your head, not tilted back like a hat. A loose helmet can come off on impact.
Where this goes sideways: Skipping wrist guards because they feel bulky. The CPSC notes they are “especially important for skateboarding.” Your instinct when falling forward is to put your hands out. Wrist guards transfer that impact energy along the splint to your forearm, not through your wrist bones. A sprain takes you out for weeks.
Knee and elbow pads round out the set. For your first board, the CDC skateboarding physical activity page recommends a pre-assembled complete. The CPSC advises inspecting and adjusting your board before you ride.
One specific warning changes the game for electric boards. In September 2023, all models of Onewheel electric skateboards were recalled after four reported deaths. The cause was the board stopping balancing the rider if its limits were exceeded. This is a different failure mode than a regular board; standard pushing and stopping techniques don’t apply.
Find Your Stance Before Moving an Inch
Your stance, regular or goofy, is your foundation. Your brain has a natural preference, and fighting it makes every step harder.
Here’s the fast test. Stand straight, have a friend gently push you from behind. The foot you step forward with to catch your balance is likely your front foot on the board. If it’s your left, you’re regular. If it’s your right, you’re goofy. That’s it. No overthinking. The national governing body beginner guide from SkateboardGB puts it simply: “Regular stance is when you place your left foot on the board and push with your right. Goofy stance is when you place your right foot on the board and push with your left.”
This isn’t about labels. It’s about matching your wiring. I spent my first few sessions trying to push “regular” because it was the common term. My pushes were weak and my balance was off. Switching to my natural goofy stance felt like the board finally listened to me. The difference was immediate.
| Stance | Front Foot | Push Foot | Feels Natural If… |
|---|---|---|---|
| Regular | Left | Right | You step left foot forward when pushed. |
| Goofy | Right | Left | You step right foot forward when pushed. |
| Switch | Opposite your natural | Opposite your natural | An advanced technique for riding fakie. |
Once you know your stance, the next skill is balancing on a board. SkateboardGB’s mantra is “Bolts for Balance”, your feet should always be over the top of the bolts. This centers your weight over the trucks, the board’s pivot points, giving you maximum control.
The 4-Step Beginner Progression (Grass, Rubber, Concrete)
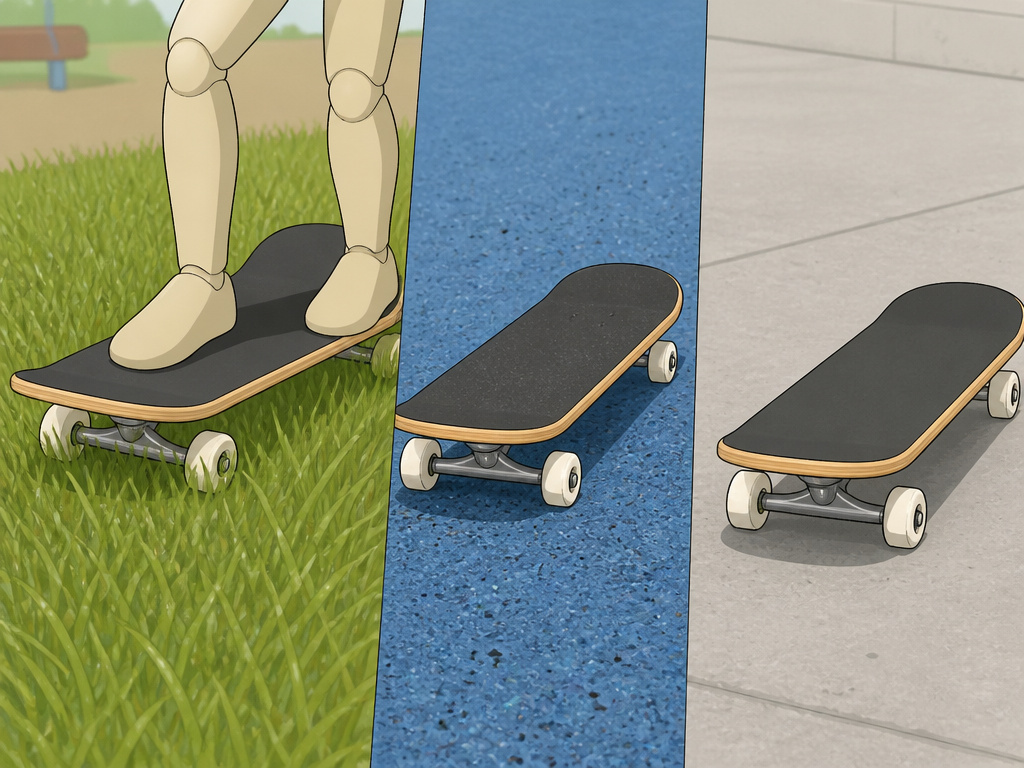
Most guides tell you to find a smooth, flat parking lot. A USSEA-certified educator on Nike.com argues that’s too big a first step. Their method is a controlled progression that builds confidence by managing the board’s roll.
Start on grass. The blades stop the wheels from rolling freely. Here, you practice the absolute basics: stepping on, finding your balance point, and stepping off. You can jump on with both feet (as SkateboardGB suggests) or place your front foot first (as the Nike guide advises). The goal is to get comfortable with the board under your feet without the fear of it shooting out.
Move to a rubber playground surface. This is the secret weapon. It’s level and slow, but firm. The board will roll, but with enough friction that a small mistake won’t send you flying. This is where you learn to push and roll a few feet, then stop. Falls here are more forgiving than concrete.
Transition to concrete or asphalt. Only after you can reliably push, roll, and stop on rubber do you move to the real surface. The skills are the same, but the board behaves faster and more smoothly. This progression directly addresses the CDC’s “smooth, flat surface” advice but adds two safer steps before it.
I taught my nephew using this method. On concrete day one, he froze. We went back to the school’s rubber basketball court. By day three, he rolled onto the concrete without realizing it and didn’t panic. The progression works because it makes the scary part, speed, the last thing you add.
Foot Placement: The Conflicting Advice, Decoded
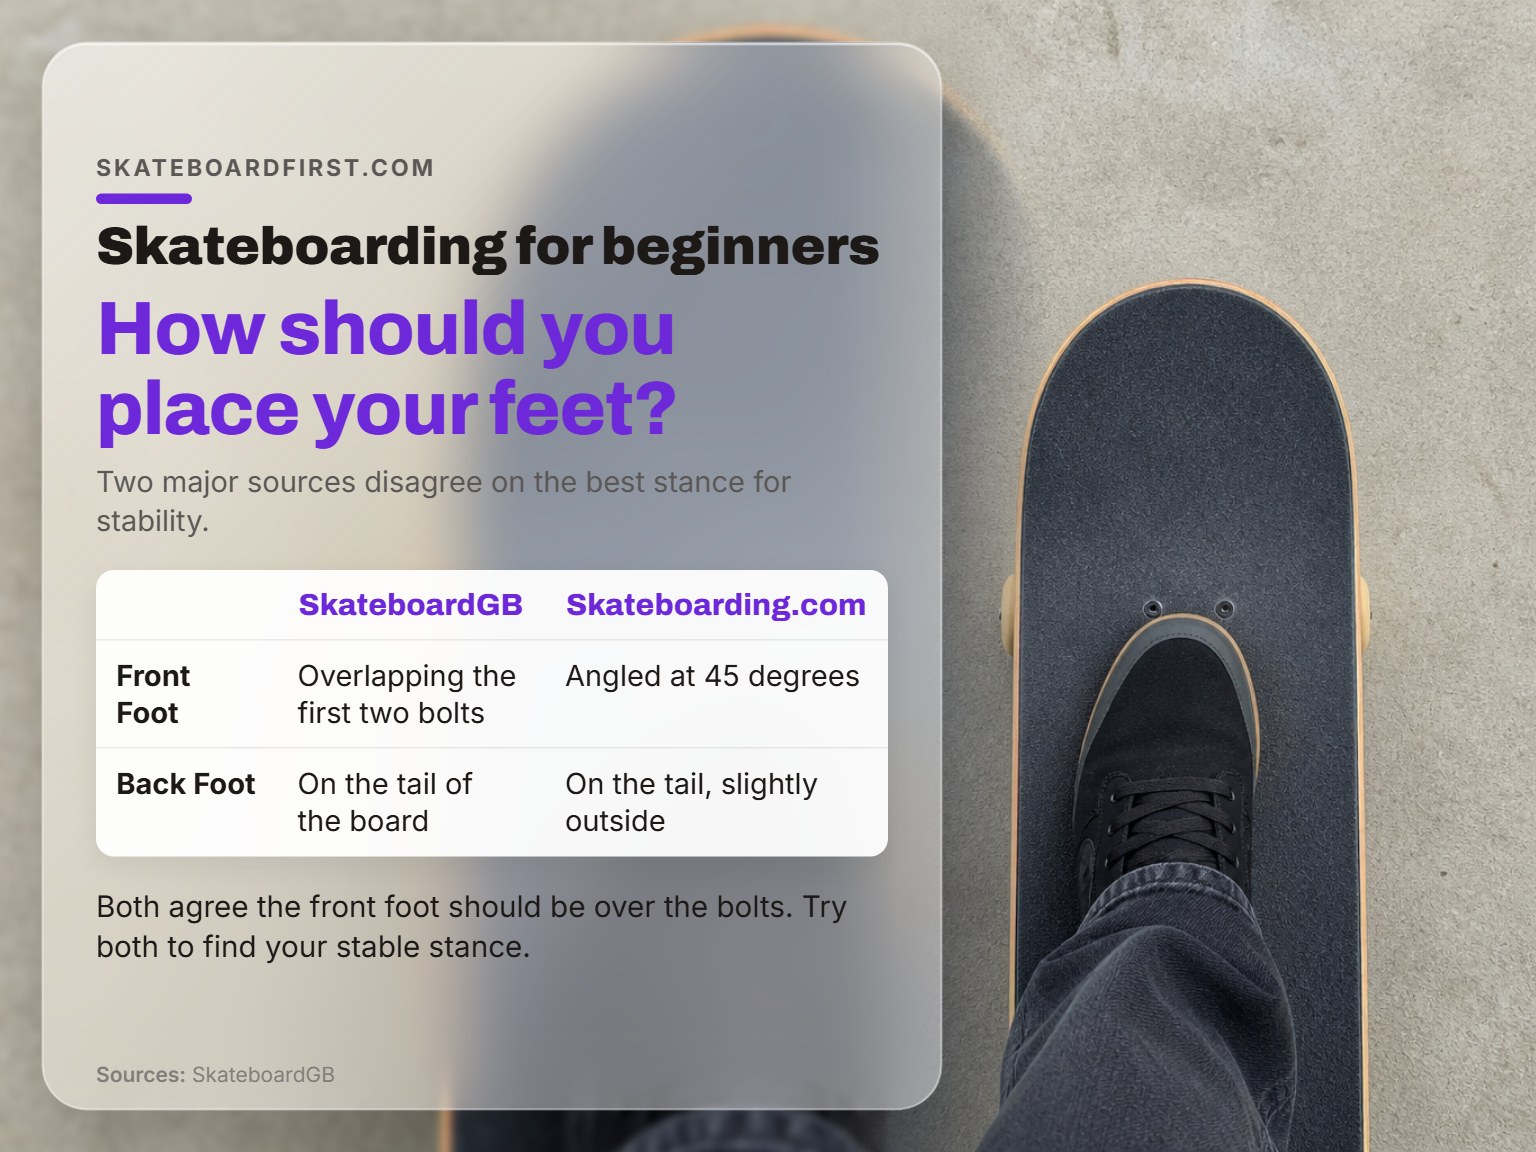
Here’s where the major sources don’t agree. And that’s fine, it means there’s more than one right way. Your job is to try each and see what gives you stability.
- SkateboardGB: “Place one foot on the deck just overlapping the first two bolts.” This is a straight-across, stable platform.
- Nike.com / USSEA Educator: “Place front foot on the board, covering two of the bolts and leaving the other two visible.” Similar to above, emphasizing a “sweet spot.”
- Skateboarding.com: “Front foot should be placed on the skateboard, angled at 45 degrees, with toes pointing towards the nose.”
The common thread is the front foot covers two bolts. A 45-degree angle is for when you’re moving and preparing to push; it allows you to pivot your front foot more easily. When you’re first standing still, a straight-across foot is more stable.
Sources disagree on back foot positioning: SkateboardGB says to put it on the tail, while Skateboarding.com says it should rest on the tail, slightly outside of the board, near the edge. This gives you a stronger position for pushing.
Try this sequence:
- Stand on the board on grass, front foot straight across covering two front bolts.
- Place your back foot on the tail, ball of your foot near the edge.
- Bend your knees. This lowers your center of gravity.
- Practice lifting your back foot an inch off the tail and placing it back down. This is the pre-push motion.
The physical cue you’re listening for is silence. A balanced, stable stance is quiet. If the board creaks or shifts under you, your weight isn’t centered over the bolts. Adjust until it’s silent.
How to Push, Turn, and Stop
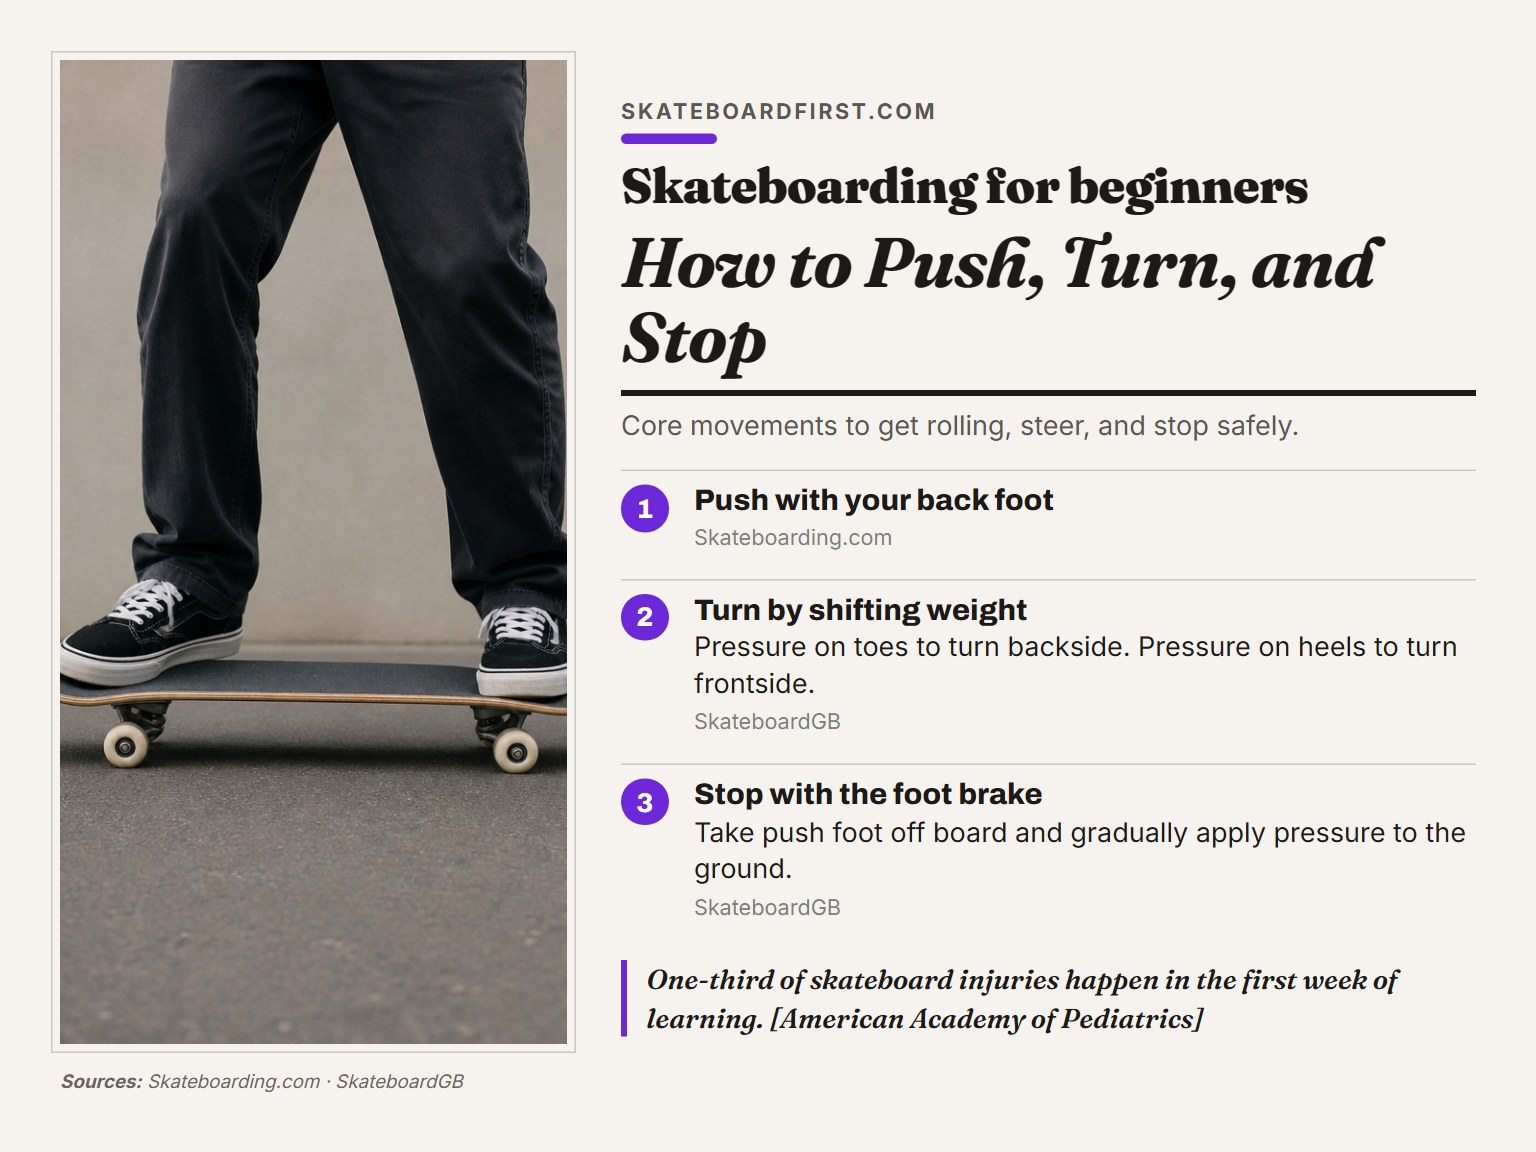
With your stance set and your balance point found, you’re ready to move. Here are the three core movements.
Pushing
This is how you generate speed. The golden rule: push with your back foot.
- Start with both feet on the board in your stance.
- Pivot your front foot to about 45 degrees, pointing forward.
- Lean your weight onto your front foot. The board is now a stable platform.
- Lift your back foot off and place it on the ground beside the board.
- Push against the ground, like you’re taking a step. Return your back foot to the tail.
- Repeat to gain speed, then pivot your front foot back to straight across for riding.
Turning
You don’t turn by twisting your hips. You turn by shifting your weight.
- To turn backside (toeside): Apply gentle pressure on your toes while keeping your body upright. The board will lean and carve.
- To turn frontside (heelside): Apply gentle pressure on your heels.
Start with wide, gradual carves. Sharp turns come later. The key is to keep your knees bent and your head over the middle of the board. Looking where you want to go, not at your feet, makes turning almost automatic.
Stopping
The safest, most reliable stop for beginners is the foot brake.
- Keep your weight on your front foot.
- Carefully lower your back foot so the sole drags lightly on the ground.
- Gradually increase pressure. Don’t stomp, a sudden stop can throw you forward.
- Come to a complete stop, then place your back foot back on the board.
Common mistake: Taking the front foot off to stop. This leaves all your weight on the back foot, which can kick the board out from under you. The front foot is your anchor.
Choosing Your First Board
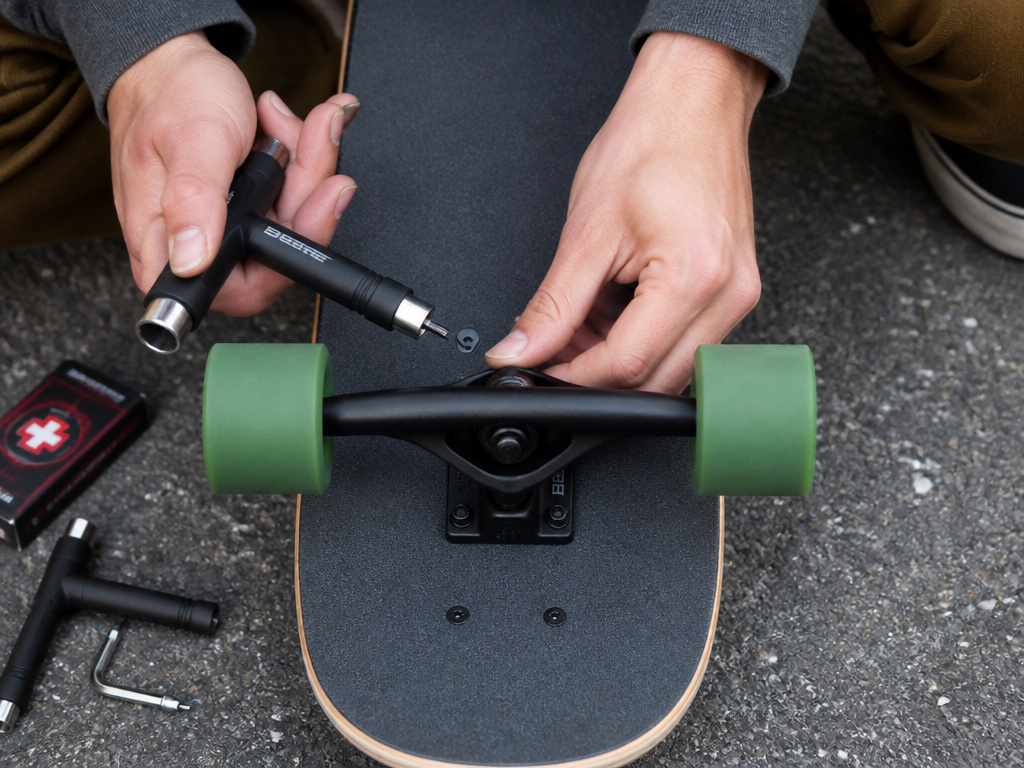
Your first skateboard is a tool for learning, not for looks. The Nike guide is blunt: a beginner’s best bet is a cruiser or a longboard, between 32 and 36 inches in length. Why? Longer decks are more stable. They have a wider wheelbase, which reduces speed wobble, that terrifying shimmy the CPSC warns about.
The wheels matter just as much. Look for large, soft wheels (60–70mm in diameter). Hard, small wheels stop dead on pebbles and cracks. Large, soft wheels roll over minor pavement imperfections, giving you a smoother, more predictable ride. This isn’t about performance; it’s about reducing surprise.
For trucks, choose a reliable brand suitable for beginners. Don’t over-tighten them right away. A little bit of looseness makes turning easier while you’re learning. You can always tighten them later for more stability at speed. A complete setup from a reputable brand is a smarter buy than piecing together a budget build with no-name parts that will wear out in a month.
Frequently Asked Questions
How long does it take to learn to ride a skateboard?
There’s no single answer, but the learning curve is steepest at the start. Most people can learn to push, roll, and foot-brake comfortably with consistent practice. The American Academy of Pediatrics notes the high injury risk in the first week, so don’t gauge progress by speed or tricks. Gauge it by control.
Is skateboarding hard to learn for adults?
The physical skills of how to ride a skateboard for beginners, balancing, pushing, coordinating weight shifts, are the same at any age. An adult may have more initial fear to overcome, but also more patience for drills. The USSEA-certified educator on Nike.com states plainly: “Age is no barrier.” The key is following a structured progression and wearing protective gear to build confidence.
What is the most important skill for a beginner?
Balance, full stop. Before you push, before you even buy a board, understand that everything, turning, stopping, not falling, stems from your ability to center your weight over the board. Spend your first sessions just standing on the board, bending your knees, and feeling that balance point.
Can I learn without going to a skatepark?
Absolutely. In fact, you should. Skateparks are for people who already know how to ride. A quiet parking lot, empty tennis court, or smooth pathway is your ideal classroom. The CDC skateboarding physical activity page explicitly advises beginners to skate on a smooth, flat surface away from traffic.
Before You Go
The single biggest differentiator between someone who sticks with skateboarding and someone who quits after a bad fall is the first week. The statistics are clear: that’s when you’re most vulnerable. So your only goal for the first seven days is to leave every session uninjured.
That means short, focused practices. Ten minutes of balancing on grass. Ten minutes of pushing and stopping on rubber. Then put the board away. Your brain and muscles need time to integrate the new movements. Rushing to concrete on day one is how you become part of that one-third injury statistic.
For your next session, pick one thing from this beginner’s guide to work on. Just one. Maybe it’s finding your stance without looking down. Maybe it’s doing ten perfect foot-brake stops in a row on a rubber surface. Small, repeatable wins build the muscle memory that makes skateboarding feel like flying, not fighting.
